Today I want to share with everyone (and record for myself for the future) how I achieved the two-color binding on this quilt:

If you look closely at the picture, you can see that the binding is both red and blue and matches up perfectly with the piecing. Here's what worked for me.
I started by making the strips of binding. I measured the red length and the blue length and figured out how much I needed of each. I made the blue binding a single length, but divided the red binding into two separate lengths:

I started with one of the red lengths. I sewed it to the quilt the same way I always do, but stopped several inches before the first color transition:

To find the transition point, I laid the red binding along the edge where it would eventually be sewn, folded it over where it would be folded when finished and made a mark with a removable pen right on the color transition point:

I then opened out the binding strip and folded it at a 45 degree angle so that the fold was right on the mark and went in the direction of the piecing This fold will end up being the stitching line:

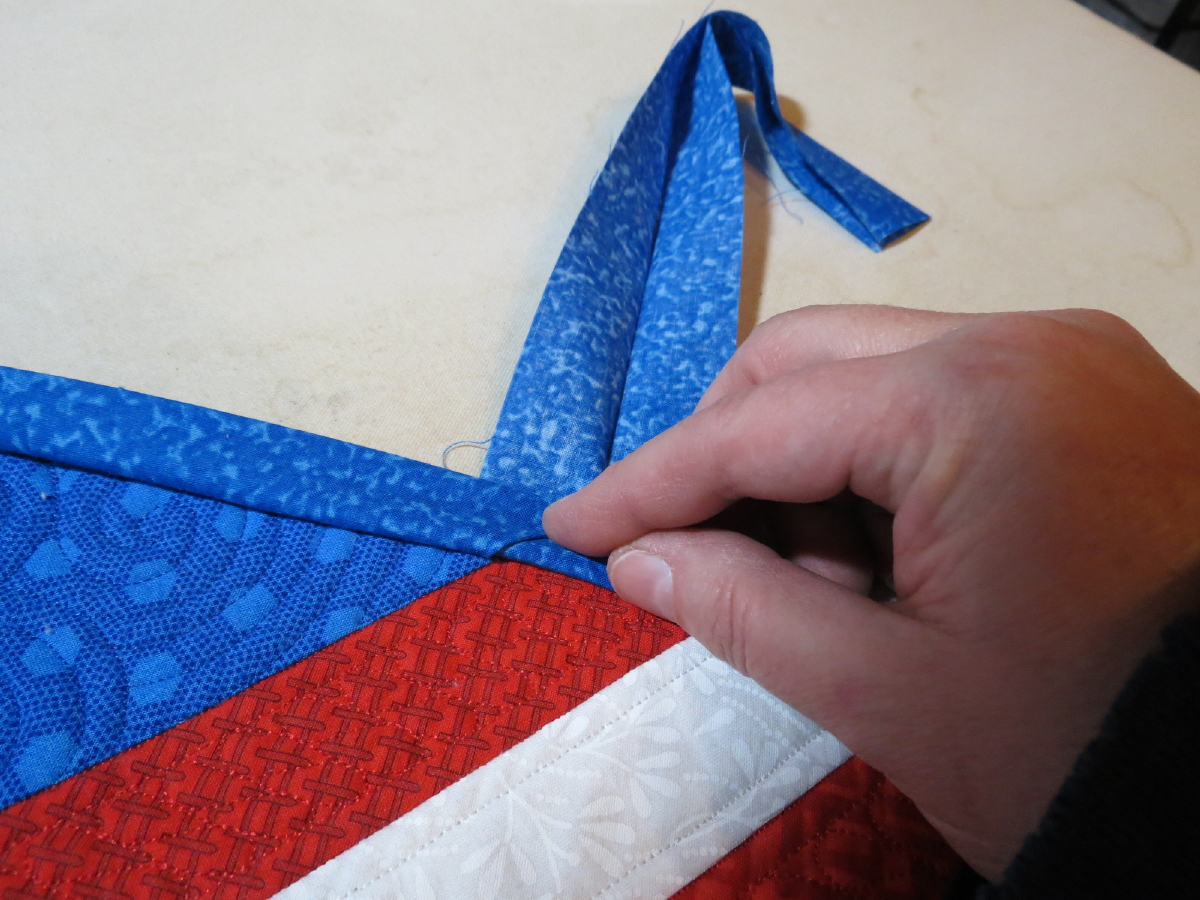
To make sure I had everything going the right way and in the right location, I folded everything back up and laid it against the quilt:

It's hard to tell in the picture, but the raw edge of the binding piece is lined up with the raw edge of the quilt. The binding strip is then folded as if it was sewn to the quilt and the position of the fold is checked. It looked good to me so I continued on.
Next I opened up the red binding strip and drew a sewing line along the fold. This drawn line isn't really needed, but I've had trouble seeing fold lines before once I get the fabric under the needle so better to just go ahead and draw it:

I then took the blue binding strip and lined it up with the red strip and pinned it in place:

To line this up correctly, the ends of the drawn sewn line should be right on the edges of the blue binding strip. The short ends of the two binding string should be on the same side of the drawn line and the long ends of the two binding strips should both be on the other side of the drawn line. If you don't get this part right, you'll be very unhappy! I then sewed right on the folded/drawn line:

To avoid any unhappiness, check your work before doing any cutting:

Again, the raw edge of the binding is lined up with the raw edge of the quilt, and the binding is folded over to see if everything lines up and at the right angle. It looks good to me, so I opened it back out, cut off the short ends of the binding strips, finger pressed the seam allowances open and refolded the strip so it was ready to sew in place. Before sewing, I lined it up again to make sure everything looked good (you really can't check something like this too many times):

It looked good so I pinned it in place so it wouldn't shift and continued sewing the binding as usual.
When I got to the second color transition point, I repeated the above process. I stopped stitching 8 or so inches before the transition point:

I laid the binding strip along the edge of the quilt, folded it back where it would be stitched and made a mark at the color transition point. I folded the binding strip at a 45 degree angle right at that point, playing with the fold until I got it going the right direction. For this quilt, the second transition was at the opposite angle of the first. I folded everything up and laid it on the quilt just as it would be sewn to make sure that I had everything right:
When it looked good, I unfolded the binding string and drew a line along the fold so that I could see it well when sewing. I lined up the second red binding strip as described above and sewed the strips directly on the line:

Remember to check everything before doing any cutting:

I trimmed the short ends of the binding strips, finger pressed the seam allowances open and folded everything back up to be ready for sewing. To make sure that I got the binding color transition in the right place, I started by putting a pin through the binding 1/4" from the raw edge going through the seam between the blue and red binding strips. Then I pushed that pin through the color transition on the quilt 1/4" from the edge of the quilt:

I held everything in place right next to the pin, pulled the pin out and put it back in so that it could hold the layers together in the right place:

I put a couple more pins between this pin and where I had stopped stitching on the binding to keep things from shifting and sewed the binding to the quilt as usual. At this point I was done with all of my color transition points so I could finish my binding as usual.
Here's how my transition points looked when finished:


I think it worked pretty well!
If you have any questions, please leave them in the comments below. I'll do my best to answer them.
Nancy
Awesome technique. I was just giving you a hard time on the TQS site.
ReplyDeleteSharon
Thanks!! I'll leave it to you to do the striped binding!
DeleteThanks for the tips.... something I will have to try
ReplyDeleteThanks! Let me know if you run into any problems or come up with any tips for making it easier.
DeleteWhat a terrific tutorial on how you achieved the "magic" color matched binding! Thanks for sharing! I might have to make a project that has a different color just to try your technique!
ReplyDeleteThanks! I'd love to hear how it works for you.
DeleteThis comment has been removed by the author.
ReplyDeleteThis technique is really amazing!!!
ReplyDeleteP.S. I'm in Colorado, too!
Thanks! What area do you live in? I'm outside of Boulder.
Delete