Hi all -
I hope everyone is enjoying their spring! Here in the mountains of Colorado, we've had some really nice weather alternating with more snow. We're expecting another 5-7 inches on Monday night. I like the snow because it gives us more insurance against the summer fires, but I sure am ready to be done with it!
I haven't done much sewing in the last couple of weeks, but I did sew another project bag. I had picked up some yarn for a cardigan and I didn't have a project bag that was big enough, so I decided to make a new one. And I had some bee fabric that I love and I've been wanting to make something out of for a long time, so this was the perfect opportunity! The big Finch Bucket bag, that I've made a couple of times, was just a little bit too small for all of this yarn, so I increased the size a couple of inches in each direction. The resulting bag was just perfect for this project!
While I was making this, it dawned on me that I should probably share a trick I figured out a while ago. One of the things that always bothered me when making bags was that I couldn't get a good. straight press on the bottom of the piece of fabric used to make the slot pockets on the inside of the bag. For this bag, the slot pockets extend completely across the lining, with their sides enclosed in the side seams of the binding. For these pockets, you sew a tube of fabric that you turn right-side-out and then press flat:
The difficult part is getting the side with the seam, which ends up being the bottom of the pocket, to be nice and straight. What I've found to be the best tool to get a nice, straight edge on the bottom of the pocket is a thin, metal ruler:
I slide the ruler into the pocket and push it to the seam end, making sure that the ruler is on the same side of the seam allowance all the way along the seam. I push it as tightly as possible into the seam:
and then iron right over the ruler:
If the pocket is longer than the ruler (like it was in this case), I flip everything over and do the same thing on the other side. I flip it over just because it's easier for me with the iron in my right hand. This gives me a perfectly straight bottom to the pocket:
And here's what the pocket looks like when it's sewn to the lining piece:
Perfect!
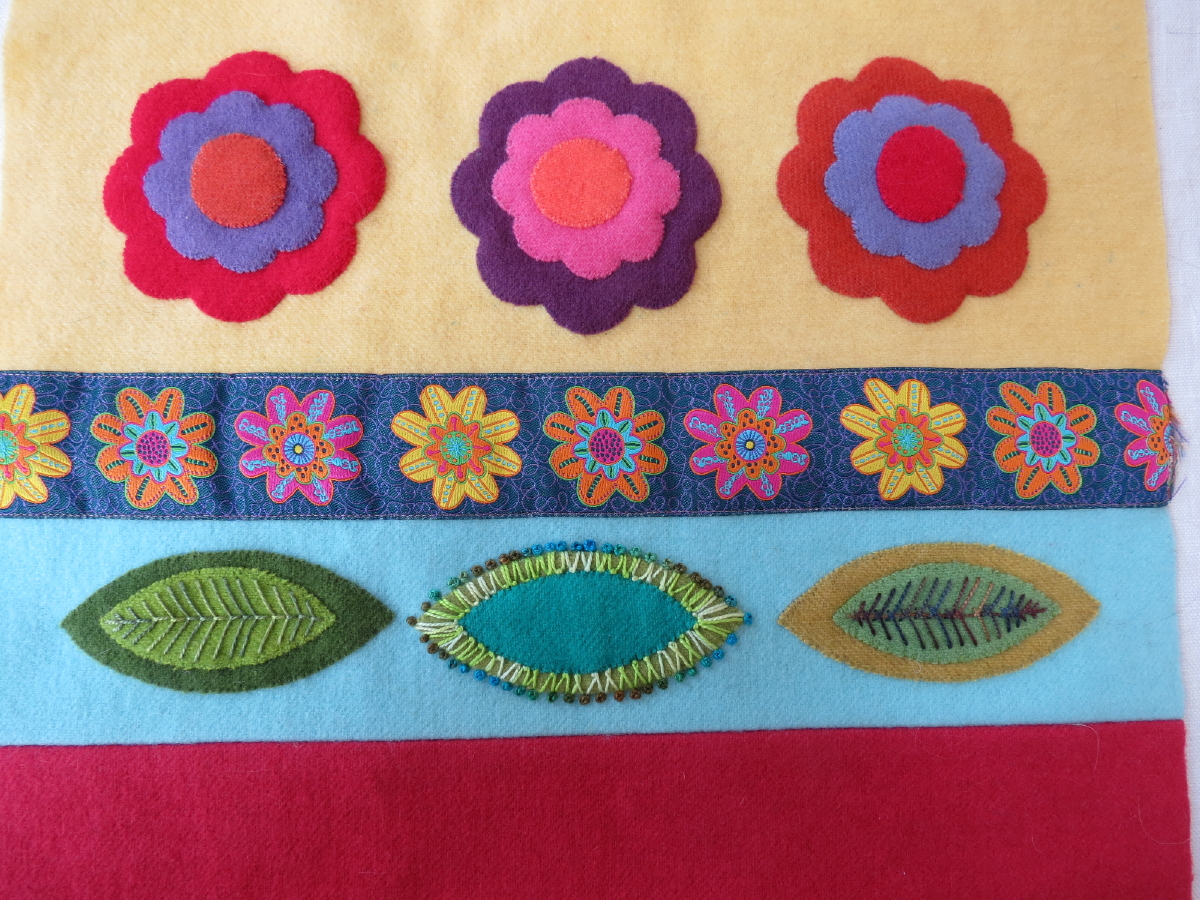
I also did some more embroidery on my wool applique bag. This time I did most of the embroidery on one of the flowers:
This is a long-term project so I'll just keep plugging away at it a little at a time.
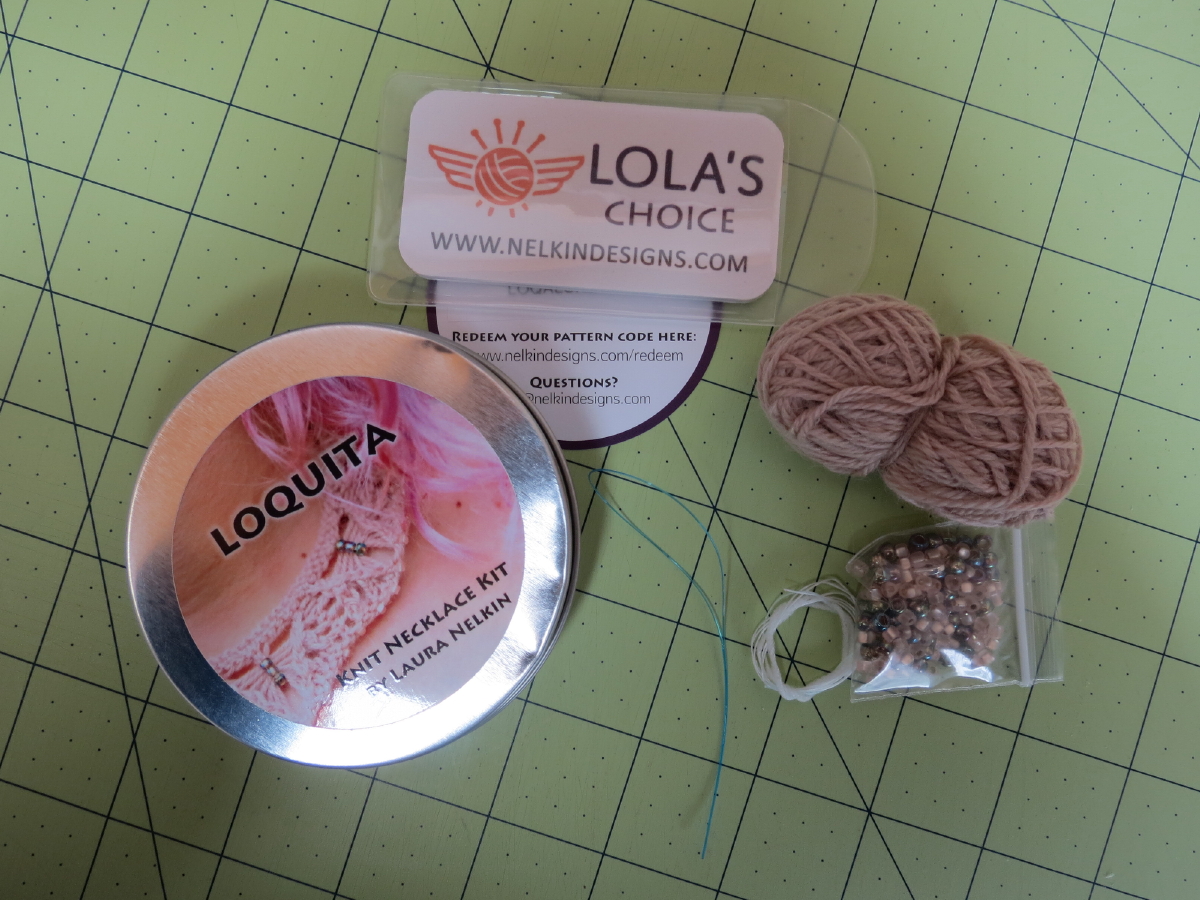
The rest of my projects this time were knitting. We got our May Lola's Choice kit, Loquita, last week:
This was a smaller project -- a beaded necklace -- so I was able to finish it fairly quickly. Here it was blocking last night:
And then finished, with the clasp attached:
I really love knitting with beads and this was a really fun, quick project!
I also finished the snood that I was making for my sister for Christmas. Last time, I'd been worried about the yarn, thinking that I was supposed to hold it double and I hadn't done that. Well, I took some time and looked at the pattern some more. It turned out that the pattern had two different yarn suggestions in different weights. The lighter weight would be held double, but the worsted weight, which is what I was using, wasn't. So it turned out that I was doing the right thing and, since I was loving the feel of the snood, I decided to finish it with that yarn. It turned out so gooshy soft!
I think she's going to love it!
Finally, I also got my May installment of the Jimmy Beans knit club project, the Lakeside Summer Shawl by Jenny V. Nelson:
They send little prizes with each installment, and this month I got that cute little hedgehog zipper bag. That will be nice for holding the little knitting accessories -- stitch markers, tape measure, tapestry needles (for weaving in ends) -- in my project bags. There was a lot of knitting for this month's installment, but I was able to finish it up:
The knit club has 3-month projects, so the June installment will finish this one up. I really like how delicate the elongated stitches look in this project!
Well, that's it for this post. I hope everyone is doing well!
Nancy
This is where I describe my quilting, knitting and crafting journey -- both the successes and the failures. There are so many interesting things to do and try! I hope you enjoy sharing my journey with me!
Sunday, May 19, 2019
Sunday, May 5, 2019
Finished Piecing Inclusivity
Hi all -
Sorry for the delay in this post, but I had to go out of town unexpectedly and so lost a couple of weeks of creative time. But I'm back and I believe I made up for lost time!
First, I'll just get the little things out of the way. On the embroidery front, I did more work on my Sue Spargo Birds on Parade bag. Previously, I had had the outside of the bag finished according to the pattern, but I didn't like how blank the back of the bag was going to be. Wool felt is expensive and I really didn't want to waste that space! So I ordered some more wool felt to use for appliques and, right before going out of town, I pulled out my Accuquilt cutter and some flower and leaf dies and I cut out some appliques for the back. I didn't put a lot of thought into the color of each piece since there was so much going on that day, but I was happy to have pulled something together that I could work on if I had some time when I was out of town. I got some of the appliques sewn on while I was out of town, then was able to applique the rest when I got back:
I think these will go well with the other side of the bag:
And I'll be able to nudge the colors a bit with the threads used for the embroidery. I was also able to start on the embroidery:
I'm really enjoying this and will definitely make more progress before my next post!
I've also done some knitting. I received my April installment of the Jimmy Beans Wool Shawl Club project:
There were "only" 10 rows to be knit in this installment, so I decided to knock those out immediately:
Of course, we're now up to over 350 stitches in each row so it did take several hours to complete.....
Since it's been a while since my last post, I also received my first installment of the Jimmy Beans Wool Knit Club project for April through June. This quarter's project is the Lakeside Summer Shawl by Jenny V. Nelson (this pattern isn't available on Ravelry yet so I can't supply a link):
I'm trying to keep up with these clubs so I decided to work on that immediately, too:
I think this is going to be a really pretty, lightweight shawl. I love how the elongated stitches look!
Even though I finished the knitting on my Ironish scarf by Laura Nelkin, I finally got the scarf blocked and trimmed the ends and got some finished pictures:
(I always have to slip in a picture of Lance where I can!)
The last knitting project I started is the Sutton Mock Cable Hoodie by Iris Schreier. This will be a Christmas gift for my sister. She requested this last year and I went through the patterns on Ravelry with her and had her pick one out. Then I ordered some yarn after I got back home. Here's the start of the snood:
I really love the look and feel of this yarn, but after I got to this point, I looked at the pattern and realized that I was supposed to be holding the yarn double for this project. This is a single ply yarn and the pattern has a bunch of k3tog stitches. These stitches were a bit tricky with a single strand of this yarn; I don't think I want to try it with a double strand so I will probably pull this out and pick a different, plied yarn for this project. I could try to finish up with this yarn and maybe it would be the right size, but I don't want to risk wasting that time. I was going to knit a gauge swatch, but it said to knit the swatch "in pattern" and I didn't know how to do that with a pattern that started with just 6 stitches and increased a couple of stitches every 2 rows. So this project is on hold for now.
Finally, I finished the piecing on my Inclusivity quilt that I'm making for my niece for her college graduation in December. In case you don't remember, this quilt is based on the Hexactly pattern by Hunter's Design Studio:
Last time, I had cut out all of the pieces for the hexagon strips and had started doing the piecing. This time I continued with the piecing. To piece this, you add triangles to the edges of the hexagons to make diamonds, and then piece the diamonds together. The part that I was worried about was getting the points on the hexagons to line up nicely. For the first of these seams, I used the method where you baste the seam across where the points meet, then, when that is perfect, you sew the entire seam with your usual stitch length. This worked nicely but took a lot of time and added a little bulk to the seam with the extra stitching that I didn't like. So, I looked at that finished seam and determined that if I matched up the seam allowances from the hexagons, that gave me the perfect position for the points to match:
Can you see how the seam allowances match up in this picture (I always press my seams open unless there's a reason not to)? With the seam allowances matched up, I would pin on both sides of the match point to hold that in place. Then, I pinned both ends of the seam to make sure that the ends overlapped 1/4". Finally, I found that adding additional pins in the middle helped things ease together better:
Using this pinning and matching, I was able to sew together the hexagons pretty quickly while still getting pretty good points:
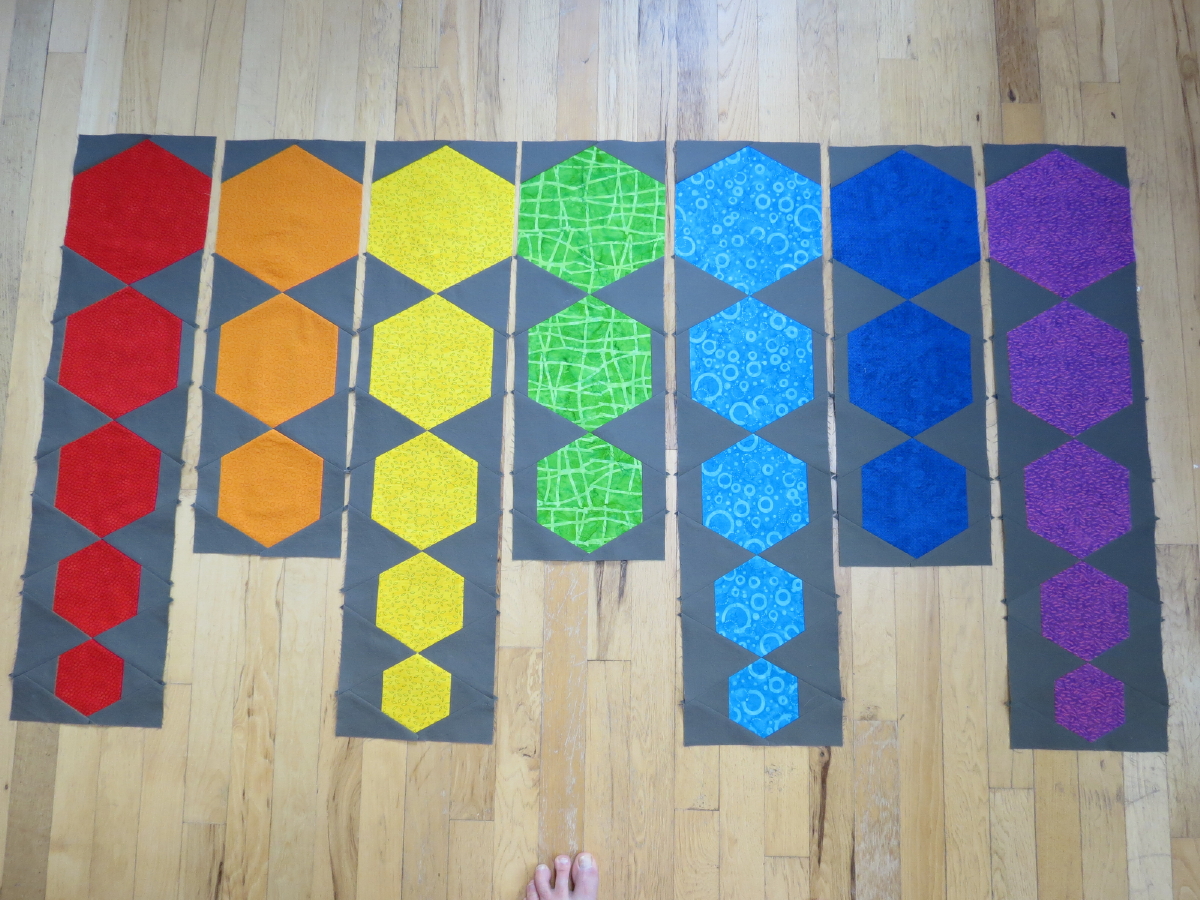
They're not perfect, but they're definitely good enough for me! Here you can see how the hexagons go together:
One thing I would do differently if I made this quilt again would be to use larger setting triangles. The patter has you use the exact size of triangles that you need, but if you don't get them in there perfectly then the strip can be a little narrow in some places. I would rather cut them oversized and then trim the hexagon strips to the right size when finished.
When I finished the hexagon strips, I had to think about how I was going to put them together. The pattern uses 7 hexagon strips for a twin-sized quilt and has a queen-sized version that uses 11 of the strips. But I wanted to make a queen-sized quilt with just 7 hexagon strips so I could represent the rainbow. I could do something with the strips lining up going in the same direction:
Or, like the pattern, I could have the long strips going down and the short strips going up:
I liked this second version better, so now I had to add background to each strip to make them the same length and decide how far apart I would put the strips. I measured my queen-sized mattress and found it is 60" across. The hexagon strips are 7.5" wide finished, so adding 1.25" finished backing strips would make the hexagon strips fit exactly on the top of the mattress. So I went with that.
Because the piecing of the triangle on the hexagon strips wasn't perfect, the strips were a little narrow in some places. to try to clean some of that up, I marked a line on the hexagon strip where I should line up the background strip to make up for those gaps:
(Of course, I started by marking the wrong side of the red hexagon strip, but, luckily, I realized that before I did any stitching and then marked the correct side.) I lined the background strip up with this line and pinned in place:
Then I sewed the seam, using the shorter seam allowance on the hexagon strip:
This worked really well for these strips, but I had to just fudge the rest of the seams since I couldn't come up with a way to mark the seams after this point. But I think it turned out pretty well! Here's the inside portion finished:
Then I just had to decide how wide I would want the top and bottom borders and and add them to the quilt. I don't have a good way to photograph the whole queen-sized top, so here are a couple of pictures to give you an idea of how it turned out:
I really love how it turned out! Now I have to think about how I want to piece the backing. I'll probably play around with different rainbows and will probably have to order some more of the background fabric to use on the back. I've got plenty of time to work on that!
One last thing I've just started thinking about is wedding quilts. I have a niece and a nephew who are both in serious relationships and, although there aren't any formal engagements yet, we have a feeling that it won't be long for either. One couple has already bought the engagement ring although the engagement isn't formal yet. So, I'm starting to think about wedding quilts so I don't get too stressed out when the announcements are made. I've decided on a pattern for the first quilt: I want to make the Wedding Bands quilt from Judy Martin's Stellar Quilts book. (If you scroll down a little bit, you'll see a picture of the twin-sized version of her Wedding Bands quilt.) I've wanted to make this quilt for myself for a long time, so this is the perfect opportunity to try the pattern. I've decided to use teals for the background and ordered the fabric already:
I'm not really pleased with the lightest fabric so will continue to look for a replacement for that one, but I love the rest of them. I also need to decide on the colors to use for the contrasting fabrics in the stars. Maybe golds? Or browns? I'll keep thinking about that....
I hope everyone is having a wonderful spring! We've been enjoying some nice spring weather up here in the mountains but, as usual in the spring, we are expecting some more snow next week. I hope this is our last snow since I've scheduled an appointment to swap out my snow tires the following week!
Nancy
Sorry for the delay in this post, but I had to go out of town unexpectedly and so lost a couple of weeks of creative time. But I'm back and I believe I made up for lost time!
First, I'll just get the little things out of the way. On the embroidery front, I did more work on my Sue Spargo Birds on Parade bag. Previously, I had had the outside of the bag finished according to the pattern, but I didn't like how blank the back of the bag was going to be. Wool felt is expensive and I really didn't want to waste that space! So I ordered some more wool felt to use for appliques and, right before going out of town, I pulled out my Accuquilt cutter and some flower and leaf dies and I cut out some appliques for the back. I didn't put a lot of thought into the color of each piece since there was so much going on that day, but I was happy to have pulled something together that I could work on if I had some time when I was out of town. I got some of the appliques sewn on while I was out of town, then was able to applique the rest when I got back:
I think these will go well with the other side of the bag:
And I'll be able to nudge the colors a bit with the threads used for the embroidery. I was also able to start on the embroidery:
I'm really enjoying this and will definitely make more progress before my next post!
I've also done some knitting. I received my April installment of the Jimmy Beans Wool Shawl Club project:
There were "only" 10 rows to be knit in this installment, so I decided to knock those out immediately:
Of course, we're now up to over 350 stitches in each row so it did take several hours to complete.....
Since it's been a while since my last post, I also received my first installment of the Jimmy Beans Wool Knit Club project for April through June. This quarter's project is the Lakeside Summer Shawl by Jenny V. Nelson (this pattern isn't available on Ravelry yet so I can't supply a link):
I'm trying to keep up with these clubs so I decided to work on that immediately, too:
I think this is going to be a really pretty, lightweight shawl. I love how the elongated stitches look!
Even though I finished the knitting on my Ironish scarf by Laura Nelkin, I finally got the scarf blocked and trimmed the ends and got some finished pictures:
(I always have to slip in a picture of Lance where I can!)
The last knitting project I started is the Sutton Mock Cable Hoodie by Iris Schreier. This will be a Christmas gift for my sister. She requested this last year and I went through the patterns on Ravelry with her and had her pick one out. Then I ordered some yarn after I got back home. Here's the start of the snood:
I really love the look and feel of this yarn, but after I got to this point, I looked at the pattern and realized that I was supposed to be holding the yarn double for this project. This is a single ply yarn and the pattern has a bunch of k3tog stitches. These stitches were a bit tricky with a single strand of this yarn; I don't think I want to try it with a double strand so I will probably pull this out and pick a different, plied yarn for this project. I could try to finish up with this yarn and maybe it would be the right size, but I don't want to risk wasting that time. I was going to knit a gauge swatch, but it said to knit the swatch "in pattern" and I didn't know how to do that with a pattern that started with just 6 stitches and increased a couple of stitches every 2 rows. So this project is on hold for now.
Finally, I finished the piecing on my Inclusivity quilt that I'm making for my niece for her college graduation in December. In case you don't remember, this quilt is based on the Hexactly pattern by Hunter's Design Studio:
Last time, I had cut out all of the pieces for the hexagon strips and had started doing the piecing. This time I continued with the piecing. To piece this, you add triangles to the edges of the hexagons to make diamonds, and then piece the diamonds together. The part that I was worried about was getting the points on the hexagons to line up nicely. For the first of these seams, I used the method where you baste the seam across where the points meet, then, when that is perfect, you sew the entire seam with your usual stitch length. This worked nicely but took a lot of time and added a little bulk to the seam with the extra stitching that I didn't like. So, I looked at that finished seam and determined that if I matched up the seam allowances from the hexagons, that gave me the perfect position for the points to match:
Can you see how the seam allowances match up in this picture (I always press my seams open unless there's a reason not to)? With the seam allowances matched up, I would pin on both sides of the match point to hold that in place. Then, I pinned both ends of the seam to make sure that the ends overlapped 1/4". Finally, I found that adding additional pins in the middle helped things ease together better:
Using this pinning and matching, I was able to sew together the hexagons pretty quickly while still getting pretty good points:
They're not perfect, but they're definitely good enough for me! Here you can see how the hexagons go together:
One thing I would do differently if I made this quilt again would be to use larger setting triangles. The patter has you use the exact size of triangles that you need, but if you don't get them in there perfectly then the strip can be a little narrow in some places. I would rather cut them oversized and then trim the hexagon strips to the right size when finished.
When I finished the hexagon strips, I had to think about how I was going to put them together. The pattern uses 7 hexagon strips for a twin-sized quilt and has a queen-sized version that uses 11 of the strips. But I wanted to make a queen-sized quilt with just 7 hexagon strips so I could represent the rainbow. I could do something with the strips lining up going in the same direction:
Or, like the pattern, I could have the long strips going down and the short strips going up:
I liked this second version better, so now I had to add background to each strip to make them the same length and decide how far apart I would put the strips. I measured my queen-sized mattress and found it is 60" across. The hexagon strips are 7.5" wide finished, so adding 1.25" finished backing strips would make the hexagon strips fit exactly on the top of the mattress. So I went with that.
Because the piecing of the triangle on the hexagon strips wasn't perfect, the strips were a little narrow in some places. to try to clean some of that up, I marked a line on the hexagon strip where I should line up the background strip to make up for those gaps:
(Of course, I started by marking the wrong side of the red hexagon strip, but, luckily, I realized that before I did any stitching and then marked the correct side.) I lined the background strip up with this line and pinned in place:
Then I sewed the seam, using the shorter seam allowance on the hexagon strip:
This worked really well for these strips, but I had to just fudge the rest of the seams since I couldn't come up with a way to mark the seams after this point. But I think it turned out pretty well! Here's the inside portion finished:
Then I just had to decide how wide I would want the top and bottom borders and and add them to the quilt. I don't have a good way to photograph the whole queen-sized top, so here are a couple of pictures to give you an idea of how it turned out:
I really love how it turned out! Now I have to think about how I want to piece the backing. I'll probably play around with different rainbows and will probably have to order some more of the background fabric to use on the back. I've got plenty of time to work on that!
One last thing I've just started thinking about is wedding quilts. I have a niece and a nephew who are both in serious relationships and, although there aren't any formal engagements yet, we have a feeling that it won't be long for either. One couple has already bought the engagement ring although the engagement isn't formal yet. So, I'm starting to think about wedding quilts so I don't get too stressed out when the announcements are made. I've decided on a pattern for the first quilt: I want to make the Wedding Bands quilt from Judy Martin's Stellar Quilts book. (If you scroll down a little bit, you'll see a picture of the twin-sized version of her Wedding Bands quilt.) I've wanted to make this quilt for myself for a long time, so this is the perfect opportunity to try the pattern. I've decided to use teals for the background and ordered the fabric already:
I'm not really pleased with the lightest fabric so will continue to look for a replacement for that one, but I love the rest of them. I also need to decide on the colors to use for the contrasting fabrics in the stars. Maybe golds? Or browns? I'll keep thinking about that....
I hope everyone is having a wonderful spring! We've been enjoying some nice spring weather up here in the mountains but, as usual in the spring, we are expecting some more snow next week. I hope this is our last snow since I've scheduled an appointment to swap out my snow tires the following week!
Nancy
Sunday, April 7, 2019
Started Piecing Inclusivity
Hi all -
I hope everyone is enjoying spring! I've been enjoying the weather! I did get sick with a stomach flu that wasn't a lot of fun. It cut into my productivity, but I'm all better now and am starting to make progress again.
I started a new quilting project. I have made a queen-sized quilt for each of my nieces and nephews for their college graduations. I'm down to my last niece and she is scheduled to graduate in December, so it's time to get started on her quilt. I've been thinking about her quilt for several years now. She's the activist in the family and is very supportive of the LGBTQ community (I'm so proud of her!) so I wanted to do something that reflected that. I purchased this pattern in Houston in 2018 because I thought it would be perfect:
The pattern is Hexactly by Hunter's Design Studio. I liked the crisp, modern feel of this pattern and thought it would be perfect with the hexagons done in the LGBTQ rainbow colors. So, I pulled out the pattern and started planning. The picture on the front of the pattern is for the twin-sized version of the quilt. The queen-sized version of the quilt looks the same, but has 11 columns of hexagons. I really want just the rainbow colors, so I'll be changing it up a bit. So, I'll be doing 7 columns like the twin-sized quilt (the LGBTQ rainbow actually has 6 colors, but I'm taking some license here because odd numbers look better and I like having some of the columns go up and other columns going down). I'm going to piece each column and set them on top of the background before making any other final decisions, but my initial feeling is that, unlike the picture, I will separate the columns with some background to make the motif wider so it isn't lost in the middle of the bigger quilt. Then I will probably line up the largest hexagons evenly across the quilt, instead of staggering them up and down like the picture, with the other hexagons going up and down as in the picture. Then, with the quilting I'll add ghost hexagons in the column colors so that all of the columns end up having the same number and sizes of hexagons and they just alternate which are pieced and which are quilted. The rest of the quilting will probably some form of vertical straight-line quilting. I'm currently calling this quilt "Inclusivity," although the name could change before I'm finished. I have several months before I have to make that decision!
I did have to order a large quantity of a solid fabric for the background of the quilt so I went to thousandsofbolts.com, my favorite online fabric shop that carries every color of the Moda Bella Solids fabric that I love. I have a color card at home with a bunch of fabric samples of this fabric, so I got that out and looked at the grays. I was initially thinking I would use a light to medium gray for the background. But when I was looking at the fabric samples, my eye kept being drawn back to this charcoal sample. It's a beautiful dark gray with a brown undertone. It still is very modern, but is less mainstream than the lighter grey I was thinking about. The other colors I've chosen are bright, standard rainbow colors.
This picture doesn't capture the brown undertones of the solid, but you get the idea. I also decided that I would use a single fabric for each rainbow color since I don't think that making that part scrappy would add anything to the quilt. That was a hard decision for me since I'm so attracted to scrap quilts!
So, now it was time to start the piecing. There's not a lot of piecing in this quilt, but the hexagon angles make the cutting an sewing take more time. To cut the hexagons, I made a copy of the hexagon shapes in the pattern, cut them out and taped them to the back of my rotary ruler. Then, I lined that shape up to the edges of the fabric and cut each edge.
I didn't stack my fabrics when cutting the hexagons because I wanted the cutting to be as accurate as possible.
Then I cut out all of the connecting triangles from the background fabric and started piecing. I got all of the side pieces sewn onto the hexagons to make them the same width:
And got the triangles added to the largest hexagons:
I feel like I'm making pretty good progress so far! And I'm loving the colors!!
Before starting my niece's quilt, I went ahead and finished my project bag with the free-motion couched spirals panels I had made. I wanted to get those panels off of my cutting table so I could get started on this project, but I didn't want to stow them somewhere where they might never get finished into anything. I found a brown fabric with circles on it in my stash that I thought went perfectly with the panels:
I really like how this bag turned out. It's a little larger than my other bags so I think it'll be very useful for some of my larger projects. For now, I've put a couple of balls of worsted weight yarn in this bag, hoping to start a pair of socks from a Craftsy class on knitting socks two-at-at-time. This would be my first pair of socks, so making them out of worsted weight yarn will make the process quicker and let me learn the process before moving on to the smaller sock-weight yarns. But we'll see when I get around to that....
But I have been doing some knitting. I made some progress on my Baby Novus sweater. I got the back panel finished:
And then I started on one of the side panels. I was actually working on the side panel when I got sick and ended up being too tired and had too much stomach pain to finish the last couple of rows. I picked this back up when I was feeling better, but I wasn't 100% yet so I found I was having trouble concentrating on the pattern and screwed up a few things, but nothing bad enough to take it out. So I finished that part, then put the project back down again for a later time:
Fortunately, when I put aside the baby sweater, I also got my next installment of my Sunshower Shawl project in the mail. So far, this pattern is just a huge number of knit stitches with some YOs and increases scattered around so it was the perfect project for someone who couldn't concentrate well. I got this month's installment done in a single day:
Then I decided that I should also finish my Moxie Cowl. All of the knitting had been finished on this project for a couple of weeks and I had even soaked it and pinned it to the blocking boards, so all I needed to do was stitch the sides together into a circle. So I pulled that off of the blocking boards and stitched it up with a Kitchener stitch. I haven't done much Kitchener stitch so I had done the stitches much too tightly, but it was easy to go back and adjust the yarn to get a perfect tension on the stitches after the fact. I really love how this cowl turned out!!
And I made my favorite model show how it looks in use:
Damn, he's cute!!
Finally, I did some more work on my Ironish scarf:
The stitch pattern in the middle of this scarf is really easy to memorize and is really fun to do! I'm almost done with the center section and I'm going to miss working on it, but really look forward to wearing it!
Well, that's all for this time. Hopefully I'll make some good progress on my niece's quilt before next time. I'm really looking forward to getting the columns of hexagons done so I can start playing around with layouts!
Nancy
I hope everyone is enjoying spring! I've been enjoying the weather! I did get sick with a stomach flu that wasn't a lot of fun. It cut into my productivity, but I'm all better now and am starting to make progress again.
I started a new quilting project. I have made a queen-sized quilt for each of my nieces and nephews for their college graduations. I'm down to my last niece and she is scheduled to graduate in December, so it's time to get started on her quilt. I've been thinking about her quilt for several years now. She's the activist in the family and is very supportive of the LGBTQ community (I'm so proud of her!) so I wanted to do something that reflected that. I purchased this pattern in Houston in 2018 because I thought it would be perfect:
The pattern is Hexactly by Hunter's Design Studio. I liked the crisp, modern feel of this pattern and thought it would be perfect with the hexagons done in the LGBTQ rainbow colors. So, I pulled out the pattern and started planning. The picture on the front of the pattern is for the twin-sized version of the quilt. The queen-sized version of the quilt looks the same, but has 11 columns of hexagons. I really want just the rainbow colors, so I'll be changing it up a bit. So, I'll be doing 7 columns like the twin-sized quilt (the LGBTQ rainbow actually has 6 colors, but I'm taking some license here because odd numbers look better and I like having some of the columns go up and other columns going down). I'm going to piece each column and set them on top of the background before making any other final decisions, but my initial feeling is that, unlike the picture, I will separate the columns with some background to make the motif wider so it isn't lost in the middle of the bigger quilt. Then I will probably line up the largest hexagons evenly across the quilt, instead of staggering them up and down like the picture, with the other hexagons going up and down as in the picture. Then, with the quilting I'll add ghost hexagons in the column colors so that all of the columns end up having the same number and sizes of hexagons and they just alternate which are pieced and which are quilted. The rest of the quilting will probably some form of vertical straight-line quilting. I'm currently calling this quilt "Inclusivity," although the name could change before I'm finished. I have several months before I have to make that decision!
I did have to order a large quantity of a solid fabric for the background of the quilt so I went to thousandsofbolts.com, my favorite online fabric shop that carries every color of the Moda Bella Solids fabric that I love. I have a color card at home with a bunch of fabric samples of this fabric, so I got that out and looked at the grays. I was initially thinking I would use a light to medium gray for the background. But when I was looking at the fabric samples, my eye kept being drawn back to this charcoal sample. It's a beautiful dark gray with a brown undertone. It still is very modern, but is less mainstream than the lighter grey I was thinking about. The other colors I've chosen are bright, standard rainbow colors.
This picture doesn't capture the brown undertones of the solid, but you get the idea. I also decided that I would use a single fabric for each rainbow color since I don't think that making that part scrappy would add anything to the quilt. That was a hard decision for me since I'm so attracted to scrap quilts!
So, now it was time to start the piecing. There's not a lot of piecing in this quilt, but the hexagon angles make the cutting an sewing take more time. To cut the hexagons, I made a copy of the hexagon shapes in the pattern, cut them out and taped them to the back of my rotary ruler. Then, I lined that shape up to the edges of the fabric and cut each edge.
I didn't stack my fabrics when cutting the hexagons because I wanted the cutting to be as accurate as possible.
Then I cut out all of the connecting triangles from the background fabric and started piecing. I got all of the side pieces sewn onto the hexagons to make them the same width:
And got the triangles added to the largest hexagons:
I feel like I'm making pretty good progress so far! And I'm loving the colors!!
Before starting my niece's quilt, I went ahead and finished my project bag with the free-motion couched spirals panels I had made. I wanted to get those panels off of my cutting table so I could get started on this project, but I didn't want to stow them somewhere where they might never get finished into anything. I found a brown fabric with circles on it in my stash that I thought went perfectly with the panels:
I really like how this bag turned out. It's a little larger than my other bags so I think it'll be very useful for some of my larger projects. For now, I've put a couple of balls of worsted weight yarn in this bag, hoping to start a pair of socks from a Craftsy class on knitting socks two-at-at-time. This would be my first pair of socks, so making them out of worsted weight yarn will make the process quicker and let me learn the process before moving on to the smaller sock-weight yarns. But we'll see when I get around to that....
But I have been doing some knitting. I made some progress on my Baby Novus sweater. I got the back panel finished:
And then I started on one of the side panels. I was actually working on the side panel when I got sick and ended up being too tired and had too much stomach pain to finish the last couple of rows. I picked this back up when I was feeling better, but I wasn't 100% yet so I found I was having trouble concentrating on the pattern and screwed up a few things, but nothing bad enough to take it out. So I finished that part, then put the project back down again for a later time:
Fortunately, when I put aside the baby sweater, I also got my next installment of my Sunshower Shawl project in the mail. So far, this pattern is just a huge number of knit stitches with some YOs and increases scattered around so it was the perfect project for someone who couldn't concentrate well. I got this month's installment done in a single day:
Then I decided that I should also finish my Moxie Cowl. All of the knitting had been finished on this project for a couple of weeks and I had even soaked it and pinned it to the blocking boards, so all I needed to do was stitch the sides together into a circle. So I pulled that off of the blocking boards and stitched it up with a Kitchener stitch. I haven't done much Kitchener stitch so I had done the stitches much too tightly, but it was easy to go back and adjust the yarn to get a perfect tension on the stitches after the fact. I really love how this cowl turned out!!
And I made my favorite model show how it looks in use:
Damn, he's cute!!
Finally, I did some more work on my Ironish scarf:
The stitch pattern in the middle of this scarf is really easy to memorize and is really fun to do! I'm almost done with the center section and I'm going to miss working on it, but really look forward to wearing it!
Well, that's all for this time. Hopefully I'll make some good progress on my niece's quilt before next time. I'm really looking forward to getting the columns of hexagons done so I can start playing around with layouts!
Nancy
Subscribe to:
Posts (Atom)