Friday, September 18, 2020

Started Iva Sweater

Hi all -

I hope everyone is doing well! I'm happy to report that Lance is all better! He got his stitches out Wednesday last week and has been completely free since then. No more torture devices! No more house arrest! Complete freedom! We're back to doing our daily walks, building his back legs back up again. Arthritis and old age (he's 13.5 years old) have made his back legs grow a bit feeble so we're working on keeping them going as strong as possible. We're going to start doing some acupuncture to see if that will help, too. It's amazing how he keeps going strong!

We had an interesting walk today. Wesley (one of my cats) decided to join us. We've never done a walk with one of the cats before, but Wesley caught up with us after we started and he's pretty stubborn so either I had to let him join us or we weren't going to be able to do our walk. So I decided to push on and see what he did. For our normal walk, we go up my road (which is fairly busy by rural terms, but not busy at all by town terms) then take a side road to the National Forest. We wander around on the limited trails that we have, then come back home. It's probably a total of just 2 or 3 miles, but it takes a while with Lance's slower pace and his sniffing detours.Well, it takes a LOT longer with a cat along! Have you ever heard the saying about "herding cats"? Well, if you've ever had a cat, you completely understand what that means! But it sure was cute to have him following along! I was just really worried that we'd come across someone else walking their dog who might not be as friendly with cats. But we ended up having the trail all to ourselves so it worked out well. But I'm hoping that Wesley didn't find it to be a fun outing so he won't come along again. I'm just too worried about something happening to him! Sorry that I didn't have a camera with me so no pictures to share.....

Now, on to my crafting. I've started working on another sweater. This one is called Iva and is designed by Rita Maassen. I bought it as a kit from Craftsy several years ago for a really good sale price (I think you know by now that I'm a sucker for sales....). Here's my progress so far:


For this pattern, you start knitting at the left side of the yoke, knitting the yoke from the left side to the right, leaving an opening for your head. You then leave a certain number of stitches on the needle and start knitting the right sleeve in the round. Here's what the arm looks like:


The pattern has you bind off the yoke stitches below the arm and then seam the sides together, but I've decided to keep these stitches live and connect them with a Kitchener Stitch instead. I think that'll be a smoother way to put it all together. After the right sleeve is finished, I'll put the left sleeve stitches on the needle (they are live since they were cast on with a provisional cast-on) and do the same on that side. Then I'll pick up stitches around the bottom of the yoke and knit the body in the round. The pattern has the body taper a little bit as you go down, but I might knit it straight down. I'll decide that after I finish the sleeves and see how it's fitting and how much yarn I have left. The last step in the pattern is to finish the neckline with a single crochet stitch. I'm liking the feel of this yarn so far and think I'll really enjoy wearing this sweater!

I also have some knitting that I've finished. Some of this was finished before my last blog post, but I went into a lot of detail in that post about my niece's wallhanging so decided to save all of the other projects for this post. The first finish was my Hiberknitting Hat by Stephen West. I've been wanting to knit a Stephen West design for a while, and the Grocery Girls (the knitting podcast that I watch) had a Stephen West knit-along, so I decided to join in. Stephen West is known for his innovative designs and interesting use of color and he has a lot of incredible shawl patterns that I want to try, but I was feeling short on time with the wallhanging so I opted for a simple project:


This hat doesn't show what Stephen does with color, but it has a lot of interesting texture and it was knit with two yarns held together. The pattern was written really clearly and I'll definitely be trying more of his designs in the future!

I also knit a couple of different market bags. The first is the Market Bag designed by Emily Kintigh:


The second is the Farmer's Market/Produce Bag designed by Monica Dewart:


There are a lot of free market bag patterns on Ravelry and I need to try a few more and test them out to see which patterns I like the best.

I also worked on my Coral Coast Wrap designed by Ambah O'Brien:


This is my monthly shawl club from Jimmy Beans Wool, where you get a new section of the pattern and little ball of yarn each month. I've finished the July installment in the above picture. I received the August installment, but haven't knit it up yet since I've been enjoying working on my sweater. Here's what I got for the August installment, to give you an idea of what the club's like:


The metal tin that the yarn came in has a magnet on the bottom and, at the end of the year, we'll get a metal sheet that hangs on the wall that we can stick the tins to for storing little doo-dads and stuff.

I also knit up a quick and easy shawl as a break when my hands would get sore when knitting the cables on the yoke of my sweater. I knit the Jodi shawl designed by Joji Locatelli. Here is my favorite model wearing it:


The colors are a bit dull in that picture, so here's a picture before I got to the purple border to give you a better idea of how bright the shawl is:


I still need to block this shawl to show off the lace better, so I'll try to get a better picture after that is done.

That's all the knitting that I've finished, but I wanted to share some fun knitting stuff that I just got. This year Jimmy Beans Wool decided to do a couple of Halloween advent calendars. These "advent" calendars have little packages that you open every day and a little project that you knit to count down the days until Halloween. The bigger calendar has 31 packages which include the yarn needed to make the Cowl-O-Ween cowl designed by Amy Gunderson and some other fun surprises. The little packages came in a coffin-shaped box:


I'm going to save these packages to start opening on Oct 1. The other "advent" calendar is smaller, with 13 little packages stored in a trick-or-treat bucket:


This calendar includes the yarn needed to make the Haunted Handwarmers designed by Amy Gunderson to match the cowl. I've already opened the first package, but haven't started the project yet:


I think these will be a fun little distraction for October!

Finally, I've been doing a little bit of sewing. I decided that I wanted to make a project bag out of the fabrics that I used for my niece's wallhanging as a little reminder for me of her wedding (which was incredibly beautiful!). I pieced the fabrics together in the gradation that I used in the wallhanging:


I pieced the colors in the opposite order on each side so that the same colors would meet at the side seams to give a continuous gradation around the bag. I stabilized the fabrics with some horsehair stabilizer that I had bought a while ago but hadn't tried out yet. This stabilizer is commonly used in making bags:


I really like the feel of the stabilizer! It gives the bag a lot of body, but is still really flexible. I wanted to get some white onto the bag so decided to hand embroider circles on top of the sage gradation. To mark the circles, I used a cool trick that I learned from a Craftsy class. I used the holes in a plastic canvas circle and marked where to make my stitches with an air-erasable marker:


That worked really well! I used a variety of embroidery stitches for the random circles:


I'm finished with the embroidery and now just have to sew my bag together. I hope to do that this weekend.

That's about all for now. I hope that everyone is doing well!

Nancy


Monday, August 17, 2020

"The First Day" Wallhanging

 Hi all -

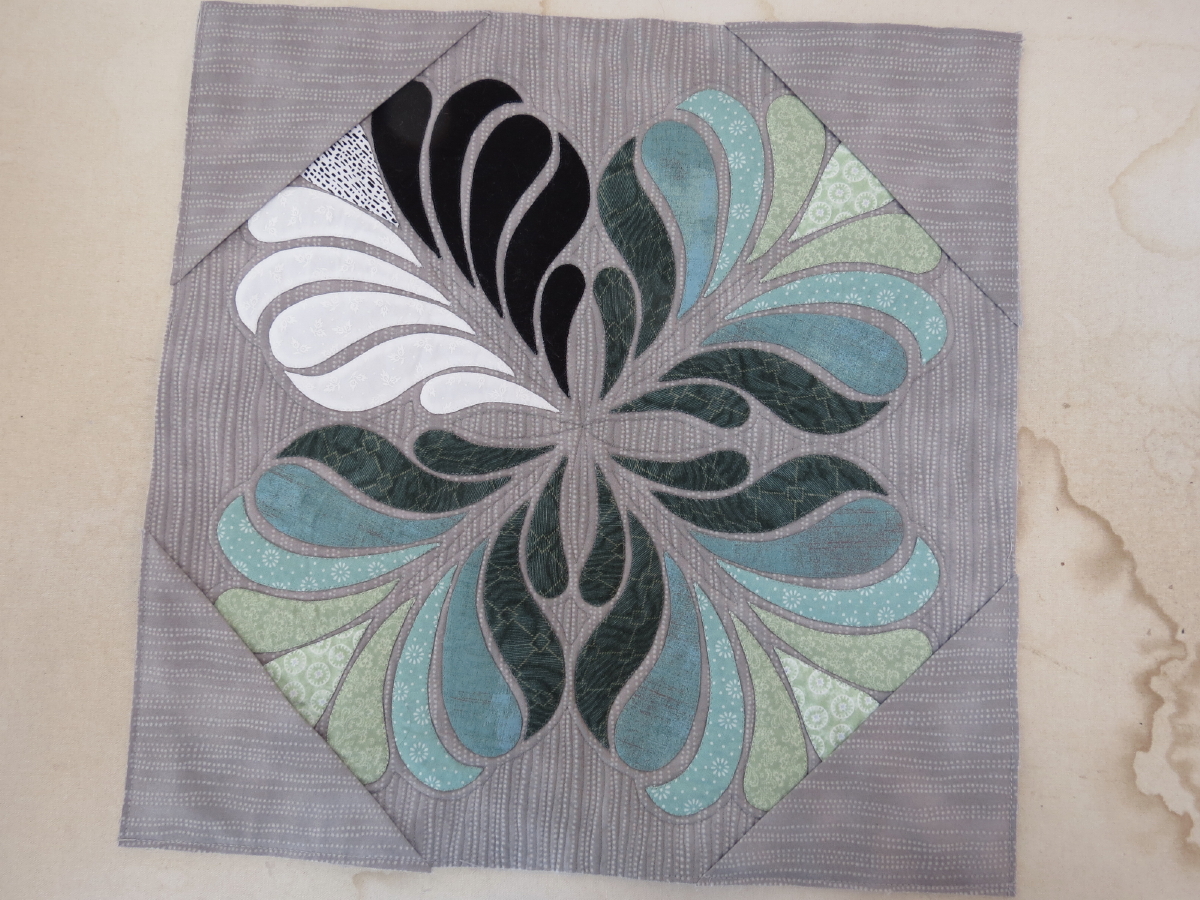
Today I'm going to share with you the wallhanging that I made for my niece for her wedding. I'm also making them a queen-sized quilt, but I won't be able to go to the wedding and I don't want to mail a queen-sized quilt, so I decided to make them a wallhanging for now and will finish the other quilt and give it to them whenever I get to see them again.

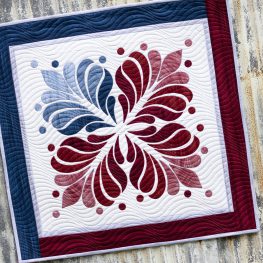
When I started thinking about making a small wallhanging for my niece, I got an email from We All Sew (the Bernina blog web site) that included a free pattern for a little applique wallhanging that caught my eye. It was the Red, White and Blue Mini Quilt pattern:


I thought this quilt had a nice modern, clean look, and that it was small enough that I could finish it on time. The first thing to do was to get the wedding colors from my sister. Her chosen colors were light sage and white. Beautiful colors for a wedding, but not a shade of green that I had in my extensive stash. And for this pattern I needed a gradation of sages so I had to go online and order some sage fabrics. Since you can't really see the exact color of fabrics online, I had to order a bunch of fabric and then narrow it down to a gradation that I liked.

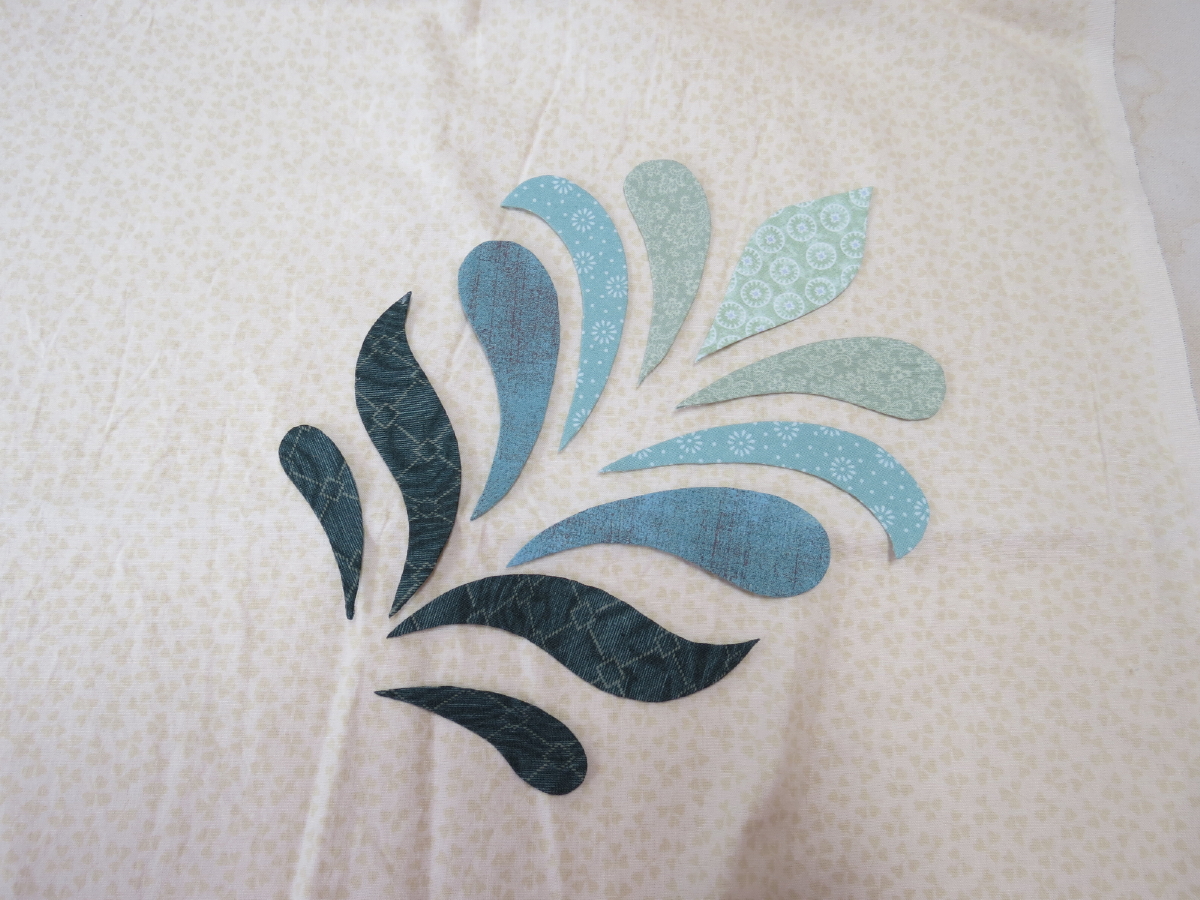
The next choice would be the background fabric. It can be hard to find a good background color for a gradation since the value of the background color will always be pretty close to one of the gradation fabrics. I could have used a white for the background, but I think that white is a "dangerous" color to use as a background for a wallhanging. It's a stark color and, depending on the color of the wall, can make the wall look dingy or can stand out too much on the wall. So I wanted to use a different color. The best way to pick a background color is to make the applique pieces and lay them on different backgrounds to see how they look. Here are the test applique pieces that I made (I'll go into detail about how they are constructed below):

First, I thought maybe a nice cream background would work:

I tried several, but none of them felt right to me. They all seemed to wash out the lighter colored fronds. Then I thought maybe a rich brown might work:

I liked that better, but it still didn't feel quite right. I thought I could use this if I didn't find anything I liked better, but I was hoping to find something else. I slept on it for a couple of days and kept going back and looking at it, but it still didn't feel right. Then it dawned on me to try gray:


I liked that a lot (it looks better in person) so I made the applique pieces for two more fronds. I liked the way the pattern used a contrasting color for the fourth frond, so I wanted to leave that one open so I could decide if I would use a different color, too. The obvious choice for the fourth frond would be to use the other wedding color -- white. But when I pictured that in my head, just using white seemed too boring. I could also make the fourth frond match the other fronds and that would be nice and safe, but it wouldn't have a lot of interest. I thought about it for a while and it dawned on me that I could add meaning to that fourth frond by making one side white to represent the bride and the other side black to represent the groom (in his tux). But what to do with the end of the frond that isn't on one side or the other? I could make it gray to represent the white and black being mixed together, but that would definitely fade into the background. So I looked through my black-and-white fabrics to see if I had anything that would work. I think I found the perfect fabric!

I really liked how all of this looked so now it was time to put it all together!

First, how did I make the applique pieces? I decided to make a kind of applique where you turn the edges of the pieces under to give it a clean edge that won't fray. There are several ways to do turned edge applique. I decided to use a method where you use a stabilizer in the shape of the applique piece and turn the edges over the stabilizer and glue them in place. You can then place the pieces on the background and sew them in place either by hand or with the sewing machine.

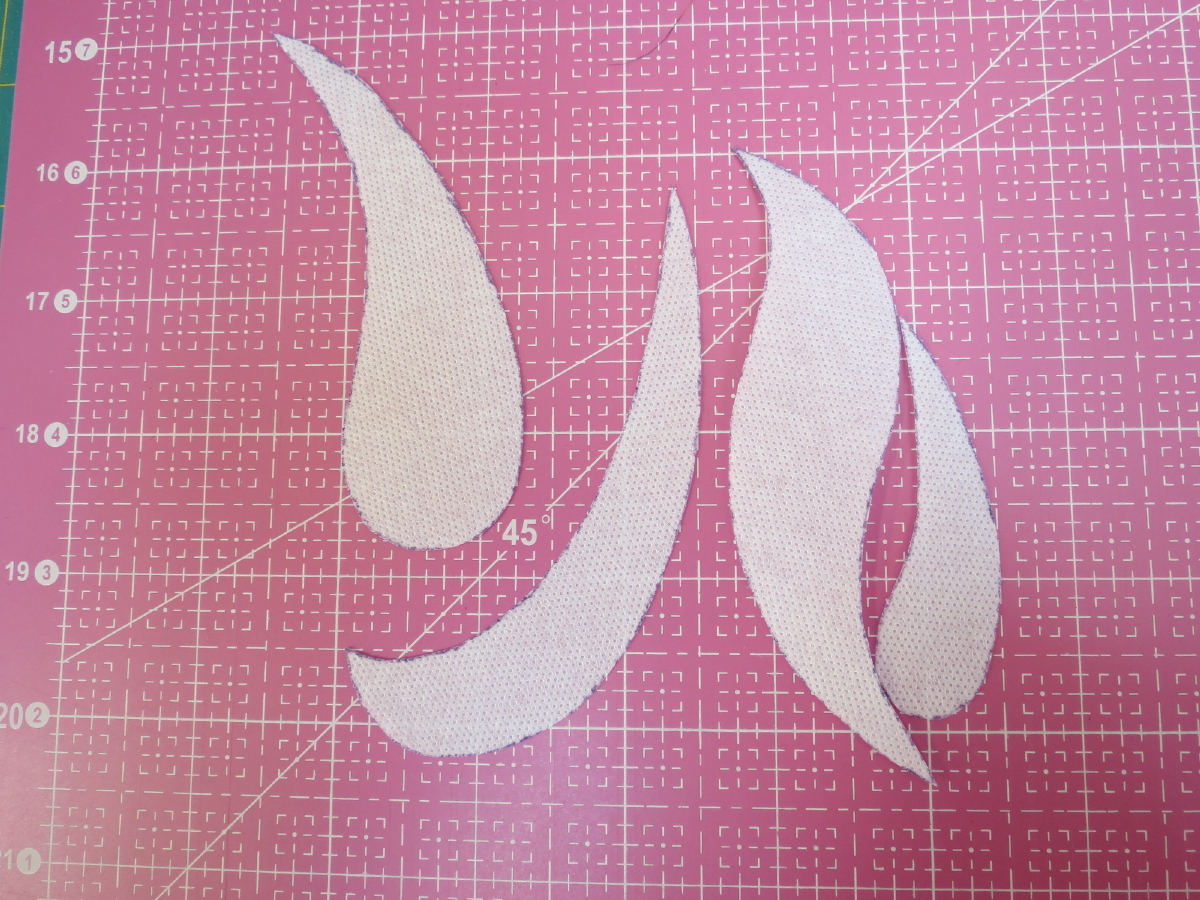
The first step is to trace the applique shapes onto the stabilizer:

Because of the way the stabilizer is used, you have to trace a mirror image of each piece, which is what the pattern provides. For the stabilizer, I used Wash-Away Applique paper from C&T:

This paper is designed specifically for this method of applique. It is fusible on one side and can be removed with water. I used a Frixion pen for the tracing:

This pen has ink in it that disappears when you apply heat to it. It's actually designed to be used with paper (I'm not sure why) so it can leave a slight white line on dark fabrics, but is perfect for this application because the stabilizer is white already. Since the paper is a fusible, the ink will disappear when you fuse the paper to the fabric so you don't have to worry about the ink line being dark and showing through the fabric.

As you probably guessed, after tracing the shapes you cut them out on the traced line:

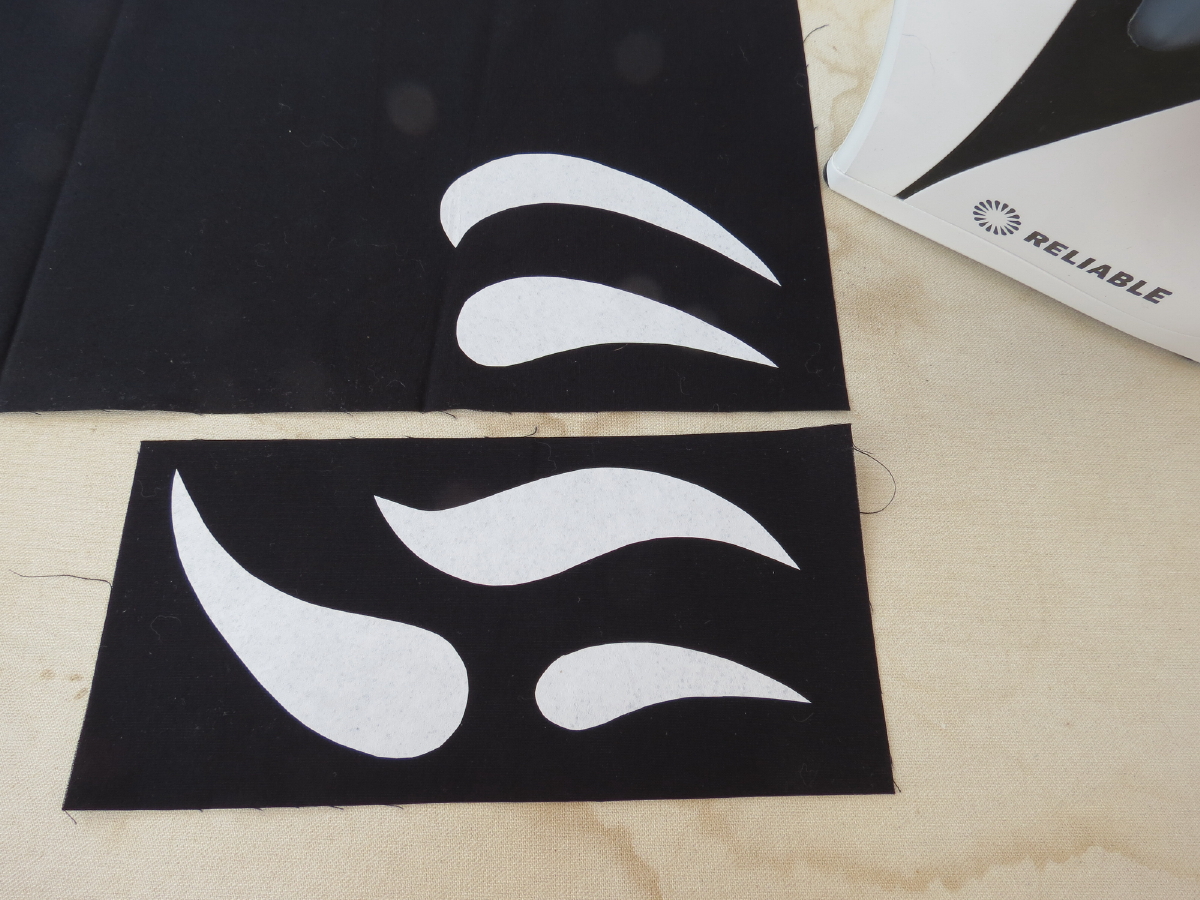
and then fuse them to the wrong side of the fabric:

When fusing the applique shapes to the fabric, you must be sure to leave at least 1/2" between the shapes so you have enough fabric to fold over the edges. After fusing, you cut around each shape, leaving approximately 1/4" of fabric past the edges of the stabilizer:

When cutting out the shapes, you also need to clip the inside curves. You'll see that when we turn the edges.

With this method, you use glue to hold the edges under the shape when you turn them. This glue should be water-soluable so you can remove the glue when you are finished with the piece. If you leave the glue in, it can make the piece stiff and heavy. I used a water-soluable fabric glue from Fons & Porter:

This glue goes on blue so you can see it, then dries clear and can be removed with water. This glue was a bit goopy in the hot weather, but it worked fine. I first applied some glue along the edge of the stabilizer, as you can see above. I then used the Appliquick tools to turn the edges:

The Appliquick tools are surgical steel rods with specialized ends. Sorry that I can't show you pictures of how to use them since I don't have anyone else to hold the camera for me, but you can find lots of videos on their use on YouTube. Basically, you hold the bigger rod with the forked end in one hand, using it to hold the applique piece in place near where you are going to turn it. You hold the smaller rod with the flattened end in the other hand and use that flat edge to roll the edge over and press it into the glue. It's a lot easier and more precise than trying to turn the edges with your fingers! You continue to add more glue and then fold more of the edges until you get all of the edges turned on the piece.


You can't glue the entire edge at once because the glue will dry before you can turn all of the edges. The pointed tip is the difficult part. You start out by just folding the edge of the fabric like you did the rest of the shape, letting the extra fabric jut out from under the shape. What I did then was apply some more glue at the tip and fold the fabric back in the opposite direction, with the fold falling just under the edge of the applique. I used my thumbnail to try to get a good crease in the fabric. Then, if there was still extra fabric, I did the same thing again. If there was still extra fabric, I trimmed it off. I used a lot of glue on this part and was trying to make sure that there was a fold at the tip of the point so I wouldn't get any fraying. These are the narrowest tips I've ever done this way so I was worried about what would happen when I soaked the piece at the end to remove the glue and stabilizer.

Once all of the pieces were prepared, I had to attach them to the background fabric. To do that, I taped the pattern to a light box and then taped the background fabric on top of that. I first fused more of the applique paper to the back of the background fabric to act as a stabilizer as I stitched around the applique shapes so the fabric wouldn't pucker. I used Roxanne's Glue Baste-It glue to hold the pieces in place on the background fabric. This glue is like Elmer's School Glue (and is probably the same formula) that comes in a bottle with a needle-nose tip so you can apply small dots of glue exactly where you want them. I used this instead of the glue stick because the glue stick could get messy and it was okay to use a glue at this point that takes a little bit longer to dry.

I decided to sew the applique shapes to the background using the sewing machine because it would be faster than sewing them by hand and because I was afraid that the extra handling from the hand stitching would cause the narrow points to fray. I used Invisifil thread, a 60 needle and a narrow zig-zag stitch. I chose this thread so that I could use the 60 needle, which I hoped would be thin enough to, again, not cause fraying on the points. I used a gray thread for all of the green fronds; black thread for the black fronds; and white thread for the white fronds and the black-and-white end piece. At every start and end, I pulled the threads to the back and tied them in a knot. When I trimmed the threads, I left about 1" of thread past the knot because I was worried about the thread working it's way out of the knot since it was so thin. Here is what the back of the piece looked like when I was finished:

Now I had to prepare the back. I wanted to include an explanation of the symbolism in the quilt in the label, so I knew it would be a large label. I like to piece large labels into the backing so the quilting secures them better, so I had to prepare the label before I could prepare the backing. Here is the label that I came up with:

Then I just had to piece the backing. I decided to use some of the frond fabrics from the front and pieced them like a log cabin block. I wanted the label to be near the center of the quilt back so I could finish the quilt with a facing rather than a binding, if I wanted:

Next came the quilting (which you can see in the above picture, but ignore that for now...). I used a cotton batting and basted the sandwich with spray basting. I find spray baste too difficult to use for large quilts, but I love it for small quilts like this one. I also put safety pins around the outside edges for extra security, in case the spray baste didn't hold well on the applique paper that I had used as a stabilizer on the front of the quilt. I quilted around the edge of every applique piece to help them pop, then echo quilted 1/4" outside of that. Then I just did vertical straight-ish line quilting, quilting a line between each pair of dotted lines on the background fabric. This made the dotted lines in the background fabric puff up, emphasizing the vertical nature of the background.

I think the quilting looks pretty good, except in the center of the quilt where it got a bit messy:

The applique pieces weren't placed perfectly in the center so it was hard to get the quilting to be neat. Next time I do something like this, I think I'll mark the quilting before stitching it to get it as neat as possible. But I like the rest of the quilting.

We're almost to the finish line now! Now I just had to finish the edges and add the hanging sleeve. Like I thought earlier, I decided that this quilt needed to be faced rather than being finished with a traditional binding. I decided to try a different method of facing the quilt that I'd seen a while ago but hadn't tried yet. This method seems less fiddly than the other methods I've tried. For this method, you start by sewing folded triangles of facing fabric in the corners:

These will be folded to the back in the end, so I was really careful about how the lines in the fabric were oriented since I wanted them to be vertical on the back like they are on the front. I basted these in place so I could make sure everything looked good before doing the final sewing. Next, I sewed facing strips to the sides of the quilt:

I basted these at first, then sewed everything 1/4" from the edge of the quilt when it all looked good to me. I then folded the edge strips out, ironed them and edge stitched them:

The edge stitching is a sewing trick that makes it easier to fold over the edge neatly. Then, I folded all of the facing pieces to the back of the quilt and ironed all of the edges to get a crisp, neat fold:

I put clips around the edges to keep the fold neat while I stitched down the edges on the back:

I stitched the side edges first, since they start and end under the corner edges. With all of the handling from turning the corners from the front and moving them out of the way when stitching the side pieces, the bias edges of the corner pieces got pretty stretched out:

So I spritzed the corner pieces with water and patted them in place and ironed them to take out some of the slack. Then I pinned them carefully and sewed them down:

I think it turned out pretty nice! I added a hanging sleeve and was finished! It looks like I forgot to take a final picture of the front in all of my rushing around to get it finished, but I like how it turned out! I made a gift bag for it using the fabric from the tips of the green fronds and got it in the mail to my sister today. It feels so good to have this finished and in the mail! It should have plenty of time to arrive since the wedding is a week and a half from now.

That's all for now. For those of you who are wondering about Lance, his elbow has healed a lot. The front part of the wound, which wasn't so deep, has healed completely. The back part over his elbow, that was really deep, has healed a lot but is still open and has a hole in it. It seems to have stalled in its healing so we have another vet appointment on Wednesday to see what they think. He's still under house arrest and is still wearing the yucky collar, so I'm hoping they'll have some ideas that might speed up his healing!

I hope everyone is staying safe and healthy!

Nancy