Monday, March 30, 2015

Lake House Romance Pillow

Hi all -

I've finished my project for the March FMQ challenge. This month our inspirational artist was Patsy Thompson. Those of you who know me, know that I've been a big fan of hers ever since I first heard of her several years ago. She is such a wonderful quilter and shares so much with the community! I have both of her books and several of her DVDs. Her books are worth getting simply for the beauty of the books themselves, and have the added benefit of great information.

Anyway, the timing of this month's challenge was perfect for me. I need to start working on quilting my sister's wedding quilt soon (they were married last Dec and I gave them the pieced top for their wedding, with a promise of the quilting as their Christmas present this year) and was thinking about using some hyperquilting, so this month's challenge was the perfect time to test out my ideas on a pillow. Here is a picture of the completed quilt top:


The first step was to piece the pillow top. I have some 20" pillow forms, so I decided to go with that size. It also worked perfectly with the original quilt since it was made with 2" finished squares, so I was able to use the exact same size of blocks on the pillow. Here is the pillow top:


Some of you might remember that when I originally made my sister's top, I wasn't paying attention to the size of the quilt when planning it out in EQ7. When I finally realized this, I had enough extra blocks to make 2/3 of another queen-sized quilt. So, while piecing the pillow top, I also took the time to finish the center portion of my version of this quilt. I love the colors and design, so I'm really excited to have one of my own. Of course, the quilting on mine will be different.

My plan was to put a feathered wreath in the center of each of the blocks. So, now was the time to draft that wreath. To start, I cut a piece of tracing paper bigger than the block center and traced the edges on the paper. I traced them with pencil so there would be no chance of ink getting on my block, then went over it with permanent marker so that I wouldn't lose the outline when erasing as I drew my wreath. I also added center lines and creased the paper on the vertical center line so I could trace from one side of the paper to the other. I used a flexible curve to some hearts inside the block:


I needed 3 hearts: the feather spine, the outer boundary for the plumes and the inner boundary for the plumes. Then I drew the plumes free-hand on one side and traced them on the other side:


Once I was happy with them, I drew over them with permanent marker so I could work on other features:


I thought this was looking good, but I needed something to fill that area above the heart. This is what I came up with:


Now it was time to think about the trapunto and the hyperquilting. If I was going to do hyperquilting, then I would want to use my quilting thread when attaching the trapunto batting so that the hyperquilting wouldn't smash down the feathers. But if I didn't do any hyperquilting, then I would want to do the trapunto quilting with water-soluable thread so that I wouldn't have to put invisible thread in the quilt when doing the final quilting. I rewatched some of Patsy's Craftsy class to get some hyperquilting ideas, and realized that some of my plumes were too small for hyperquilting so trapunto with the water-soluable thread would be the way to go. I can play with hyperquilting on my version of the quilt when I get around to quilting that one. Luckily, Patsy covers trapunto using water-soluable thread in her Craftsy class, so this project would still qualify for the FMQ challenge.

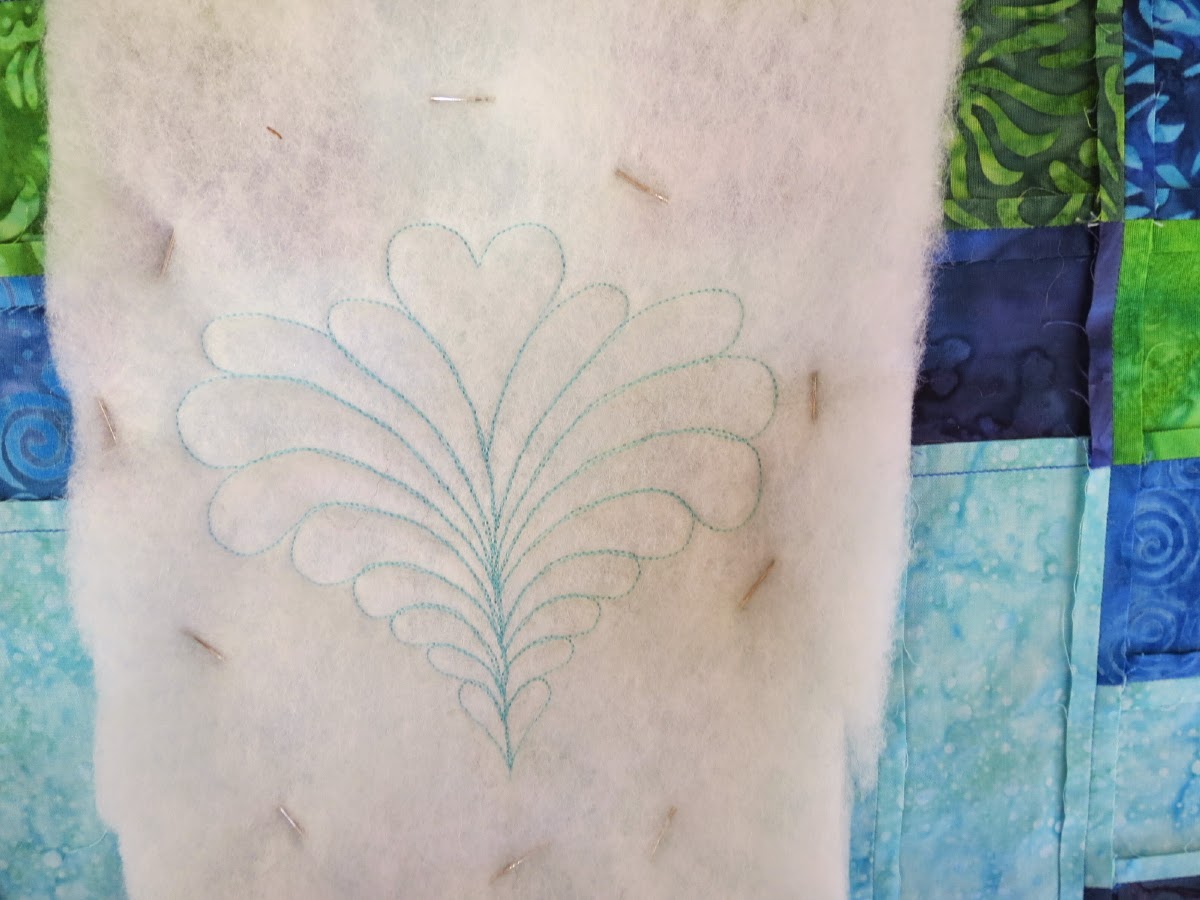
With that decision made, I could move on to the trapunto. I began by transferring the design to my pillow top using a light box and a pink Sew-Line pencil. I tried a couple of different marking tools, and that one seemed to show up the best for me. In my design, the feathered heart and the upper plume don't actually touch each other, so I decided that it would be easier to cut out the excess batting if I worked on each area individually. So I pinned some wool batting behind the upper plume:


And quilted it using water-soluable thread in the top and a light blue thread on the bottom (as Patsy suggests in her class):


Then I cut away the excess batting:


I did the same for the feathered heart. It worked really well to do these separately.

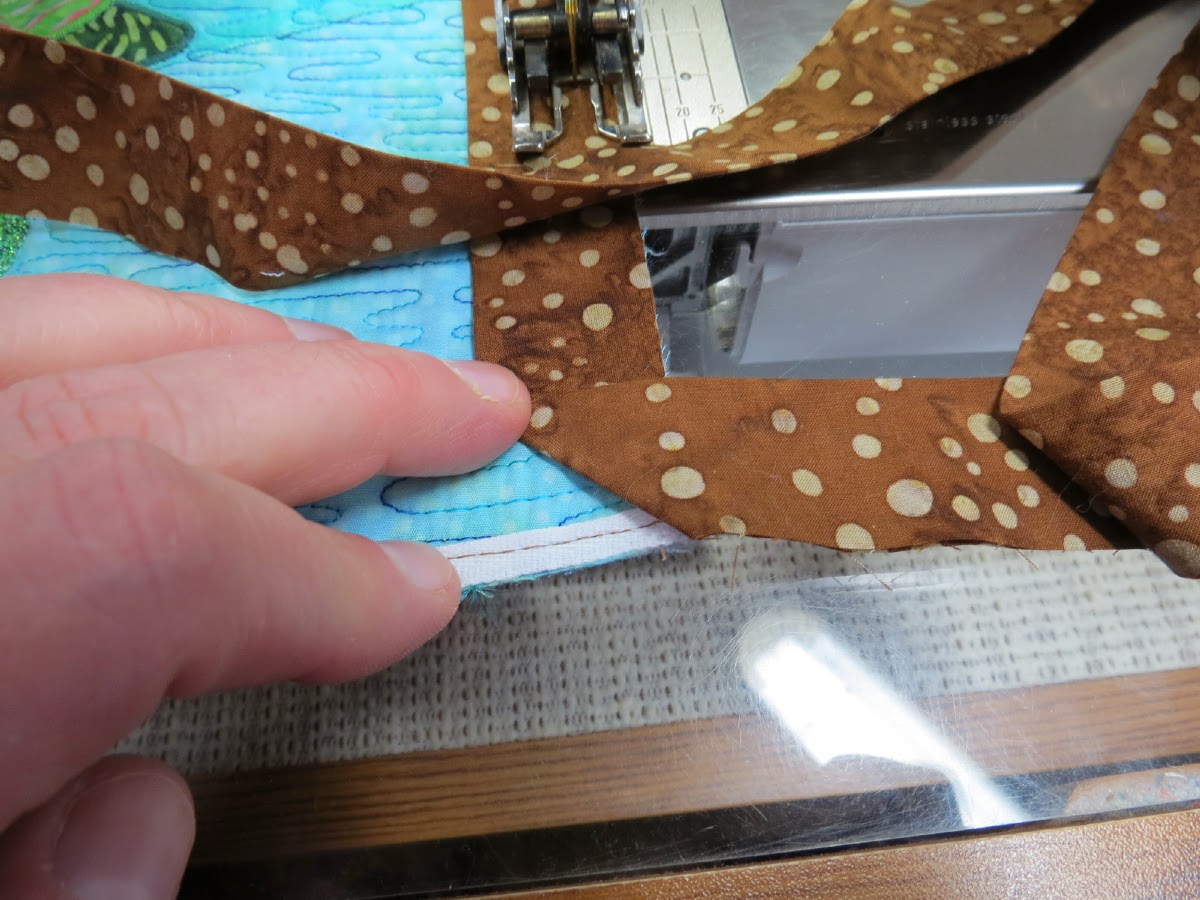
With the trapunto done, I could now create the quilt sandwich as usual and do the quilting. Here it is with the quilting finished:


And a picture of the back so you can see the quilting better:


I used the same thread in the bobbin as in the top. The main quilting was done with Glide and the background quilting with Kimono silk. I started by quilting the straight lines in the chains to stabilize the top for the FMQ. The quilting in the chains represents the diamond from the engagement ring. Then I quilted the main motif and added 3 echoing lines using the silk thread to make the motif really stand out. Now I had to decide on the background quilting. I'm always unsure of what I want to use in the background. I knew I wanted curved cross-hatching inside of the heart, but how to fill up that outer space? Then it dawned on me -- a water meander to go with the theme of the quilt. Perfect! Here are a few more pictures of the quilting:


And the final pillow:


I'm really excited with how this turned out!

When I go to quilt the big quilt, I'm thinking that I'll probably skip the trapunto step. It does provide some nice texture, but the plumes are small enough that I think I'll get much the same effect with just regular quilting, and that'll save me a lot of time.

Hope you enjoyed this!

Nancy


Saturday, March 21, 2015

Inspired by Libby, Finished

Hi all -

Yea! I finished my Inspired by Libby quilt! It feels so good to actually have something done. Well, maybe not completely done since I still need to add some buttons for the eyes (I keep forgetting to do this), add a hanging sleeve, name the quilt and add a label. But it sure looks done!

The next animal I wanted to add to the quilt was a jellyfish so that I could try Libby's techniques for working with sheers. I found a great sheer in my stash so was excited to be able to use it. The first step was to iron a freezer paper pattern on the sheer:


I put the iron on a wool setting to avoid melting the sheer and put a teflon sheet underneath to protect my pressing surface in case this was still too hot. It worked like a dream! The next step was to spray a temporary basting spray on the other side of the shape, stick it on the quilt in the desired location, add a stabilizer to the back and sew around the template:


Then I cut around the outside edge of the stitching and removed the template:


Looking good! Now I needed to sew something around the edge and add the tentacles. I looked through me embellishing threads and decided that some Razzle Dazzle would look the best. I was hoping to try my free-motion couching foot for this, but I did a small test and Libby was right -- the thread was too thin to use with this foot. When moving in certain directions, the thread wasn't caught with the stitching. She said that you need to use a thread that fills the hole in the foot, and that seems to be the case. So, since I didn't have a thicker thread that I thought would look good, I had to do the embellishment with bobbin work instead.

To do the bobbin work, I added more stabilizer to the back and drew my lines on that. Then I loaded the thread in the bobbin, turned my piece face down and started stitching:


It was looking really good on the front, too:


I did the tentacles first so I could sew over the top edge of the stitching when I went around the edge of the body. Here's what it looked like when the bobbin work was done (sorry for the quilting in the picture, I forgot to take this picture earlier):


I really like it! My only concern is that there isn't enough stitching around the edge to hold the sheer securely. And, in fact, I did see some of the sheer coming up in a corner while I was doing the quilting so I added some sewing glue in that area to hold it in place. Since this is a wallhanging, hopefully it won't get enough handling to pull any more up. But I'll keep the glue handy, just in case!

Now it was time to do the quilting. I decided to use up some smaller scraps of batting by piecing the batting. I found 2 pieces that would be big enough:


And I pulled out my #10 foot:


I like this foot for piecing batting because it keeps the pieces from overlapping, but still allows the zigzag stitch to pull the pieces together so the end up being butted up perfectly. First I just took them to the sewing machine and tried sewing them together:


I remember this working for me once, but the last time I had tried this the two pieces of batting had fed at different speeds and I ended up with a bunch of waviness where they were sewn together. I had this problem again this time (sorry, forgot to take a picture), so I had to come up with a solution.

This time I laid the pieces flat on the cutting mat again and then added pins:


Then I carefully took the pieces to the sewing machine and sewed them together, keeping the pinned spots aligned so the pieces would feed evenly:


This worked, but it was a royal pain to keep the pins in place. So, next time I'll either use some erasers or something to cap the ends of the pins or I'll use a water-soluable marker to mark the matching points and hold them together with my fingers. But I now had my batting for this project:


Now it was time to sandwich and quilt this. I didn't do anything special on this step and here's the quilted piece:


Then I squared it up to prepare for the binding. Before adding the binding, I decided to add some twill tape to the edges of the quilt to keep them from stretching. This is a trick I learned in a David Taylor class and I've only done it once or twice before. I just laid the quilt flat and measured the twill tape along one edge. I cut two pieces of the tape that length, one for each side. That way I knew that the two sides would be the exact same length. When I used the tape before, I had trouble getting the end of the tape to line up with the edge of the quilt, no matter how well I pinned everything. So this time I pinned everything in place, then sewed an inch at the bottom of the edge to hold that in place before moving to the top and sewing all of the way down. That worked really well for me. I also used some washable glue stick to stick the ends to the quilt before sewing because the loose ends kept moving around before I could start stitching. Here is what the twill tape looked like once it was applied:


I put the twill tape on the front so that I wouldn't have to fight with it when folding the binding over the edge and stitching it on the back. Here is a close-up of one of the corners:


Very neat and tidy!

Now on to the binding. I normally cut my binding at 2" because I like a nice, narrow binding on my quilts. This time I cut it at 2 1/8" to give it more space for the twill tape. It probably wasn't needed, but having a little bit of extra binding on the back wouldn't hurt this piece. I didn't do anything special in the binding, but I thought I'd share how I do the corners since it's different than Libby's method. Libby's method only works if you are doing a 1/4" binding. My method works with any width binding to get a perfect mitered corner every time. I sewed my binding on at slightly wider than 1/4" to make sure that the twill tape was covered.

To determine the miter angle, I stop sewing a few inches before reaching the corner. I fold the binding strip towards the right, with the fold making a 45 degree angle with the quilt edges and the raw edge of the binding strip continuing the straight line at the bottom edge of the quilt:


I use my thumbnail to press the fold so that I get a good crease on the inside and pull the binding strip straight again:


Sometimes this crease is visible enough to be used for the sewing line, but I've found that sometimes I can't see the crease once I get there with the sewing machine so I always mark the crease before continuing my sewing:


I then continue sewing the binding until I get to the drawn line, and follow the drawn line off the edge of the quilt:


I've found that sewing the miter to the corner of the quilt gives me a neater corner and also holds the backing fabric in place so it doesn't get folded over when I turn the quilt and start down the next side.

To add another Libby technique to the quilt, I decided to couch some Razzle Dazzle along the edge of the binding, and use that stitching to secure the binding on the back. Instead of using fusible, I used washable school glue to hold the binding in place on the back, just because I don't like adding unneeded fusible to my quilts. Then it was time to do the couching. I just followed Libby's instructions for this part:


It worked really well most of the time:


But every once in a while I would find myself veering into the quilt with the couching:


Can you see in about the middle of the picture where the couched thread doesn't butt up against the binding like it should? I think the problem was that things would go really well and I'd stop paying such close attention. Then the bulk of the binding would push the walking foot towards the center of the quilt, pulling the couched thread with it. I think that if I paid better attention while doing the stitching then it would come out perfectly.

Just to finish off, here's a picture of the back of the quilt, showing the fun backing fabric:


I love this fabric! I got it years ago to make a baby quilt for a coworker in the UAE. I thought it was perfect since it's a desert there and we were doing rain studies.

That's it for now. Sorry this was such a long post! I should have split it up into two posts, but I wanted to get it out there and move on.

Nancy


Saturday, March 14, 2015

Inspired by Libby, Part 3

Hi all -

I've made some progress on my Inspired by Libby quilt this week. I'm getting pretty excited about it! If you remember, last time I had the background finished and had added some seaweed using thread work. Now it was time to add some animals using Libby's reverse applique technique.

To start, I looked around on the Web for underwater coloring book images. I'm not confident in my drawing skills so I needed a place to start:


I found a lot of fun images to play with! I picked a simple fish to start with and traced the elements of the fish onto freezer paper. I added areas of overlap where one piece covers another. I figured the easiest way to do this would be to put the fins behind the fish body:


Since I needed to start with the fins, I used the fish body pattern to place the fins, tacking things in place with touches of the iron:


Then I removed the fish body pattern and ironed the fin patterns firmly in place:


I put the fin fabric behind the piece, making sure that there was plenty of extra fabric around each edge and that the fabric was right-side up. I pinned around the pattern to hold everything in place:


 And checked the back to make sure that there was plenty of fabric around the edges:


I sewed around the edges of the pattern pieces using my darning foot with the feed dogs down and removed the freezer paper patterns:


I cut just the quilt front around the inside of the stitches to reveal the underlying fabric:


and trimmed the excess on the back, leaving plenty of fabric to keep the piece stable:


That went pretty well! Now it was time to add the fish body. I did this in the exact same way and came up with this:


Looking good so far! Now it was time to add the satin stitching. I was really worried about how this would look around such detailed edges. To start, I pinned some tear-away water-soluable stabilizer on the back. Then stitched around the fins in a matching color using satin stitch:

And here is the back with the stabilizer:


Then I satin stitched around the fish body:


I was very pleased with how this turned out! So I added a few more appliques:


The fish eye is drawn on with a washable Crayola marker so I'll know where to put a button or something when I'm finished with the quilting. I also added stitched lines on the clam to define the shape better. I did this now because I might want to leave it unquilted so that it pops up from the background better when I'm finished. I also sewed the satin stitching twice over the seaweed fronds because the seaweed thread was peeking out a bit. This should also help secure that thread better.

I added another seaweed frond in front of the first fish, and here's what I have so far:


I'm really liking it! The spacing of the animals is a little uniform, but I didn't have much room to play with so I think it'll be okay.

The next step is to try adding a jellyfish in the upper right-hand corner. I want to try Libby's method of working with shears for that. I'm getting closer!!

Nancy