Sunday, March 27, 2016

Happy Easter!

Hi all -

I hope you are all having a wonderful Easter Sunday! I don't really celebrate Easter myself, but I did watch some new Craftsy videos and do some knitting and quilting. Now I'm watching the last two games in the Elite Eight round of the NCAA men's basketball tournament. Sadly, Kansas lost yesterday so my team is out of the tournament, but Oklahoma, another Big 12 team, and North Carolina, another favorite of mine, are still in the tournament so I still have teams to root for. North Carolina plays tonight, so we'll see if they can make it into the Final Four.

Spring started this week, so we celebrated with a little blizzard. We got something over 2 feet at my house. We've had a lot worse in the past, but this is enough wet, heavy snow to really know you're shoveling! Here's a view out my front door:


The snow hadn't stopped at this point, but it was mostly done and my power was back on so I decided to start the shoveling. I took some pictures after starting to try to give some idea of the snow depth:


Here's the gate before shoveling:


And after:


Luckily, I don't have to leave the house in storms like this!

So, what have I been working on this week? I've done some more knitting, which is a good thing to work on when listening to basketball games that you don't need to watch closely. I'm still working on using up the yarn for that old blanket. I still have full skeins left, but I decided to start working on knitting things while unraveling the blanket:


It works pretty well to knit while you unravel! First, I made part of a hat from the pink band that had been at the top of the blanket:


I had to put this aside when I got to the dark mauve band, so I finished this hat:


and made this cowl:


Here is Lance modeling both:


He actually loves the modeling because he knows he gets a good treat afterwards!

On the knitting side, I watched the videos for the new Craftsy class "Wild Quilting: Creative Free-Motion Combinations" by Christina Cameli. I've seen this type of quilting called "Grafitti Quilting" elsewhere and I've known for a long time that this is how I want to quilt my Bonnie Hunter Grand Illusion quilt. I had basted this quilt on the longarm with water-soluable thread last fall when I basted my sister's wedding quilt. So I got the quilt out and started quilting. The quilt is really wild so it's really hard to see the quilting, which is why I figured I could go for something fun. I decided to use a bright green Glide thread because I want the quilting to give the quilt a green glow. Here's some of the quilting on the front:


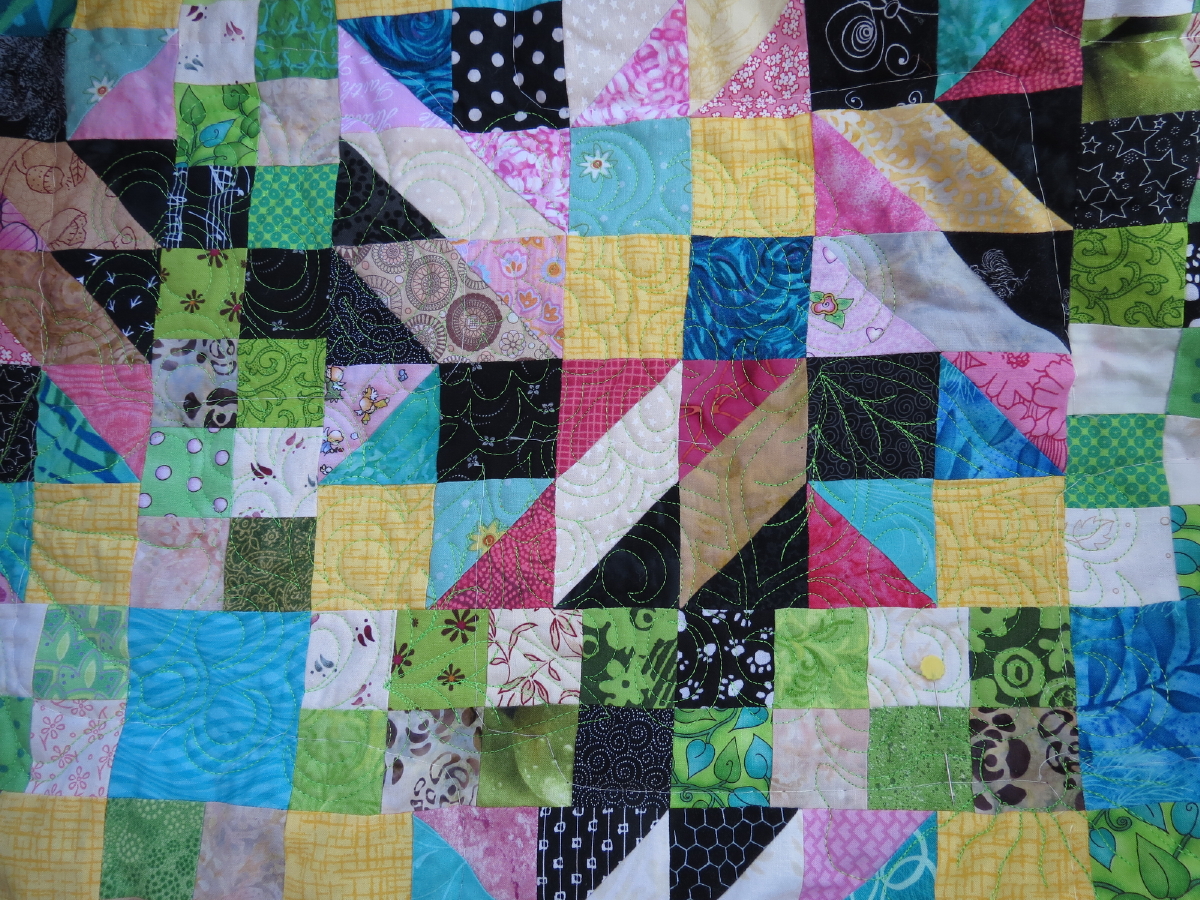
The pin in the lower-right corner is marking where my bobbin ran out so I know where to start up again. And here is some of the quilting on the back, where you can see it a bit better:


My "formula" is scattered big flowers of different types and pairs of leaves with a swirly background fill that she calls "bear claw" and some straight line quilting to fill in odd spaces that appear between the designs. I haven't gotten very far, but I'm really liking what I have. And if I got bored of doing this, I can switch to other designs as I move along.

While doing this quilting, I'm reminded of a couple of "features" of the new machine that I actually don't like. They both have to do with turning the machine off and back on again. With my other machines, if you turn the machine off with the needle in the fabric, the needle will stay in the fabric when you turn it back on. With the new machine, the needle comes out of the fabric when you turn it on. It's not a huge deal because I can use the hand crank to get the needle back in where it was, but I have to remember that it does this so I don't accidentally shift the quilt too far before putting the needle back in. The other, similar issue is with the tension. My other machines have mechanical tensions (I believe), so the tension setting stays where it was when you turn the machine off and back on again. Since the new machine has an automatic tension, it resets when you turn the machine on so I have to remember where I had it set and reset it before I start. Not difficult problems, but not ideal either. But the machine does stitch smoothly and beautifully and I love the extra harp space!

Hope everyone is having a wonderful spring!!

Nancy

Sunday, March 20, 2016

Poolside Tote

Hi all -

This is my second blog post in my quote challenge from Terry Knott. Thanks again, Terry, for including me! If you get a chance, head over to see what she's working on. Here is my quote for today:

“If I’m going to sing like someone else, then I don’t need to sing at all.” ~Billie Holiday

This is a good reminder to me to find my own voice, which is something that I struggle with.

While most of my time this week was spent watching basketball, I did get my Poolside Tote finished:


This was another bag kit that I bought from Craftsy last year on sale. The instructions for this bag were great! I think this bag will be good for carrying projects to sew day.

While watching basketball (Go Jayhawks!!), I've been doing some more knitting. I started with this hat (recognize the yarn? You'll be seeing a lot of it...):


I got to the point where I need to start tapering down to the top, but I don't have the right size double-pointed needles. I ordered the needles I need, but I might try finishing this up with the "magic loop" method. In the meantime, I made this headband:


This is the companion yarn to the yarn above. It's hard to tell in the pictures, but the headband is pink while the hat is a dark mauve. And, per request, here's Lance modeling the headband:


He loves it!

On the quilting side, I haven't accomplished anything but I've been thinking about the Hoffman Challenge. I have the fabric and have some ideas. I would like to chronicle that journey in my blog for my own records, but don't want to show that to others who are also doing the challenge and my not what to see what I'm doing. So, I think I will include any information about the Hoffman Challenge at the end of my blog posts. I'll put a warning message and then bunches of blank space so you would have to scroll down to see it. Hopefully, this will satisfy my need to chronicle what I'm doing, without revealing anything to those who don't want to see it.

Nancy

Sunday, March 13, 2016

Geo Pop Canvas Tote

Hi all -

I've been invited by a friend to join in a quote challenge. The rules of the challenge are to:

1 - Thank the person who nominated me.
2 - Post a quote a day for 3 days.
3 - Each day nominate 3 new bloggers to take part.

So, many thanks to Terry Knott for nominating me! You can follow her quilting journey here. She makes a lot of beautiful quilts and shares her design process along the way. Very interesting!

For the second part, I don't blog daily so I'll share quotes in three blogs. I want to share quotes about creativity and inspiration, but the state of the world (and our country in particular) has been weighing heavily on my mind so I had to go to with this:

"The world is a dangerous place to live; not because of the people who are evil, but because of the people who don't do anything about it."
-- Albert Einstein

I promise I'll be more positive in my next quotes!

I'll have to skip the third rule because I don't follow very many blogs. There just aren't enough hours in the day!

Now on to what I've been working on......

Last year I purchased a couple of kits for bags from Craftsy when they were on sale. I decided it was time to get those made. I was able to finish the first one since my last blog. The pattern is called the "Geo Pop Canvas Bag". I felt the instructions were pretty poor, but the bag did turn out nice:


I've also continued with my knitting. I finished the mobius cowl that I had started in my last blog post. I really like how it turned out. By request, here is Lance modeling it:


You can't see it well because Wesley was pretty sure that he needed to be in the picture, too. You can wear it long, like Lance is doing above, or you can double it up to keep your neck warmer:


And here you can see the lace patterning with a little bit of cabling and you get an idea of what the picot bind off looks like:


This was my first attempt at the picot bind off (which I had never heard of before) and it doesn't look as good as the picture in the book, but I still like it a lot.

I also made another cowl:


This one is made with some yarn that I bought 25 or so years ago to make a crocheted blanket. A friend showed me how to crochet and I started the blanket and then put it aside and when I went back to it years later, I couldn't remember how I did it so I couldn't finish it. I had bought a bunch of yarn to make sure that I didn't run out, so now I want to use it up making stuff to put in my bag for the homeless next fall. This yarn is a bit stiff:


but I think it's still pretty and will definitely keep someone warm. You'll be seeing a lot more stuff made with this yarn in the future......

And, finally, just a little picture of Lance enjoying our spring-like weather:


This is shear relaxation and joy in the sunshine! Of course, I always have to check for breathing when I first see him out there like this....

Nancy

Tuesday, March 1, 2016

Chevron Quilt

Hi all -

It's been a slow year so far, but I did finally get some quilting done. Well, I got some piecing done, but it's the same thing in my mind. I've been having trouble with my quilting muse lately so I decided to look for a piecing project that I might enjoy. Then I remembered a chevron quilt I started last spring. I'd seen several chevron quilts online with some gorgeous quilting and I really wanted to make one for myself. The ones I'd seen were constructed from half-square triangles. I didn't like the extra seams that the half-square triangles create, so I decided to piece mine in columns. Then I realized that if I pieced in columns, then I could easily vary the widths of my chevrons and that excited me so I got out a piece of paper and started doing some calculations, then pulled out a bunch of Kaffe Fassett fabrics and a matching solid and set to work. I cut my fabrics into the rectangles I had calculated and started sewing. To sew the columns, I started by laying neighboring pieces at right angles and drew a line from corner to corner:


I then stitched on that line and also stitched another line about 1/2" from the first:


This second line of stitching allowed me to easily create bonus half-square triangles for another project. I then cut between the lines of stitching:


To make chevrons, I had to make sure to make half of the blocks in one direction and half in the other:


After pressing, I had a portion of my columns:


Thinking ahead, I pressed the seams in opposite directions so the seams would nest when I sewed the columns together:


And I got these extra half-square triangles:


When I picked this project up again now, I had about half of the above units finished, so I made the rest of these units and then started putting the columns together. This was done with exactly the same method:


Once the columns were finished, I was able to sew them together. That's when I found a couple of mistakes. I must have cut a couple of the rectangles too narrow because the columns didn't line up in two places. Oops! Now I had to do some repairs. I started by removing the bad pieces and cutting rectangles to replace them. Here is a replacement piece next to the spot where I took out the bad pieces:


So that I could line things up correctly, I drew a line on the replacement piece. Sorry I didn't get a picture of the line on the above replacement piece, but this gives you and idea of what I did. For the above pieces, the replacement piece would be rotated to the right so the yellow fabric would be on the left and the line would start in the yellow and end in the solid:


I then lined the straight edge of the original column along the drawn line:


Now I could again draw a stitching line from corner to corner. I did a lot of pinning at this point since I was dealing with a raw bias edge and I didn't want it to move. Then I took it back to the sewing machine and sewed along the drawn line and trimmed away the excess:


Voila, that piece was fixed:


Then I just had to fix the other pieces and sew the columns together:


I love how this turned out! I'm not sure when I'll start the quilting, but it might have to be soon since I'm thinking of writing up a pattern for this quilt and seeing if I can sell it on Craftsy or somewhere.

I've also been continuing with my knitting. I made another hat using the same yarn as a previous one:


The picture looks blue, but the yarn really is green. I also made myself a soap sack:


I have a bunch of bar soap, but I rarely use it in the shower because I hate how it slips out of your hand and I hate dealing with the small pieces. I think this will help a lot. And if I like it, I might make more for my family for Christmas. It's always good to find gifts they might like! And I found a bunch of different patterns so they don't have to be all the same.

My final knitting project has been more work. It's going to be a mobius cowl. I had to learn a new mobius cast-on before I could start. It was difficult to get all of those stitches right and I had to start over 4 or 5 times, but I finally got it right:


It doesn't look like much in the picture, but these are 40" circular needles with the wire doubled up on itself so it looks like a 20" loop. So you sew around both sides and end up where you started and the cast-on stitches will end up in the middle of the cowl. Here it is after some more stitching:


And a close-up of the side:


Now that I have the cast-on figured out, the stitching itself is going fairly quickly considering there are 400 stitches in each round. The pattern calls for a picot bind-off, which I've never seen or heard of, so hopefully that'll go better than the cast-on did!

That's it for now! Hopefully I'll start making more progress on things so I'll be able to post more frequently. I'd like to get back to my weekly posts if I can.

Nancy