Hi All -
Today, I thought I'd share a little quilt that I just made for a friend. She is in the midst of her second battle with breast cancer. Another friend suggested that we each secretly make some sort of Monarch butterflies to send to her because the Monarch is her symbol of strength. I thought that was a great idea, so I started looking at "monarch coloring book" images on Google. There were a bunch of really cool images, but when I found a set of images each with a butterfly inside of a heart, I knew that that was what I needed to do. This is the image that I chose:
It came from
https://www.getcoloringpages.org/downloads/butterfly-and-heart-design-9, if you are interested in seeing their other cool designs. This design is perfect for a little wholecloth quilt, so that's what I decided to make.
To get started, I loaded the image into Adobe Illustrator, scaled it up to the size I wanted to make and printed it onto regular paper. I decided to make it about 12" square, so I had to tape several pages together to get the full image:
Next, I had to choose the fabric. I wanted an orange fabric to represent the Monarch. I started by looking at some fabrics with some texture. I really wanted to use this fabric and had originally convinced myself that it would be wonderful, but after sleeping on it I started to feel like the pattern in the fabric would overshadow the quilting:
But I was still really wanting to use a patterned fabric, so next I set my heart on this fabric:
I love the deeper color and how the dots suggest the dots on the Monarch's wings and how the flow of the pattern suggests the fluttery flight of a butterfly, but in the end I was too worried about the pattern making it hard to see the quilting so I ended up putting this one aside, too. I finally decided that I would have to stick with a more solid fabric:
The other decision I had to make was the thread. I stuck with my favorite FilTec Glide. I love how this thread shines and how easy it is to work with. I wanted to do the subtle color change of the original picture, so I chose a black and a dark gray for the quilting:
I always choose my threads by unwinding a bit and laying it on top of the fabric. I don't pool the thread like some people do because I want to get a sense for how a single line of quilting will look on the fabric. (Note that the quilted line will be slightly darker than the line you get when laying the thread on top of the fabric because the quilted line makes holes in the quilt that create shadows that darken the quilting line slightly.)
Now that I had chosen my supplies, I could get to the business of making the quilt. First step was to transfer the image to the fabric. I use a lightbox:
And transfer the lines using a blue water-soluable pen:
Turning on and off the lightbox makes it really easy to check for missed lines.
Next I needed to sandwich the quilt. Even though the colors don't go with the front of the quilt at all, I decided to use a breast cancer fabric for the backing since that seemed most appropriate:
For small quilts like this, I like to use basting spray to hold the layers together:
(For bigger quilts, I generally pin baste since it's hard to deal with the layers on a large quilt without help and I feel like the pins hold things more securely for me.)
Now for the fun part -- the quilting! I started with the black thread. I was afraid of accidentally quilting with the black outside of the butterfly boundary, so I started by quilting the boundary and then filled in the middle:
(If you look closely, you might be able to see the little blip at the bottom on the left side of the butterfly where I accidentally followed a line in the heart instead of the butterfly line, but it was subtle enough that I decided to leave it when I found it.) I didn't quilt the antennae at this point because I wanted to make sure that they were quilted over the heart rather than under it.
Then I switched thread to the gray and quilted the heart. Then I switched back to the black thread for the antennae:
It always looks messy to me with the blue markings, so I soaked the quilt right away to get rid of those:
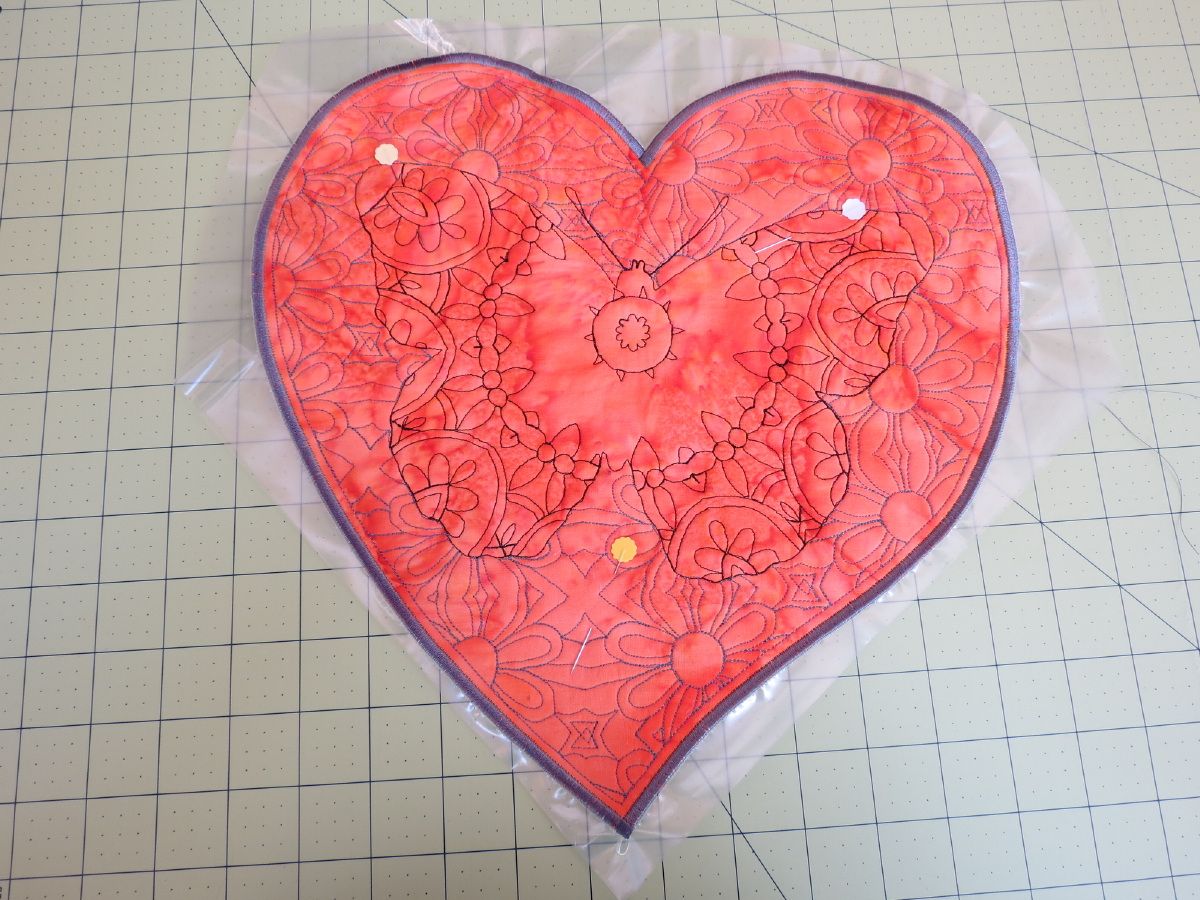
Ahhhh! So much better! I like the way the butterfly subtly separates itself from the heart.
Now I had to make another decision -- how to finish the edges?? I'm always so uncertain about these decisions, but I also like thinking about the possibilities, so I just have to let it sit for a little while I mull things over. I felt a binding would be too bulky for the delicacy of this piece. It would also be difficult to put on around the heart shape.I thought about couching something fun around the edge, but I didn't have anything that would look good and I wanted to get the piece finished so it would get to my friend as soon as possible. So I finally decided to just satin stitch around the edge of the quilt using the dark gray thread.
To start, I just quilted a line a quarter of a inch from the outside of the quilt. This line would stabilize the edge of the quilt and keep the edge from folding under while I was doing the satin stitching:
To quilt this line, I used the echo quilting foot on my Bernina:
I love this foot for quilting around thick areas on your quilt, like around hand embroidery, but I'd never tried it for echo quilting before. It worked great! When I've tried to do 1/4" echo quilting with my regular darning foot, I've had trouble seeing things so my lines would always waver, but the visibility on this foot is great and it was a lot easier to use. Once that line was quilted, I trimmed the heart just outside of the line. (The color of the quilt is more like the above pictures than this picture.)
Then I just started satin stitching around the edge of the quilt. I found that the satin stitching was causing the edge of the quilt to curl pretty severely, so I stopped after 4 or 5 inches and ripped out those stitches. It was clear that I needed to add a stabilizer. I looked through my stabilizers and this is the one that I chose:
This is a heavyweight water-soluable stabilizer. I think that one layer of this stabilizer would have been enough, but I used two layers instead. I wanted to make sure that I didn't have to rip out the stitches again because I was afraid that all of the holes from the satin stitching would weaken the edge of the quilt. Better to waste an extra layer of stabilizer than to have to start over on the quilt!
I just pinned the quilt on top of the stabilizer in 3 places and that was enough to hold everything in place. This time the satin stitching went perfectly!
Since I've only satin stitched the edge of a quilt once or twice before, I wasn't sure how to tie things off neatly. I decided to tie the two threads together on the back:
And then run the thread ends underneath the satin stitching before trimming it off:
I think that's going to hold everything in place well. The last steps were to tear away as much of the stabilizer as I could, and then soak the quilt again to remove the remaining stabilizer. I found that the stabilizer was thick enough that I had to cut it with scissors to get the tears started, but then it tore pretty easily next to the stitching. I'm not sure if I got all of the stabilizer out with the final soaking, but I actually hope that a little bit stayed in because I think that'll help hold the thread ends better.
Unfortunately, after waiting overnight for the quilt to dry, I forgot to take a final picture before putting it into the envelope and taking it to the Post Office. But I think you can see it well enough in the picture before the stabilizer was removed. I did remember to sign the back, though.
I hope you like this little quilt. It was fun to make and my friend was happy to receive it!
Nancy