Sorry it's been so long since I posted. I've been a bit low on motivation and have also been rethinking how to write my blog posts to make them as useful as possible, both to me and to you. I had been doing kind of a weekly status on my current projects, but I was finding it difficult to go back and find information about specific projects with everything mixed up together like that. So, I think I'll be moving towards having my posts concentrate on individual projects with the name of the project in the title of the post. That will allow me to look back through the post titles to find information on specific projects, even if the project name changes along the way. And, hopefully, it'll make my blog seem less like a "what I did on my summer vacation" report and so will make it more interesting for you. I'll still have periodic posts sharing multiple small projects (I have several bags I need to share with you), but I'll keep those separate from the larger projects. I will still try to post frequently enough to both motivate myself to get things done and to keep you from forgetting me, but I'm still working out the balance between posting frequently and having enough progress to make the posts useful so we'll see how that goes.....
I've been thinking a lot about my motivation issues lately. I believe what's happening now is that I have so many different projects that I really want to work on, that I'm having trouble picking which one I want to start with and I end up stalled. So I decided that I needed to start with a small project that I could finish quickly and also help me with my goal this year of trying to push myself to try things outside of my comfort zone or things that expand my skill sets.
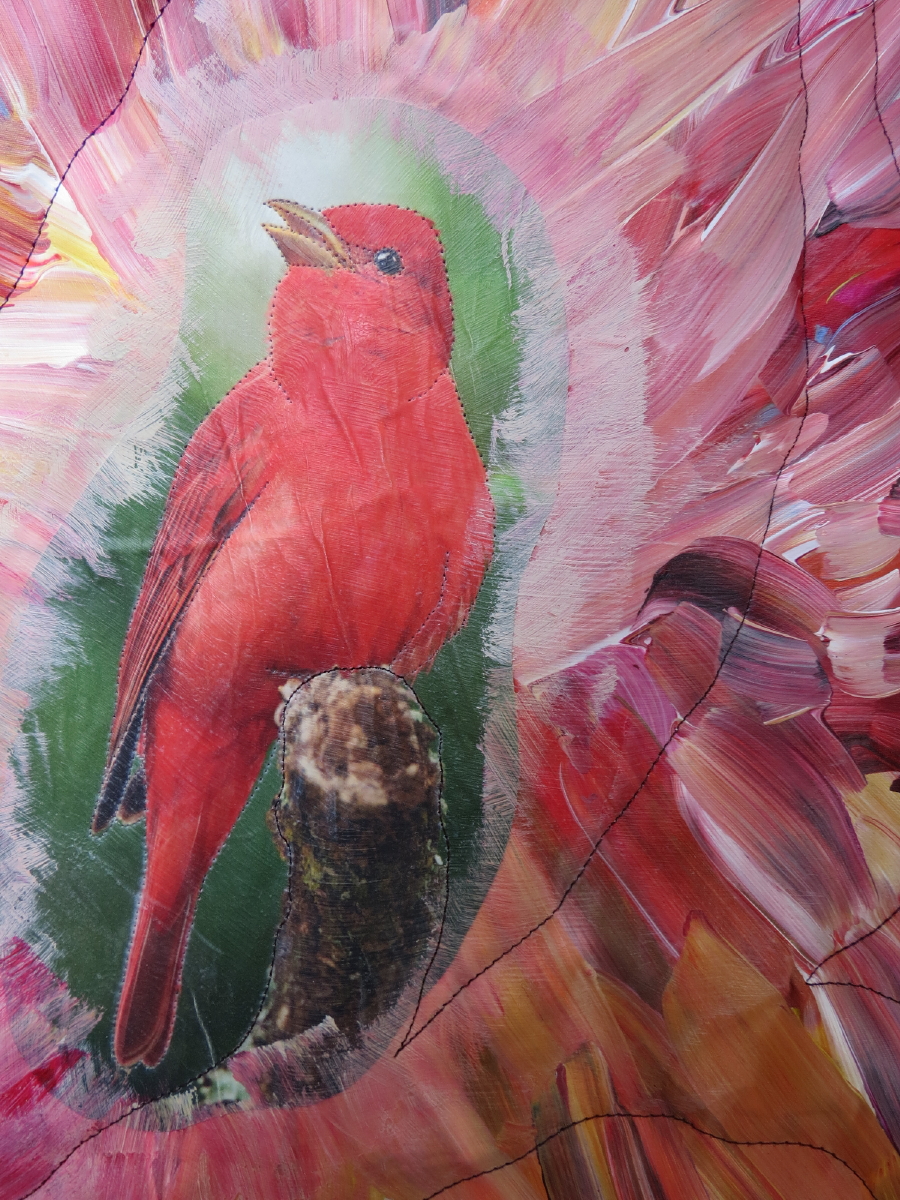
I decided to start by finishing a little piece that I started on a sew day with friends last year when we decided to dabble with paints. That day, my friend, Cathy, brought supplies so that we could play with a technique that she found in Quilting Arts magazine. It was basically decoupaging on fabric. She painted some muslin pieces with acrylic paints ahead of time so we would have backgrounds to use, and brought the supplies and some magazines that we could cut pictures out of. Here is the piece that I made that day:

To be honest, this piece didn't completely appeal to me, but that made it a good opportunity to see if I could improve it with quilting. And it allowed me to play with quilting a painted piece and use a non-traditional binding. So it was a really good piece to start with!
When I had first been thinking about the quilting, I was thinking about highlighting the kind of sunburst affect coming out from the bird. So I was thinking about straight-ish lines radiating out from the center. But the more I thought about it, the more I realized that that was what I didn't really like about this piece. That, and the piece was just too red. So I decided that I needed to come up with a way to tone down the red and the radiating feel of the piece.
Before I could do anything, I needed to make my quilt sandwich. I wanted to make the bird puff up as much as possible, so I decided to use a double batting with a puffy polyester piece on top of a stabilizing cotton piece. I wasn't sure if the bird would be able to puff up with the layers of paint, magazine page and decoupage medium on it, but I wanted to try. I knew I couldn't use pins to baste it because the holes in the paint wouldn't heal, so I used spray baste to hold the layers together. It turned out to be tough to find a time during that windy period when I was preparing this when I could spray the pieces without them blowing away, but the weather finally cooperated! After spray basting, I went ahead and sewed around the edges of the piece with a basting stitch to keep everything more secure. I used a basting stitch so I could easily remove the stitches if I needed to release some puff at the edges.

Now it was time to think more about the quilting. Of course I wanted to stitch around the bird to make him stand out, so I did that with invisible thread. As I looked at the piece some more, I started to see the darker streaks in the background and how they could be used to define the tree that the bird is sitting on. I didn't think it would be wise to try marking my lines before quilting, so I looked over the piece and traced out the branches with my finger to try to get the shapes in my head, then just went for it. There's going to be no removing stitches with this quilt because those holes will never go away!

So far so good. Now I needed to fill the branches with bark. The quilting needed to be fairly tight to both flatten the areas around the bird as much as possible and to lay down a lot of brown thread to help calm the red paint. Luckily, trees are not perfect so my quilting didn't have to be either.

I was liking it more and more as I went along.

After filling in the branches, I needed to figure out what to do in the rest of the background. Since the bark quilting was pointy with long lines, my first thought was to quilt blue swirling lines in the background to represent the sky and to contrast with the lines in the bark. But it wasn't feeling right to me. I thought about it for a while and realized that what was bothering me was the green background of the red bird picture. The blue sky quilting would fight with the green picture background so what I really needed to do was some sort of leaf quilting.

I decided to use a pointy leaf shape, even though the points were a lot like the points in the bark, because I felt like that shape would fit together better than any other leaf shapes I could think of. I added a vein line down the centers of the leaves to lay down a little more thread. I think it worked pretty well.

I really liked what the thread was doing to the picture so was pleased with the results of the quilting. And I was really happy to be done with quilting on the thick acrylic paint! I only had a few thread breaks while quilting (and, surprisingly, none of them were when using the invisible thread), but the sound of the needle going through the paint was like a helicopter hovering over my head. And my arms would buzz from the vibrations every time I took a break! I also had to work hard to tame the puff of the batting in the background, even though the layers of stuff over the bird made that area not puff up very much. But I really liked the result!
Now I wanted to come up with an edge finish. A satin stitch was the obvious choice to deal with the stiffness of the piece. What I decided to try was to start with a narrower, tight satin stitch to control the edges and create a frame for the piece, then go over it with a wider, looser satin stitch to create little jaggies on the sides of the first satin stitch. These would be in brown thread to give the piece a nice frame. Then, I would whip stitch around the edges with a green perl cotton to give it some color. To start, I drew the edge with a Sharpie marker. I figured this would be okay since it would be hidden by the stitching.

Then I stitched the first round of satin stitch.

Then I trimmed the edge of the piece.

When trimming, I decided to be lazy and use the rotary cutter on the straight edges. This worked fine at first, but then I got bold and decided to trim a little closer on one side and, of course, the ruler slipped a little and I ended up cutting some of the stitches. Bummer!! After using a few choice swear words, I decided that I could just use a little glue to hold the stitches in place since I was going over it with another round of stitching and that ended up being fine. But, lesson learned, it's better to spend the extra time and cut carefully with the scissors! So I did the second round of satin stitching and then added the perl cotton.

Overall, I'm pretty pleased. If I use this edging again, I will make a couple of changes. First, I would go around the edge with a narrow satin stitch like I did for this one, but I would follow that by another round of tight satin stitching after cutting the edge to seal the edges. I thought I wanted the wider, looser satin stitch to create jaggies on both sides of the original satin stitch, but you couldn't really see the jaggies on the outside edge and the unsealed edges of the quilt were a bit sloppy looking, so I think that would have been better. The jaggies on the inside of the quilt, however, were nice but wouldn't show up much in a picture so you'll just have to imaging it yourself. And I do really like what the whipstitching added to the edge, so I'm pleased with that.
That's about it for this piece. We had another sew day yesterday, so I gave this quilt to Cathy who had painted the background and introduced us to the technique. She's also a bird watcher so really appreciated it.
Nancy