Saturday, January 30, 2016

Ribbon Candy

Hi all -

As usual, I've been a bit scattered working on lots of different things lately. Since this is a quilting blog, I'll start with the little bit of quilting I've done. I'm caught up with all of my obligations, so now I'm back to working on my own stuff. The project I chose is my Jacqueline De Jong quilt which I'm currently calling Let the Sun Shine. As a reminder, this is what the top looked like before I started quilting:


I'd also already finished the SID and done some of the background quilting in the blue. I'm basically tackling the quilting as the spirit moves me, with no overall plan. So, the next piece that piqued my interest was the orange "narrow" borders. While I was piecing this quilt, these borders struck me as being too wide and bulky for the rest of the quilt. I thought about redrafting the pattern to make these thinner, but I didn't feel like doing all of that work, especially with one of the borders being round. Instead, I decided to de-emphasize the borders with the quilting. So I started by quilting lines 1/4" from each edge of each border. This was easily done with the feed dogs up using my 1/4" even feed foot. Then I filled the middle channel with ribbon candy. I don't know about you, but it's really fun for me to watch the dense quilting flatten the desired areas of the quilt when using fluffy batting:


My ribbon candy quilting isn't as smooth as I would have liked, but I love the overall effect:


The quilting is much more effective that it looks in the picture, but you might get a better idea of it if you click on the picture to enlarge it. And here is a close-up, in case that helps:


I'm in a bit of a motivational slump so that's all of the quilting I've done lately. But I've gotten a lot of knitting done.

First, I decided to use some bulky yarn that I got on sale. I looked through the patterns on Ravelry and found this hat pattern:


And a nice cowl to go with it:


Of course, poor Lance has to show us how to wear it:


And I made another hat that I decided to mail to a friend:


I loved this pattern and this yarn so I'll probably make a few more of these. It looks blue in the picture, but this hat is actually green.

Finally, I blocked the scarf that I shared with you in my last blog. I'm new to knitting and this is the first time that I've blocked a piece:


It looks SO much nicer blocked! So you don't have to look back, here's what it looked like before the blocking:


Such a difference!

Well, that's it for now. We've had some incredibly wonderful weather lately, but that's ending now. There's a storm just starting up that could dump a bunch of snow, depending on the path it ends up taking. We'll see how it goes.....

Nancy


Sunday, January 17, 2016

A Couple of Mug Rugs

Hi all -

Sorry it's been so long since my last post. I continue to feel better and haven't had to use a cough drop since Friday, so that's great! The little coughing I still have has been managed by water and tea. My stomach is very happy about that!

I've even started a little bit of quilting. I wanted to start with a couple of mug rugs that I promised to some online friends. For the first mug rug I thought back to a quilt in a magazine that I wanted to make sometime. It's a pieced Sunbonnet Sue-type block. I looked through my magazines and found the pattern in an old Quiltmaker:


I had actually thought the block was paper-pieced, but the pattern uses templates and I would have had to add a lot of lines to make a paper-piecing pattern. The block in the magazine was 10" square, but I wanted something smaller so I started by reducing the templates by 80%:


Of course, this also reduces the seam allowance so I then had to trace the piecing lines and add the 1/4" seam allowance back:


I went ahead and traced complete templates for every piece in the block, including 2 A templates since the block uses two of these. My idea was to print the templates onto some Quilter's Select Print & Piece Fuse Lite, fuse them to the back of the fabric and then piece them. The Print & Piece Fuse Lite is a product that can go through your printer, has a light fusible on one side and is partially water-soluable so should be fine when left in the project. Since this block has some complex pieces, I thought this product would make the cutting easier, keep the fabric stable while sewing and have all of the match points already marked for me. As I went to print from the traced templates to the Print & Piece Fuse Lite, I realized my first mistake. The tracing paper I used was 9"x12" while I was assuming it was 8.5"x11" so some of my templates were cut off a bit when I copied them:


Oh well, all of the sewing lines were still there so that was fine. I cut around the templates and fused them on the back side of the fabric:


Then I cut out each piece aligning the sewing line with the 1/4" line on my ruler to make sure I had my seam allowances all right:


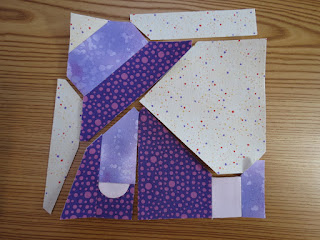
Then I just had to do the piecing. If you look back at the picture of the pattern, the only piecing instructions were the little block diagrams to the left of the quilt picture. The first thing I had to take care of was the hand, which is appliqued on top of a square. I didn't get any pictures of the process, but what I did was trim the hand template on the sewing line around the curve. Then I fused the template on the back of the hand fabric, ran a line of glue stick on the stabilizer around the curve, folded the fabric onto the glue and used the iron to smooth it out and activate the glue. Once I had this done, I glued the hand on top of the appropriate fabric square and just left it like that. My plan was to stitch the hand down while doing the quilting. This worked really well. Here are the pieces of the block laid out after sewing some of the simple seams before any of the many set-in seams:


The first set-in seam I did was sewing the large background piece to the leg and dress front. I just took it one seam at a time and it went together easily:


The stabilizer really made the sewing easy and the lines made matching the points a breeze:


I continued on with all of the seams until the whole block was pieced:


Then I just had to sandwich it, do the quilting and add the binding. When picking out the binding fabric, my first thought was to use the dark purple. I realized that I have a tendency to always bind with the darkest fabric in the quilt, which tends to be a good choice but is also very predictable. I didn't think I would like to have the dress merge into the binding so I decided to bind it with a brown that would look kind of like the girl is in a frame:


I think it turned out very nice. I was going to soak the mug rug at the end to break down the stabilizer, but it actually feels good with that extra stability so I decided to leave it as it is.

For the second mug rug I got out a bag of hand-dyed raw silk that I picked up from another quilter in November. I'm lucky to live near Lynda MH Faires, a quilter and teacher, and she had a bunch of cool supplies in a quilter's garage sale. I had actually missed her sale, but heard about it from a friend and had a class with Lynda in Houston and she invited me to stop by and go through all of the stuff she had left. I went crazy and will try to remember to post pictures of all of my wonderful silk scraps in a future post! Here's the bag of raw silk that I was working from:


It's so gorgeous and has such a wonderful texture! If you can see the little label, I actually got this whole bag for just $1. I decided to do some improvisational piecing. I wasn't sure if the raw silk would be difficult to work with, but it really was no problem to work with. I used a 3/8" seam allowance, just in case, and here's what I came up with:


For the quilting, I decided to follow the modern movement and do some walking foot quilting using a curvy stitch. This is a stitch that I've wanted to use for years, but didn't have access to it until I got my new machine. I used a nice variegated 50-weight silk thread that I found in my stash. Unfortunately, I don't remember where I got this thread because it's beautiful and sewed like a dream. I'll be keeping my eye out for more in the future:


Now I just have to decide how I want to finish up the edges.

Besides the quilting, I've also been doing some knitting and tatting. These were nice projects to work on while I was sick and couldn't sit at the sewing machine without coughing my lungs out. Here's the first scarf I made:


This is a nice, light scarf that can be worn inside and outside. It was nice to wear while I was coughing. Here's my runway model showing you how fashionable it looks:


And here's my second scarf, which I just completed this week:


Although it looks nice now, I think this one will look better once I've blocked it. Here it is on my beautiful and patient model:


Finally, I've also been doing some tatting. I originally taught myself to tat from books about 20 years ago. I was curious about tatting because it's such a common crossword puzzle clue. I made a few things, then just kind of forgot about it. Then I found some tatting in my mom's stuff and also saw some tatting classes on Craftsy, so I decided to pick it up again. The first thing I made was a pair of earrings:


I still need to add the hardware and they should probably be blocked, but they aren't bad. I've also started making a necklace:


I just got to the step where I need to add a bigger bead, but realized that I don't have a crochet hook thin enough to go through the hole in the bead, so I'll need to wait for my new crochet hook to arrive before I can continue work on this piece.

That's about it. I was feeling like I haven't been accomplishing anything lately, but I feel better now that I have it all down on "paper."

Hope you are all having a great week!

Nancy

Saturday, January 2, 2016

Happy New Year!!

Hi all -

Sorry for the silence. I did get all of my Christmas projects done, then rushed to get everything packed and make my way to Kansas City. I got a hat knitted up for my nephew before hitting the road:


I actually knit this hat twice. This is the first version made with thinner yarn so it ended up being a bit too small. I knit another version with thicker yarn and that one came out just right. I thought I had taken pictures, but I can't find them now so this one will have to do. They were both in the same colors so it's hard to tell the difference in pictures. The first hat I'll keep in a bag that I will hopefully fill with hats, scarves and mittens that I can donate to the homeless shelter. I've never knitted with two colors before so I'm really happy with how this one turned out.

I also finished my sister's quilt, but didn't get any extra pictures myself. The only added quilting was a wave design in the narrow border to nail that border down a bit. Here is a picture of the quilt on my sister's bed that she took for me:


She and her husband were VERY pleased! Greg was especially pleased that the bedroom walls go with the quilt so he doesn't have to repaint! Everyone else also seemed to like their handmade gifts, so I was really happy. My niece's are pretty stylish so I never know if what I make is cool or lame. (But I'm not sure if they would tell me if they were lame, either.)

We got our traditional picture of the dogs in front of the Christmas tree and all of the presents:


They are all so sweet and cute! From left to right we have Winnie, Lance, Brutus and Vada. Lance is mine and the rest belong to my sister Linda. We were also able to get a picture of one of my niece's:


Isn't she beautiful? This is Kelsey, the Respiratory Therapist who graduated from college in 2014. She and another niece, Terra, who is a nurse, had to work 12-hour shifts on Christmas night so they celebrated with us then took naps and ran off to work. Terra had also worked the 12-hour shift on Christmas Eve. Their stamina amazes me!!


I had a good visit with my family. At my good friend Renata's suggestion, my sister and I went out for Chinese foot massages. They were incredible! We went to Long Life Foot Massage in Olathe, KS. Their definition of "foot massage" is to soak your feet in hot water while they give you an ear/scalp massage then a hand/forearm massage. Then they work on the feet and calves. When that is finished, you go into a private room for a shoulder/back massage. Incredible! And the prices are great: $40 for 60 minutes; $60 for 90 minutes. We went for the 60 minute at the beginning of the week to check them out, then went back for the 90 minute at the end of the week since I ended up staying an extra day because of the weather.

I also got to have a really pleasant lunch with my friend Janet, who also lives in the area. We went to Bo Ling's, my favorite Chinese place in the area. She's so much fun to talk to -- we ended up chatting for a couple of hours again. It's so much fun getting to meet up with our online quilting friends!

The unfortunate part of the trip is that I got sick again. It started off as a bad sinus headache and some soreness of my throat on Christmas day, and, as usual with my asthma, moved into a bronchitis that I've been battling ever since. It was starting to get better at my sister's house, but the long drive home to a literally freezing house pushed back the healing a bit. Yes, my boiler died while I was away and the temperature in the downstairs part of my house was just 36F when I got home. Upstairs was even colder with the pet water dish and the toilet water frozen solid. I got the pellet stove lit, but it took many hours for that to heat up the house. Since I have the pellet stove, I decided to wait out the holidays before calling a plumber in to see if he can fix it, so hopefully I can get someone out next week. I left a voice message for one today. Hopefully, he'll be able to understand what I said since I also have laryngitis now. That just keeps things interesting.

As you've probably guessed, I haven't gotten anything creative done since I've been home. I've just been concentrating on sleeping whenever my coughing fits allow me to get some rest. But I should be able to start up again soon and will hopefully have something fun to show you next week.

Hope everyone had a wonderful holiday season!!

Nancy