Sunday, January 27, 2019

Project Bag for Project Bag Projects

Hi all -

As you know, I've been really enjoying making knitting project bags lately. Two of the projects that I forgot to share last week are project bag kits from Sue Spargo. I had seen these bags somewhere online before I went to Houston and had planned on picking up the kits while I was there. But there was a problem -- Sue Spargo didn't have her own booth at Houston this year so I didn't know where to get them. Late in the week I mentioned this to a friend who is a Sue Spargo fan and she suggested that I check the Wonderfil booth since they work closely together. So, I went to the Wonderful booth on Sunday and found out that Sue's family had been in the booth earlier in the week selling stuff, including both of those bag kits, but they had already gone home so I had missed them. I was bound and determined that I wanted these kits, so I logged into Sue's web site and ordered the kits online while I was still in Houston so they would arrive soon after I got home. Now I just have to make the kits!

I had started both kits before my last blog post, but forgot to include them. At that point, I had sewed together the backgrounds for each bag. Here is the background for the Swag Bag kit:


And here is the background for the Birds on Parade Sac kit:


This is, of course, the quick part of her projects! The next step is to attach the applique. I got this done on the Swag Bag:


The next step is the embroidery. I was going to start the embroidery on this bag, but then realized that I still have a Road Runner Needle Roll kit from the year before at Houston that I need to finish, too. It makes sense to finish this one first, so I went back to that project and did some more embroidery:


I just have to do the embroidery on the orange circles and then I'll be able to sew everything together and finish this project.

Now we get to the interesting title for this post. With all of the handwork in these Sue Spargo project bag kits, I really needed a project bag to hold these projects so I could keep everything together and take it easily wherever I wanted to work on it. So, I had to make a project bag for project bag projects. I decided to use my Finch Bag pattern again since this is a big bag and would have enough room for all three of these projects along with all of my threads and other supplies. I looked through my stash and found some beautiful fabric that I've been wanting to use for a while, that also had colors that matched the colors in my Sue Spargo projects. I really love how this bag turned out!!


To add to the fun, a friend of mine, who is also a knitter, had her birthday this month. I decided to make a project bag for her, too. She's a big dog lover, so I looked through my stash for some dog fabric that I thought she might like. Here is the bag I came up with:


I'm loving this bag, too, and might have to make one for myself out of this fabric! Since I'm the queen of WIPs, I know there are a lot of project bags in my future.....

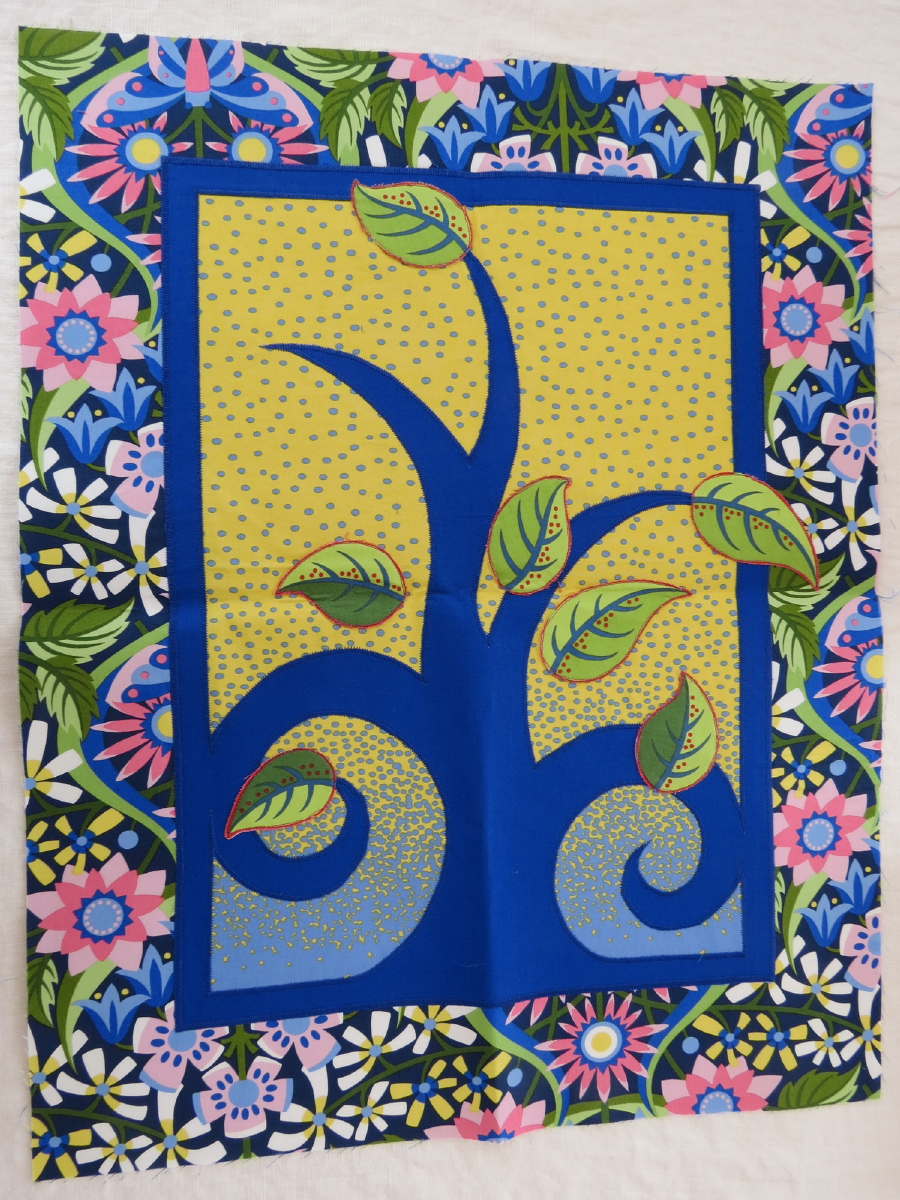
Moving on to something else, my Houston classes post caused me to pull out my Tree of Life project from my Jane Sassaman class. This is a fun project that I should be able to finish fairly quickly. I was able to finish the next step on this project, which is getting all of the appliques attached:


Here's what the back side looks like with her method:


In case you can't tell from the photo, you apply the appliques in layers, cutting out the background from each applique before proceeding to the next layer. So you end up with a single layer throughout the whole quilt. Since her method has you cut out a bunch of shapes and then placing them on the background to see what you like, I had ended up with an extra flower cut out from class. So, you guessed it, I decided to also make a project bag using Jane's technique. Since I had all of the supplies out and had my machine settings for the satin stitch, I decided to get started on the bag even though I haven't finished the wallhanging. I started by sewing together a couple of pieces of fabric for the background for each side of the bag, making these a little larger than I'll use for the final bag so I can trim the pieces to size and not have to worry about any shrinking while I play with things. Since the background includes fabric that will end up on the bottom of the bag and I had that extra room for slop, I drew lines on the backgrounds to indicate where I needed to confine the appliques:


I measured these lines based on the amount of slop I added and the planned size for the boxed corners of the bag. I had to be careful to honor these boundaries on the bottom part of the bag, but could go over the lines a bit on the top since the top of the bag isn't boxed. I then chose some more flowers, leaves and butterflies to applique to the bag and arranged them in a pattern that I found pleasing:


I got all of the appliques attached and added embroidery for the butterfly's antenna. I've also fused some fusible fleece to the back of each side and now I have to decide if I'm going to do some light quilting to the sides or if I'll just assemble the bag as is. I think either way will be fine since the bag isn't large. Then I'll get back to finishing the wallhanging. I'll have some decisions to make there, too. I really like how the embroidered antenna look on the bag piece, so I have to decide whether to embroider the antenna on the butterfly on the wallhanging or quilt the antenna instead. Also, do I want to add more embroider to the wallhanging? I'll have to see how I feel when I get back to that, which should be soon.

I've also continued to work on my knitting. In my last project-based post, I'd shown a Brioche hat that I'd started to knit. I've finished that project now, but not before making a big mistake. I use a knitting app on my iPad called knitCompanion. This is incredible software where you can load your pattern PDF and then program things so that you click a button after each row and it highlights the next pattern row so you can step through the pattern with fewer mistakes. There are several sections to the hat pattern that have instructions that you step through and I programmed all of those like you are supposed to. However, there was also a "hat body" section to the pattern that has you just knit until your hat is a certain length. I'm still learning the app so I'm not sure how you're supposed to put that type of instruction in, so I decided to just remember it. But when I got to that point in the pattern, I forgot about the hat body and skipped that part. It was so stupid because even while I was doing it I kept saying to myself that this can't be right and this pattern sure is going to make a weird hat! But I ignored my inner voice and just kept on until I had finished my "Brioche Yarmulke":


Pretty funny, huh! Well, I put this aside and made a new one actually following the Brioche Shapka pattern as written and I really like those results better!


Another project from last time that I've continued to work on is my Framed scarf:


As you can see in the picture, I finished my first skein of yarn and added my second. Even though this is the same yarn, the first skein has a lot more brown in it. This is common in hand-dyed yarn. I didn't see any difference in the skeins before knitting, but there is a big difference in the knitted yarn. But I'm actually okay with this. This scarf is knitting up really soft and spongy and the colors are beautiful. I think it'll look kind of neat to have the two (and maybe three since I'll probably have to add in a bit of a third skein at the end since I added the second skein right before the middle of the scarf) ends look different.

Finally, I have another knitted project I've been working on. My current favorite online yarn supplier is Jimmy Beans Wool. They have an incredible selection of wonderful yarns and their customer service is wonderful. This is the company for the Craftvent project (the shawl) that I worked on over Christmas. They also have different clubs that send you yarn or projects or parts of projects each month. I've signed up for two of these clubs this year: one that is a year-long club that sends you monthly installments for a shawl that will be finished by the end of the year, another that sends you monthly installments for mystery projects that take three months to complete. I haven't received my January shawl installment yet, but I did receive the mystery project installment:


Our January-March 2019 project is the Moxie cowl by Marinda Lariz knit in blue, white and grey yarn. This is going to be a really cool project because it consists of all sorts of stitches with all sorts of textures. Here's the first month finished:


And here's a close-up of some of the texture:


I am really enjoying knitting this project! I love all of the different stitches -- you definitely don't get bored! And the yarn they chose is really squishy and wonderful to work with! Jimmy Beans did make a mistake and didn't send enough of the white yarn to finish the first month's instructions, but all I had to do was send them an email and they immediately sent me some more yarn so I could finish. A lot of people had the same problem, so it was their mistake and not mine. After I requested my yarn, they also announced that they will be sending out extra yarn to everyone in the next monthly installment to make sure that everybody has enough yarn to finish the project. I really like them!

Well, that's all I've been working on. I hope you are working on something fun, too!

Nancy

Sunday, January 20, 2019

Houston 2018 -- Classes

Hi all -

This is a bit late, but, finally, here is  my post about the classes that I took in Houston. I decided to take it easy this year and only took 4 classes. This was partly to give me more time to enjoy the show, take pictures of everything and spend some time with friends that I don't see anywhere else. I'm also getting more experienced with the show and have a better idea of which days I might want to spend in the classroom. Without further ado, here are my classes from 2018:

Tree of Life with Jane Sassaman, Mon 9-5

I love Jane Sassaman's work and I was really looking forward to a fun day of playing with her technique and looking at her art.Her style is just so appealing to me! Last year I took her class on drawing abstracted flora images, so this was a good next class for me.


In getting ready for the class, I had a tough time going through my fabrics to find things that might be appropriate for this project. I really wasn't happy with my choices, but I brought them anyway to have a starting point. Jane brought a bunch of fabrics for us, so I ended up buying new fabrics from her. With her fabrics, I could concentrate on learning her technique rather than stressing over whether my choices worked together.

In this class, we worked with Jane's Tree of Life quilt pattern. There were actually 5 or so versions of the pattern that we could choose from. Here are a couple of her class samples:


I really enjoyed this class. Jane is a very sweet and talented lady and is really fun to listen to. Her technique is fun and works well for these types of quilts. Here is what I got finished in class:


And here are the rest of the appliques I prepared in class and where I planned on placing them:


I'll probably pull this project out pretty soon so I can finish it up.

Sheer Irises with Esterita Austin, Tues 9-5

My Tuesday class was Sheer Irises with Esterita Austin. Esterita is a very talented artist and a very funny lady. I took her animal portraits class last year (I really need to pull that project back out and finish it....) so thought this would be a fun class to take this year. Esterita's background is in painting and she has found a technique for using sheers to mimic the effect of water colors. It's really pretty cool what she's done!


Esterita started the class with a slide show explaining the technique and showing some examples of what can be done with sheers. Then she demonstrated the technique so we could see it up close. Finally, we were given a class kit containing the line drawing you see on the screen above, an inspiration photo and a bunch of sheers to use for our own work. Here's the class sample that she brought:


And here's what I got done in class:


I thought the class itself was very good, but I really hated the classroom setup. For this class, she pushed two of those banquet tables together and put 6 people at each pair of tables. She had 3 or 4 mini irons to share at each table, which was really nice compared to the iron situation in most of the Houston classes, but it was really hard to arrange your supplies in any useful way in a space that was maybe 2.5'x2.5'. I ended up leaving early, when I got to the point where I figured I had heard everything she was going to say, because I just couldn't handle that cramped situation.

Painting with Needles -- Possibilities of Free-Motion Quilting with Noriko Endo,Wed 9-5

I'm also a big fan of Noriko Endo's work and this is the first of her classes that I've taken. I really want to take her mosaic class sometime, but I'm a little scared since a friend took it and she had to draw her own image in class to use for the technique rather than being given an image to use by the teacher. I would rather use an image designed by the teacher in a technique class. But I will pull up my big girl pants one of these years and take that class from her.


Anyway, this class sounded like it was just up my alley. Based on the class name and the description, I thought it would be a class about a technique that was some combination of free-motion quilting and thread painting. The supply list also sounded like that would be the class since we brought a quilt sandwich and some threads. Actually, this was a class about free-motion quilting and painting with paint and Noriko supplied the paints. Here is Noriko's class sample:


And here is another example of hers that I find a bit more appealing:


For our class project, Noriko had hand-drawn the face and wild hair on Golden Threads paper for each student. Wow! I couldn't believe she did all of the work! Each drawing had the same face, but there were differences in the hair as that part was supposed to be used just as an inspiration anyway. We pinned our images to our quilt sandwiches and then quilted the face lines and the main lines in the hair to give us a framework to work from. We then tore off the papers and embellished the framework with free-motion quilting. It was so amazing to me that she drew so much detail on each of these papers and we were to just throw away most of it. I'm pretty lazy so if I were her then I would have just drawn the lines that she wanted us to quilt rather than drawing all of that. But it was nice to see the details.

This is what I got finished in class:


I was pretty pleased with it considering it was done on a different sewing machine than I'm used to and considering that it was done with a 100 wt needle in the machine. It's really hard to quilt details with such a big needle!

I think that this was probably a good class for most of the students, but wasn't the best fit for me. I didn't feel like I learned much or got much out of the class. But I did like Noriko a lot and definitely plan on taking another class from her when I have the chance!

Sheer Faces with Esterita Austin, Sat 9-5

When signing up for my classes, I decided to take Esterita's Sheer Faces class on Saturday even though I was also taking her Sheer Irises class on Tuesday. I hesitated about this, but I really wanted to take classes on Saturday when the show would be crowded, but I was a lot more interested in the Irises class than the Faces class, so I just ended up with both. As you would expect, there wasn't much difference in the classes, besides the actual project that we worked on.


The class was set up the same as the Irises class. We went through a slide show much like the one used on Tuesday and she also gave us a hands-on demonstration. Both of these were very useful and I got more out of it the second time through, as you would imagine. But by Saturday I was tired and experiencing sensory overload, so I really couldn't handle the classroom situation and left even earlier this time. Here's what I got done in this class:


I do think that both of the sheer classes are good, but I wouldn't suggest taking both of them. Also, if you have the opportunity, I would take these classes somewhere other than Houston (or probably any quilt show). These classes would probably be wonderful in a guild setting or something like that where you might have some room to spread out.

Nancy

Sunday, January 13, 2019

Project Bags and Knit-Along

Hi all -

It's time for my first progress report. What I've been working on most lately are knitting and knitting project bags. For my birthday last August, I treated myself to several knitting project bags from different Etsy sellers. I really love fun project bags and, being the queen of WIPs, I need a lot of them! I've been wanting to make some of my own since then, but I was too busy with Christmas stuff to take the time so I had to wait until after the holidays. Well, that time is here and I've got my first couple of project bags.

My first bag is a zipper bag like the ones I had purchased. I decided to base this one on my sister, Sue, to hold the yarn that I purchased for some mittens I'm going to knit for her for next Christmas. To remind me that this is a project for her, I chose some Paris fabric that I had used a couple of years ago to make a sewing notions bag for her.


I really love this fabric and how this bag turned out! I used a matching fabric for the lining.


For the zippered bag, I didn't put any pockets inside because the bag is pretty small and I don't think pockets would be useful. But I did add a lobster clip that can be used for keys or for a small notions pouch to keep them handy. I'm guessing this won't really be useful for this type of bag, but it didn't hurt to put this in to see if I like it.

For my next bag, I used the Finch Bag pattern by Stitch Mischief. I had seen this bag on one of the Grocery Girls video podcasts and wanted one for myself. My other sister, Linda, requested a snood for Christmas next year so I made this bag to hold the yarn I purchased for that project. Since she's a dog lover, I used some of my fun dog fabric for this bag.


The inside of this bag does have pockets and I added the lobster clip here, too.


The base of this bag is an ultrasuede-like fabric but the rest of the fabrics are quilting cottons.

Then, just for fun, I decided to make the Little Finch bag that also comes with the pattern. I wanted to see how I like the two sizes. For this one, I just picked some Tula Pink fabric that I really like.


I haven't added the rope to the top of this bag yet because I ordered some gray rope that I think will look better than the white rope that I used for the other bag. Without cinching, the fuchsia fabric of the casing is a little strong, but I think it'll look better once the rope is added and it is closed. The inside is just like the other Finch bag.


I used some more of the ultrasuede-like fabric for the base.

To finish out the sewing that I've done, I also made a Christmas gift bag for the gift that I already bought for my sister for next year:


I thought of a gift that I think will be perfect for her, so I wanted to get it now before I forget about it. So, scary as that sounds, I'm already getting ready for next Christmas! I hope to continue to work on Christmas throughout this next year, especially making the gift bags as soon as I have the gift. This will reduce some of the stress right before Christmas. This past Christmas, I had to make 20 gift bags at 2-3 hours each right before Christmas and that was pretty tiring! I got a couple of the bags back so I can reuse them next year, but I can't really make the bags ahead of time because the gifts have to fit inside of them.

Now on to my recent knitting. For Christmas, I bought myself the Craftvent calendar from Jimmy Beans Wool. The Craftvent calendar is an advent calendar that gives you a piece of a project every day in December up to Christmas. It comes in a really nice box with a drawer for each day:


This is a really nice box and I need to figure out how I can reuse it! The project this year was the Get Together Shawl by Joji Locatelli (sorry, I can't supply a link because the pattern isn't generally available yet). I kept up with the project on the appropriate days up until when I left to visit my family in Kansas City. I finished the rest of the project when I got back home. I still need to block it and trim the yarn ends, but here are a couple of pictures of the shawl:


I'm going to keep this shawl for myself and use it when sitting on the couch. Since menopause my body temperature tends to fluctuate a lot so this will be good for pulling on and off of my shoulders as I get hot and cold. The pattern has optional tassels on the points that I decided to forego since those might be seen as cat toys by my cats, and that wouldn't be good! I really love the feel of this shawl!

Another project I've been working on is the Framed scarf by Susan Gater. This is a free pattern available on Ravelry. I started this project while I was in Kansas City. When I travel, I just bring some interesting yarn with me, then when I'm ready to start something I look through patterns on Ravelry and start something that appeals to me at the time. I had been thinking of making the Brioche hat that you'll see I've started below, but I wasn't feeling well and I wanted a simple project so I started this scarf instead.


This has been a really nice project for when I need some mindless knitting. The only place where I have to pay attention is one place in the pattern where there is a yarn-over followed by a slip-1-with-yarn-in-front. With this combination, you basically have to wrap the yarn around the needle twice, but I've only wrapped it around once several times. It's not noticeable in the pattern, but it throws off the stitch count so I've added increases where needed to get me back to the proper count. No one will ever notice this.

Finally, I've also been participating in Laura Nelkin's knit-along. For the first quarter of every year, Laura has a knit-along where you knit any of her patterns and you are eligible for prizes. This is really nice because you can start new projects or you can finish up WIPs that you have sitting around. She also has sales on her patterns at different points through the knit-along. Since I lover her patterns, this is perfect! There are weekly prizes just for participating, even if you don't finish anything. And there are extra prizes for finished objects. And there is a big prize for a specified group of projects. This year the big prize is for making one of each of the following:

  1. A project with beads (I'm doing Lolatude for this)
  2. A project for charity (I'm doing Brioche Shapka for the homeless shelter for this)
  3. A sweater (I'm planning to make a Baby Novus for this)
  4. A project for an appendage -- foot or hand (I'm planning to make Princess Lola socks for this)
Lolatude was the Lola's Choice project for Sept 2018. At that time, I was too busy with getting ready for Christmas to work on this so I was happy to start it for the knit-along. This is a shawlet knit from a mini sock blank. Here's what we got in the kit"


A sock blank is undyed yarn that is knit (generally by machine) and then painted, stamped, dyed, whatever to get a unique placement of colors along the yarn. You then pull the yarn from one end of the blank and knit something with it. Here you can see how my knitting is coming off of the left edge of the blank:


This yarn is a little harder to knit with because it is very kinky, but I strangely enjoyed that texture as it went through my fingers. If you don't like that texture, you can unravel the blank and wind the yarn into a ball which will help reduce the kinks. Anyway, I've finished the knitting for this project, with a very small amount of yarn left over since the project is designed to use whatever amount of yarn you have.


Now I just have to fix the stitch I dropped that is being held by the stitch marker in the corner, block it and make the peyote beads that are attached to the short straight edge as a fastener for the shawlet. I'll show pictures when it's finished so you can see how it works.

The other knit-along project I've started is the Brioche Shapka.


This project is a bit of a challenge because I've only done Brioche once before and this is a more complicated Brioche pattern. I did screw up one of the more complicated Brioche stitches the first time I tried it and ended up just ripping everything out and starting over since it was so close to the beginning of the project, but it's going better now. I find the rhythm of the Brioche knitting relaxing, but it does take concentration so I can't work on this when I'm paying attention to anything else. I think this will look pretty cool when it's finished!

Well, that's all for now. We had a really pretty snow this weekend so I'll be needing to get out there and do some shoveling pretty soon. We need the snow so I hope we get a lot more of this soon!

Nancy