Thursday, January 26, 2017

Colorado Skies Finished

Hi all -

This week I was able to knock off another UFO. This one had been sitting around for a couple of years, getting worked on for a while and then being put aside for something more important. It's called Colorado Skies because it reminds me of the incredible deep blue skies you see in the Colorado mountains on sunny days:


This quilt was made from Jacqueline de Jonge's Happiness pattern. I started it several years ago with a group of quilters on The Quilt Show. I was originally calling it Let the Sun Shine and last posted about it here. But I think Colorado Skies is a more appropriate name for it.

When I picked this back up, I had a lot of the quilting already done and just had to figure out more motifs and continue on. So I started with the outer border. The central quilting has curly boundary shapes with feathers on one side and straight lines on the other, so I wanted to continue that into the border. I like the look of quilted swags with piano keys, so I decided to go with that. I started by making evenly spaced marks along each border edge using an expanding sewing gauge. Then I took some circle templates and marked each of the swags. I quilted the swags free-hand, then used Lisa Calle's ProLine 8 ruler to quilt the straight lines:


It always amazes me just how cool the texture created by the quilting looks!


I thought about putting feathers in the inside of the swags, but I just love how that area puffs up so I decided to leave it.

The last area I needed to design a motif for was the corner squares in the flying geese border. I drew out a couple of motifs on paper. I first tried curved cross-hatching because I love that, but it was not going to work at all with this quilt. So then I tried a couple of motifs more in line with the other quilting:


I think either of these would have worked, but I liked the one on the left better. The one on the right was too matchy-matchy with the nearby border quilting and I liked the feathers in the one on the left better. To mark the quilt, I drew straight lines across both diagonals and found some curved templates for the curves:


The straight lines would be used for lining up the feathers and the straight line quilting. I first quilted the curves:


I know this is weird, but I love seeing how each step tames the puff in the quilt and creates the incredible texture. The next step was the feathers:


For those, I stitched along the curve to the center and quilted the center plume, quilted the plumes along one side, then stitched along the curve back to the center and quilted the plumes along the other side. Look at that puff in the middle! To flatten that out, I added the straight lines:


Isn't that cool? And now it's the yellow triangles that have the puff -- which is what I want since those are the focus of that part of the quilt. Here's the back of the corner so you can see the quilting better:


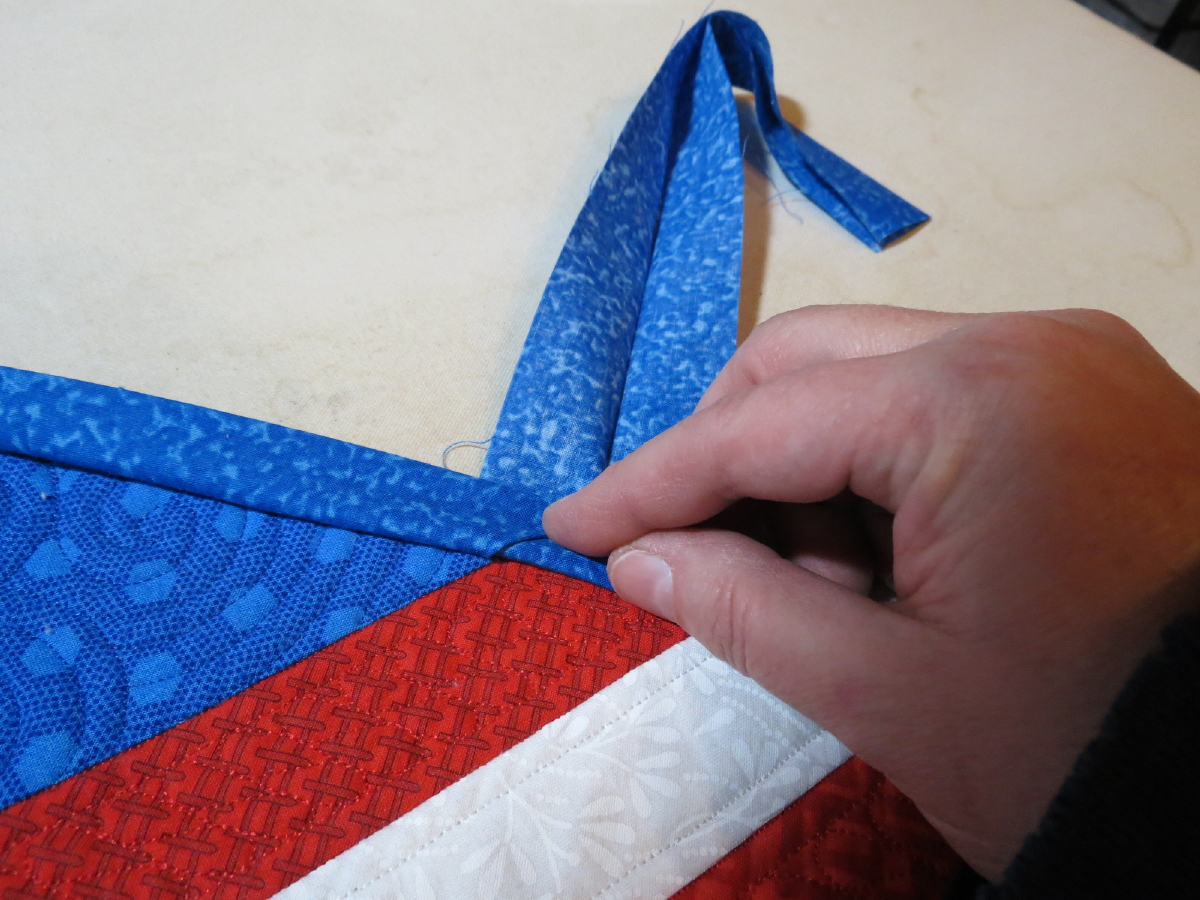
Then it was just a matter of adding the binding, hanging sleeve and label and it was finished! Here are a few pictures of the quilting:


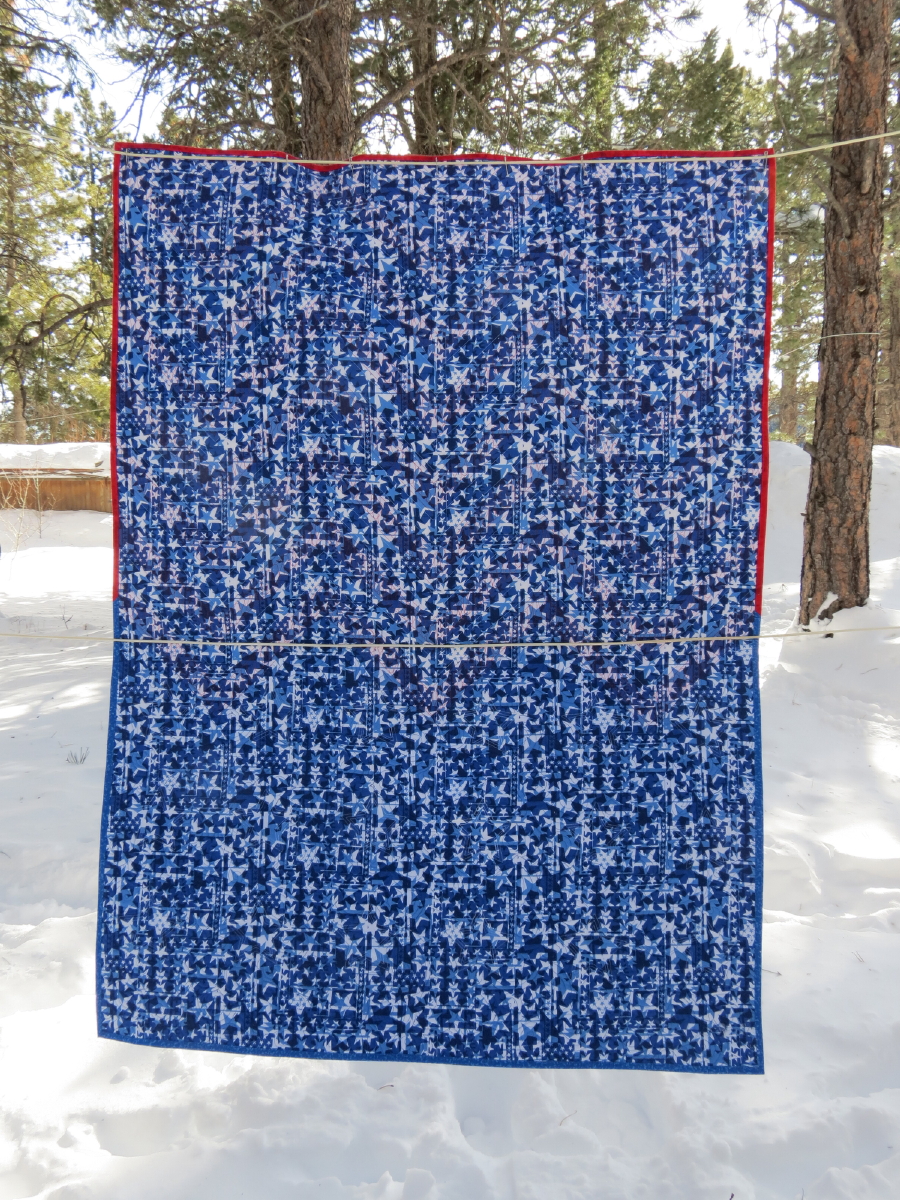
And a picture of the back so you can see the quilting better:


Now to hang it up in the bedroom and figure out what to work on next!

Nancy

Friday, January 13, 2017

Tutorial: Two-Color Binding

Hi all -

Today I want to share with everyone (and record for myself for the future) how I achieved the two-color binding on this quilt:


If you look closely at the picture, you can see that the binding is both red and blue and matches up perfectly with the piecing. Here's what worked for me.

I started by making the strips of binding. I measured the red length and the blue length and figured out how much I needed of each. I made the blue binding a single length, but divided the red binding into two separate lengths:


I started with one of the red lengths. I sewed it to the quilt the same way I always do, but stopped several inches before the first color transition:


To find the transition point, I laid the red binding along the edge where it would eventually be sewn, folded it over where it would be folded when finished and made a mark with a removable pen right on the color transition point:


I then opened out the binding strip and folded it at a 45 degree angle so that the fold was right on the mark and went in the direction of the piecing This fold will end up being the stitching line:


To make sure I had everything going the right way and in the right location, I folded everything back up and laid it against the quilt:


It's hard to tell in the picture, but the raw edge of the binding piece is lined up with the raw edge of the quilt. The binding strip is then folded as if it was sewn to the quilt and the position of the fold is checked. It looked good to me so I continued on.

Next I opened up the red binding strip and drew a sewing line along the fold. This drawn line isn't really needed, but I've had trouble seeing fold lines before once I get the fabric under the needle so better to just go ahead and draw it:


I then took the blue binding strip and lined it up with the red strip and pinned it in place:


To line this up correctly, the ends of the drawn sewn line should be right on the edges of the blue binding strip. The short ends of the two binding string should be on the same side of the drawn line and the long ends of the two binding strips should both be on the other side of the drawn line. If you don't get this part right, you'll be very unhappy! I then sewed right on the folded/drawn line:


To avoid any unhappiness, check your work before doing any cutting:


Again, the raw edge of the binding is lined up with the raw edge of the quilt, and the binding is folded over to see if everything lines up and at the right angle. It looks good to me, so I opened it back out, cut off the short ends of the binding strips, finger pressed the seam allowances open and refolded the strip so it was ready to sew in place. Before sewing, I lined it up again to make sure everything looked good (you really can't check something like this too many times):


It looked good so I pinned it in place so it wouldn't shift and continued sewing the binding as usual.

When I got to the second color transition point, I repeated the above process. I stopped stitching 8 or so inches before the transition point:


I laid the binding strip along the edge of the quilt, folded it back where it would be stitched and made a mark at the color transition point. I folded the binding strip at a 45 degree angle right at that point, playing with the fold until I got it going the right direction. For this quilt, the second transition was at the opposite angle of the first. I folded everything up and laid it on the quilt just as it would be sewn to make sure that I had everything right:


When it looked good, I unfolded the binding string and drew a line along the fold so that I could see it well when sewing. I lined up the second red binding strip as described above and sewed the strips directly on the line:


Remember to check everything before doing any cutting:


I trimmed the short ends of the binding strips, finger pressed the seam allowances open and folded everything back up to be ready for sewing. To make sure that I got the binding color transition in the right place, I started by putting a pin through the binding 1/4" from the raw edge going through the seam between the blue and red binding strips. Then I pushed that pin through the color transition on the quilt 1/4" from the edge of the quilt:


I held everything in place right next to the pin, pulled the pin out and put it back in so that it could hold the layers together in the right place:


I put a couple more pins between this pin and where I had stopped stitching on the binding to keep things from shifting and sewed the binding to the quilt as usual. At this point I was done with all of my color transition points so I could finish my binding as usual.

Here's how my transition points looked when finished:


I think it worked pretty well!

If you have any questions, please leave them in the comments below. I'll do my best to answer them.

Nancy


Thursday, January 12, 2017

Star Spangled Banner Finished

Hi all -

I have my first finish of the year! Yea! Here it is, the quilt I'm making for the Kansas City Hospice House:


Actually, I finished the quilt a week or so ago, but I wanted to wait until I finished the pattern and got it uploaded to Craftsy before sharing it with you. This is my first pattern and I think I did a pretty good job on it. If interested, you can purchase the pattern here. (Shameless self promotion....)

Here is what the full quilt looks like:


I'm especially pleased with the quilting. For the white strips, I just echoed the edges of the strips so the centers would pop; for the red stripes, I also echoed the edges but filled the center with ribbon candy. I think that gives some wonderful texture. To finish the top area, I quilted in the final red stripe so we got the correct number of strips, then filled the top area with straight lines mirroring the chevrons:


 In the blue, I just used a spiral background fill that I learned from Angela Walters. The stars have three lines of quilting echoing the shape and providing extra security when washing:


I usually like to use a backing that shows the quilting, but I found this fabric that I thought was perfect for a patriotic quilt so you can't see the quilting:


The final feature of this quilt is a two-color binding that matches up with the piecing perfectly. When trying to decide on the binding fabric, I didn't like how the red or blue alone would blend on one side of the quilt and stick out on the other, so I figured out how to use them both. Here's one of the transition points:


I was really excited with how well these turned out and my next blog post will be a tutorial on how I did it.

Until then, here's a little kitty yin-yang for you to enjoy:


Aren't they the cutest?

Nancy

Monday, January 2, 2017

Tutorial: How to Make a Faced Edge

Hi all -

I hope everyone had a wonderful holiday season! I had a wonderful visit with my family and then had  a few days at home to relax and get back into the swing of things.

I thought I'd start the new year with a tutorial on how I did the faced edge on my nephew's wallhanging. I wanted to record the details in case I need a refresher the next time I need a faced edge on a quilt.

Here is the finished quilt top that I started with:


It is completely quilted and trimmed to size, with a 1/4 inch of seam allowance around the outside.

I started by cutting 4 strips of facing fabric that is 2-1/2" wide by the length of each side of the quilt. I chose to use the fabric that I used behind the corner appliques since this is the fabric that will touch the facing the most. My quilt is square so the strips are all the same length. For a rectangular quilt, you would have 2 shorter strips and 2 longer strips:


Press under 1/2" along one long side of each of the strips:


This fold doesn't have to be exact since this will be the edge of the facing that is closer to the middle of the quilt.

Line up the corner of two of the strips with the raw edges in the corner and the folded edges to the inside, as shown. If your quilt is rectangular, this will be 1 long strip and 1 short strip. Pin along the raw edge of the top strip:


Lift up the folded edge of the top strip and put a few dots of washable glue in the seam allowance:


Lay the folded edge back in place and press with a dry iron to set the glue:


Take out the pins and fold the top strip back. Sew the strips together right along the crease:


Fold the top strip back over to make sure that everything lines up correctly:


Then fold the top strip over again and trim the end of the bottom strip along the edge of the top strip:


This will reduce the bulk in the corners of the facing.

Repeat these steps to finish each of the four corners of the facing. When finished, you should have a square or rectangle like the following, that is just slightly smaller than the size of the quilt top. The outside edges are the raw edges; the inside edges are the folded edges:


Pin the facing to the quilt top, right sides together. The facing will be slightly smaller than the quilt top, but you can stretch it to match things up:


Turn the facing to the back and press. Make sure to roll the edges so that the facing doesn't show on the front as you press. Having the facing slightly smaller than the quilt top helps with this. For this quilt, I didn't trim the corners before turning them, but instead folded the corners along the stitching, then flipped them to the inside of the facing. Next time I might try trimming them to see how that works:


Whip stitch the facing to the quilt backing to finish:


Turn the quilt over and admire your beautiful, clean edges:


I hope you find this tutorial useful!

Nancy