Hi all -
It's been a slow year so far, but I did finally get some quilting done. Well, I got some piecing done, but it's the same thing in my mind. I've been having trouble with my quilting muse lately so I decided to look for a piecing project that I might enjoy. Then I remembered a chevron quilt I started last spring. I'd seen several chevron quilts online with some gorgeous quilting and I really wanted to make one for myself. The ones I'd seen were constructed from half-square triangles. I didn't like the extra seams that the half-square triangles create, so I decided to piece mine in columns. Then I realized that if I pieced in columns, then I could easily vary the widths of my chevrons and that excited me so I got out a piece of paper and started doing some calculations, then pulled out a bunch of Kaffe Fassett fabrics and a matching solid and set to work. I cut my fabrics into the rectangles I had calculated and started sewing. To sew the columns, I started by laying neighboring pieces at right angles and drew a line from corner to corner:
I then stitched on that line and also stitched another line about 1/2" from the first:
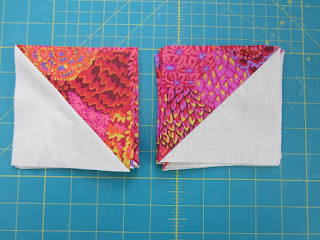
This second line of stitching allowed me to easily create bonus half-square triangles for another project. I then cut between the lines of stitching:
To make chevrons, I had to make sure to make half of the blocks in one direction and half in the other:
After pressing, I had a portion of my columns:
Thinking ahead, I pressed the seams in opposite directions so the seams would nest when I sewed the columns together:
And I got these extra half-square triangles:
When I picked this project up again now, I had about half of the above units finished, so I made the rest of these units and then started putting the columns together. This was done with exactly the same method:
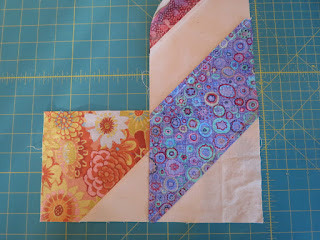
Once the columns were finished, I was able to sew them together. That's when I found a couple of mistakes. I must have cut a couple of the rectangles too narrow because the columns didn't line up in two places. Oops! Now I had to do some repairs. I started by removing the bad pieces and cutting rectangles to replace them. Here is a replacement piece next to the spot where I took out the bad pieces:
So that I could line things up correctly, I drew a line on the replacement piece. Sorry I didn't get a picture of the line on the above replacement piece, but this gives you and idea of what I did. For the above pieces, the replacement piece would be rotated to the right so the yellow fabric would be on the left and the line would start in the yellow and end in the solid:
I then lined the straight edge of the original column along the drawn line:
Now I could again draw a stitching line from corner to corner. I did a lot of pinning at this point since I was dealing with a raw bias edge and I didn't want it to move. Then I took it back to the sewing machine and sewed along the drawn line and trimmed away the excess:
Voila, that piece was fixed:
Then I just had to fix the other pieces and sew the columns together:
I love how this turned out! I'm not sure when I'll start the quilting, but it might have to be soon since I'm thinking of writing up a pattern for this quilt and seeing if I can sell it on Craftsy or somewhere.
I've also been continuing with my knitting. I made another hat using the same yarn as a previous one:
The picture looks blue, but the yarn really is green. I also made myself a soap sack:
I have a bunch of bar soap, but I rarely use it in the shower because I hate how it slips out of your hand and I hate dealing with the small pieces. I think this will help a lot. And if I like it, I might make more for my family for Christmas. It's always good to find gifts they might like! And I found a bunch of different patterns so they don't have to be all the same.
My final knitting project has been more work. It's going to be a mobius cowl. I had to learn a new mobius cast-on before I could start. It was difficult to get all of those stitches right and I had to start over 4 or 5 times, but I finally got it right:
It doesn't look like much in the picture, but these are 40" circular needles with the wire doubled up on itself so it looks like a 20" loop. So you sew around both sides and end up where you started and the cast-on stitches will end up in the middle of the cowl. Here it is after some more stitching:
And a close-up of the side:
Now that I have the cast-on figured out, the stitching itself is going fairly quickly considering there are 400 stitches in each round. The pattern calls for a picot bind-off, which I've never seen or heard of, so hopefully that'll go better than the cast-on did!
That's it for now! Hopefully I'll start making more progress on things so I'll be able to post more frequently. I'd like to get back to my weekly posts if I can.
Nancy


Love the quilt. I hope you write a pattern. I'll buy it! A question remains regarding this blog. Does the hat look good on Lance? Lois
ReplyDeleteThanks! If I write a pattern, I think my good friends can have a copy for free....
DeleteI haven't put hats on Lance's funny shaped head, but I should try it. Next hat, I promise!!
The quilt turned out great! I love the size variations! Looking forward to photos of your mobius cowl on your supermodel Lance :)
ReplyDeleteThanks! I'm sure Lance is looking forward to me finishing the cowl, too. He does love the runway!
DeleteNancy,
ReplyDeleteEnjoyed your post. Making the extra HST pieces while you're making the ones you want is a very efficient use of time. They're all ready for anything you want to use them for. I may use some of my diamond pieces I cut with my Accuquilt Go to work on a chevron quilt, too. Thanks for the inspiration.
Thanks! I can't wait to see what you come up with!
DeleteNancy, I hear you about your quilting muse. . .I think mine must have gone to a warmer and drier climate for a vacation! :) Loved your chevron quilt and soap bag. I missed Lance modeling your hat! I agree with you about the HSTs to stitch them as you go. Thanks for the great post!--Terry
ReplyDeleteThanks! I hope we have an early spring so your quilting muse hurries home!
DeleteHi Nancy - fun to see your latest project! I really like the result!
DeleteBarb
Love your knitting projects and your chevron quilt top. Don't worry about your quilting muse...it's just taking a nap and will probably awaken on some rainy spring day. :D
ReplyDelete