Monday, July 29, 2024

Lots of EPP

 Hi All -

I hope everyone is enjoying their summer! It's hard to believe that August is just around the corner. Boy, does time fly!!

I've continued to work on my English Paper Piecing (EPP) project that I started in a class. I finished my last two blocks:

Third EPP Block

Fourth EPP Block

While making my blocks, I watched some YouTube videos and played with a few different methods for basting and piecing to come up with what seems to work best for me. For basting, here's what I've settled on:

  • I got some Sew Tite magnets for holding the paper and the fabric together when basting. These magnets hold everything in place better than clips and they don't get in the way as much.
  • I've settled on sew basting rather than glue basting. Glue basting is quicker, but I found that if I used enough glue to keep the fabric in place, then I got some fraying of the edges when releasing the paper. The glue also left residue on the papers that bothered me. But I can definitely see the appeal of glue basting for others!
  • When sew basting, I prefer putting a stitch through the paper and the fabric on each side of the piece rather than only piercing the fabric with the thread. While it's nice to not have the extra holes in the paper, I felt like just basting through the fabric left the fabric too loose around the paper.
For the sewing, I have these preferences:

  • I prefer using whip stitch over the flat back stitch taught in class. I had a lot of trouble picking up the small bites of fabric near the edge using the flat back stitch, which really slowed me down. The whip stitch is a lot faster for me and it is still pretty invisible on the right side.
  • Again, the Sew Tite magnets hold the pieces better for me while sewing than the clips did and they are less awkward. The magnets are really easy to use when whip stitches, but you can also use them for flat back stitching by using a "palette" under the pieces you are stitching. Sew Tite sells such a palette here if you want to see how that works.
That's what seems to work for me, but I could change things as I get more experience.

Now that I have all of my blocks, I appliqued them to the panels of my bag. The Mondo Bag is made from 4 rectangular panels  I'm positioning the EPP blocks on the panels so that the blocks will be displayed on point in each of the points at the top of the bag. Here are the appliqued panels positioned on the floor like they will be sewn together to make the bag:

EPP Bag Panels

Hopefully, that gives you and idea of what I have in mind for this bag. Now I have to decide on what other decoration I want to do on the panels before sewing the bag together. I feel like there is too much plain solid fabric to leave the panels as they are, but I have to look at these for a while to decide how I really feel. I also don't want to overdo it on the decorations. My gut is telling me to put an echo stitch around the edges of the EPP blocks, 1/4" from the edges of the blocks. Then, I could stitch straight lines at random intervals from the EPP echo stitch to the end of the rectangle, parallel to the long edge of the rectangle. These lines could be in random colors used in the blocks. Once I get the panels figured out, the bag will go together pretty quickly. I want to have the bag finished for our next guild meeting on Aug 15. That's a lot of time, but I'm pretty busy after this week so I need to keep that in mind.

While I'm playing with EPP again, I decided to pick up my old EPP WIPs (works in progress) and make some progress on those, too. The first EPP project I started is a hexagon charm quilt. A charm quilt is a quilt that uses a different fabric for every piece in the quilt. Years ago I started making a charm quilt using 1.5" hexagons. (Hexagons measurements are the length of each of the 6 sides.) To put the top together, I'm piecing the hexagons together like this:

Hexagon Charm Quilt Unit

These units are easy to work on and I think will be as easy as any other units to work with when putting together the final quilt. I figure I can put the units together and then fill in with extra hexagons wherever needed to get the desired shape for the quilt. With this unit, I now have 23 units completed for my quilt. I have no idea how big I want to make this quilt at this point.

The other WIP I had sitting around is made with small octagons and squares. The edges on these pieces are only 1/2". The squares are all a solid blue fabric and the octagons are all sorts of Kaffe Fassett fabrics. I've only sewn together a few of the pieces. I'm starting with these units:

Kaffe Octagon Quilt Units

Here's an idea of what they'll look like together:

Kaffe Octagon Quilt

These are small pieces so I have a LONG way to go with this one.

Finally, I did some more knitting on my Festival of Stitches shawl designed by Lisa Hannes. I knitted the white cable section:

Festival of Stitches

I wanted to get this section done while I still had the stitch sequence in my head so I would make fewer mistakes. I also wanted to put away my cable needle. The rest of the sections should be easier. I look forward to finishing this shawl!

Well, that's it for now. I hope everyone is doing well!

Nancy


Saturday, July 20, 2024

First Two EPP Blocks

 Hi all -

Summer marches on.... We had a hot spell for a week, but now we're back to moderate temperatures and afternoon showers. It's so wonderful!

I finished the block that I started in our guild's EPP class. Here it is:

First EPP Block

I don't want to make a quilt out of these blocks so I decided to make a bag. I decided to use the construction from the Mondo bag that I made in this post. It's hard to see in the final bag, but the bag is made from three rectangular panels that are sewn together in kind of a spiral to make the bag shape. In the pattern, the panels are pieced together from squares, but you can really do anything with this construction. So I decided that I would use this construction to make a bag using four of these EPP blocks  I started by looking through my stash to find fabrics that I thought would go with the four original fabrics I got in the class kit. Here are the original fabrics:

Original EPP Fabrics

I didn't think to take a picture of my stash fabrics, but I pulled a lot of them and I'll probably look at more as I construct the other blocks so a picture of that fabric pile might not be useful. Anyway, I pulled some fabrics and also finished my second block:

Second EPP Block

I had to stop here with the EPP because I didn't have enough of the papers to make another block. You can remove the papers once you have sewn around the entire perimeter of the unit, but that only reclaims 8 of the 24 units needed for the block. So it was time to start thinking about the bag. I looked through my fabrics, picked a burlap-like upholstery fabric and cut out all of the pieces needed for the bag and then realized that I miscalculated and the pieces were too small to accommodate the EPP blocks. So back to the stash and this time I chose a pink solid fabric that matches one of the colors in the fabrics. Here is the first block appliqued on the bag fabric:

First Block Appliqued

The solid pink might be a bit intense for my tastes for a bag, but I'll get the EPP blocks finished and appliqued to the panels and then I can decide if I want to tone down the pink with some quilting using other colors in the fabrics. To applique the EPP block to the panel, I start by measuring in from the edges the appropriate distance and then marking a line using an air-erasable marker. I can then place the block very accurately:

EPP Block with Placement Lines

I really like air-erasable markers for stuff like this because I don't need the marks for long and don't have to worry about having trouble getting the marks out. The picture of the first appliqued block above shows that the lines have disappeared on their own after just a day. This block has a 90 degree corner in it, which means that the "dog ears" on these corners can stick out a bit and be hard to push behind the block while you are appliquing. To alleviate this problem, before pinning the block to the pink panel I took my scissors and clipped the corner of the folded over edge of each of these corners. It's hard to see, but here is one of the corners with that little fold peeking out:

90 Degree Corner Before Trimming

Can you see that little corner peeking out under the side of the block? Here is where I trimmed a little bit off of one of those fabric flaps:

90 Degree Corner After Trimming

It's not much, but I think it made a big difference when it came to appliquing the block. The trimming had to be done immediately before pinning and appliquing the block because what can really sneak out from under these edges are the threads when they unravel a little bit with wear. Doing this trimming and then immediately doing the appliquing gets those edges protected so they can't unravel and peek out. Once the block was pinned, I appliqued it to the background using a narrow zig-zag stitch and invisible thread. Here is the second block all attached to the bag panel:

Second EPP Block Appliqued

With the paper pieces reclaimed from these units, I can now start on my third and fourth blocks!

When taking breaks from sewing, I've continued to make progress on my Festival of Stitches shawl designed by Lisa Hannes. I finished a narrow eyelet section and then a cable section on one side of the shawl:

Festival of Stitches close-up
I love the look of the cable section, but it definitely was a lot of work! The cable stitches aren't difficult, but they are hard to undo when you make a mistake. I must have been tired or distracted because I made several mistakes that I had to fix. But it's finished on this side and I really love it! I'll have to do this section again on the other side so hopefully I'll be able to pay better attention next time! Here is how the shawl is looking so far:
Festival of Stitches

This shawl continues to be a lot of fun!

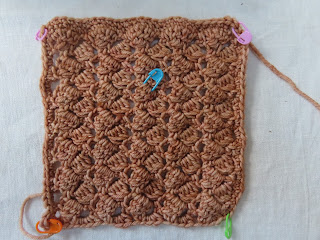
Finally, I've been neglecting my Jimmy Beans Wool blanket club while I've been enjoying my other projects. I've gotten a couple of months behind and need to catch up. The project is the Wildflower Crochet Blanket designed by Lena Skvagerson. I was able to complete the three blocks from May:
Wildflower Crochet Blanket May block #13


Wildflower Crochet Blanket May block #14

Wildflower Crochet Blanket May block #15

I still need to add the May section to the larger center block. I tried to do that based on the written instructions, but my stitches didn't match the picture so I'll have to watch the associated video before I can finish that block.

That's it for now. I hope everyone is doing well!

Nancy


Wednesday, July 10, 2024

Prickly Pear Quilt Center Finished

 Hi all -

I hope everyone has been keeping cool and safe! It sounds like things are pretty bad around the country. We've been really lucky up at my house. The weather has been really pleasant. The mornings have been in the 40s, with several mornings starting out at 41F. The highs have been in the 70s, with it being 79F right now in the early afternoon. We've had a little bit of rain to keep things green. We could always use more to keep the fires at bay, but there's not much worry about fires here yet. It's just so beautiful! 

It's been a really productive week for me. I finished piecing the center of the Prickly Pear quilt designed by Georgette Del Orco:

Prickly Pear

It's amazing how much faster sewing is than knitting!! I'm making the twin size version of the quilt. As you can see, the center is finished and I just need to trim the edges and add the three borders.  I think it's turning out beautiful!

While piecing my Prickly Pear quilt, I also picked up my old leaders and enders project. When piecing a quilt, you get a better start to the seam if you sew something else in front of it and you get a better end to the seam if you sew something after it. This lead Bonnie Hunter to come up with the idea of "leaders and enders" where you have some simple piecing that you run through the sewing machine at the beginning and end of your piecing and you end up with units for another quilt while you are working on your current one. My current leaders and enders project is the Sisters Nine Patch designed by Bonnie Hunter. The queen size version of this quilt requires 169 9-patch units made out of 2 inch squares of fabric. Here are the new units that I finished while working on my Prickly Pear quit:

Sisters Nine Patch units

It's a lot of new units, but a small fraction of what I need for the entire quilt.

I've also continue with my knitting. I finished the body of my Verba Top designed by Victoria Chaplina:

Verba Top

I still have to pick up the stitches around the neck and arms and add an I-cord edging, but I'm taking a break from this project for a few days. This yarn, which is made of paper and cotton, has no stretch and so is a bit hard to knit with.

On that break from my Verba Top, I've made some progress on my Festival of Stitches designed by Lisa Hannes:

Festival of Stitches

It is SO much easier to knit with this wool yarn! I'm really enjoying this!! I finished the mosaic section on the left side of the shawl:

Festival of Stitches left side detail

Then I knit the caramel lace portion of the right side of the shawl and started on that mosaic section:

Festival of Stitches right side detail

The mosaic section on the right side reverses the colors from the left side, making an interesting contrast. Because this is so comfortable to knit, I'll probably work on this some more before getting back to my Verba Top.

Nancy


Tuesday, July 2, 2024

Happy Independence Day!

 Hi all -

Time sure is flying! Can you believe Independence Day is just 2 days away? Although summer has just begun, I know it'll be over before I know it. So I'm trying to enjoy every day! I have someone working to build me a new shed. He has finished demolishing the old shed and is ready to pour the concrete foundation for the new one. There were some unexpected problems with the demolition so that took a little longer than expected, but I think things should go fairly quickly now. Unfortunately, Grace is very protective of her yard so I have to keep her in the house while they work. But she's really good about chilling out in the house. I can't wait until the shed is finished! Right now everything from the shed is sitting on the deck. I've gone through a lot of the stuff and scrubbed it and decided to get rid of some of it, but I'll have to wait until the shed is ready to finish that job since it'll be easier to finish that when I can put the clean stuff in the shed and get it out of the way. The guy said he could also haul away the broken down hot tub that I've been trying to get hauled away for many years and can clean up the big tree that fell down in the spring storms. I'm looking forward to all of these improvements!! If everything goes well with the shed, I'll have him come back next spring to rebuild my deck which needs some work and, if not too expensive, would be nice to make a little bigger. Grace, Buttercup and I love sitting out on the deck!!

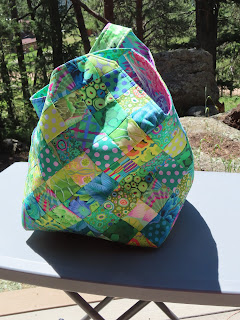
I had a finish this week! I finished my Mondo Bag designed by Mattie Rhoades:

Mondo Bag

Mondo Bag

The bag is a good size and is easy to make. Now that I know how the bag is made, I can use it for a while and see if I like the design and then make others with some improvements. I already know some changes I would make if I make another one. First, the pattern has an optional pocket which I included in the bag. The pocket from the pattern ends up being crooked and doesn't seem very useful. If I make another bag, I'll sew together the lining without the optional pocket then will add more conventional pockets that are straight up and down and more useful. I understand why the designer made the pocket like she did, but I think my pockets will be better. The other change I will make will be to fuse the fleece inside the bag to the outside panels rather than fusing it to the lining panels. I'm sure the designer fused the fleece to the lining panels because the outside panels in the pattern are sewn on the printed stabilizer. But if I make another bag I won't be using the printed stabilizer and I like the outside of the bag to have the stability for the bag, if that makes sense.

I've also made progress on my Verba Top designed by Victoria Chaplina:

Verba Top

As you can see, I've joined the front and back and ame making progress down the body of the top. I'll probably knit about 4 more inches on the body before adding the 1.25" hem. Then I'll be picking up stitches around the arms and neck and adding an I-cord edging which will be pretty and should also control some of the curling. I don't look forward to picking up the stitches, which has proved difficult with this yarn, but I am excited to be nearing the finish of this top!

Finally, I felt like doing some piecing so I started working on a Prickly Pear quilt designed by Georgette Dell'Orco. This is a quilt kit that I've had in my stash for a long time now. Connecting Threads used to have incredible sales on their quilt kits and I would pick up anything that was interesting and cheap in preparation for retirement. This is one of those kits. So far, I've got 13 blocks finished:

Prickly Pear

I have 26 more blocks to make for a twin sized quilt. I think I'll finish the top, but then put it in my pile of tops that need to be quilted. I really should be working on a couple of other quilts instead of this one but I really wanted to just do some mindless piecing so this one got pulled out for now.

Well, that's everything I've been working on this week. We'll see what sparks my interest in the next week....   ðŸ˜„

Nancy