Monday, May 26, 2025

Some More Bags

 Hi all -

I hope everyone is having a wonderful Memorial Day weekend! We've been having rainy weather here. It's been raining and foggy off and on for a couple of days now and it looks like it is supposed to continue throughout the week. Unusual for us, but very welcome! We also had a visitor in the yard this morning. We had a beautiful bull moose munching away when we got up. I had to keep Grace in the house until he left, but he only stayed about an hour. I was lucky enough to look out the front door as he was walking by the house so I got to safely look at him from about 6 feet away. I just love living up here!!

I was able to make a few more of the Twice As Nice Pouches designed by Aneela Hoey. These are the little bags I'm making for the ladies in my English Paper Piecing (EPP) group. The first one I made was for myself. I've been wanting to make this bag for myself for a while and I'm in the EPP group, too, so it was the right time!

Twice As Nice Pouch - For Me

I also decided to make one of these for a friend of mine who has a birthday in early June. She's not in the EPP group, but she's a quilter and a knitter, too, so can always use a bag. I choose a fabric that depicts an underwater scene because she and her daughter just finished their entries for the 2025 Cherrywood Challenge. The theme this year is The Abyss.

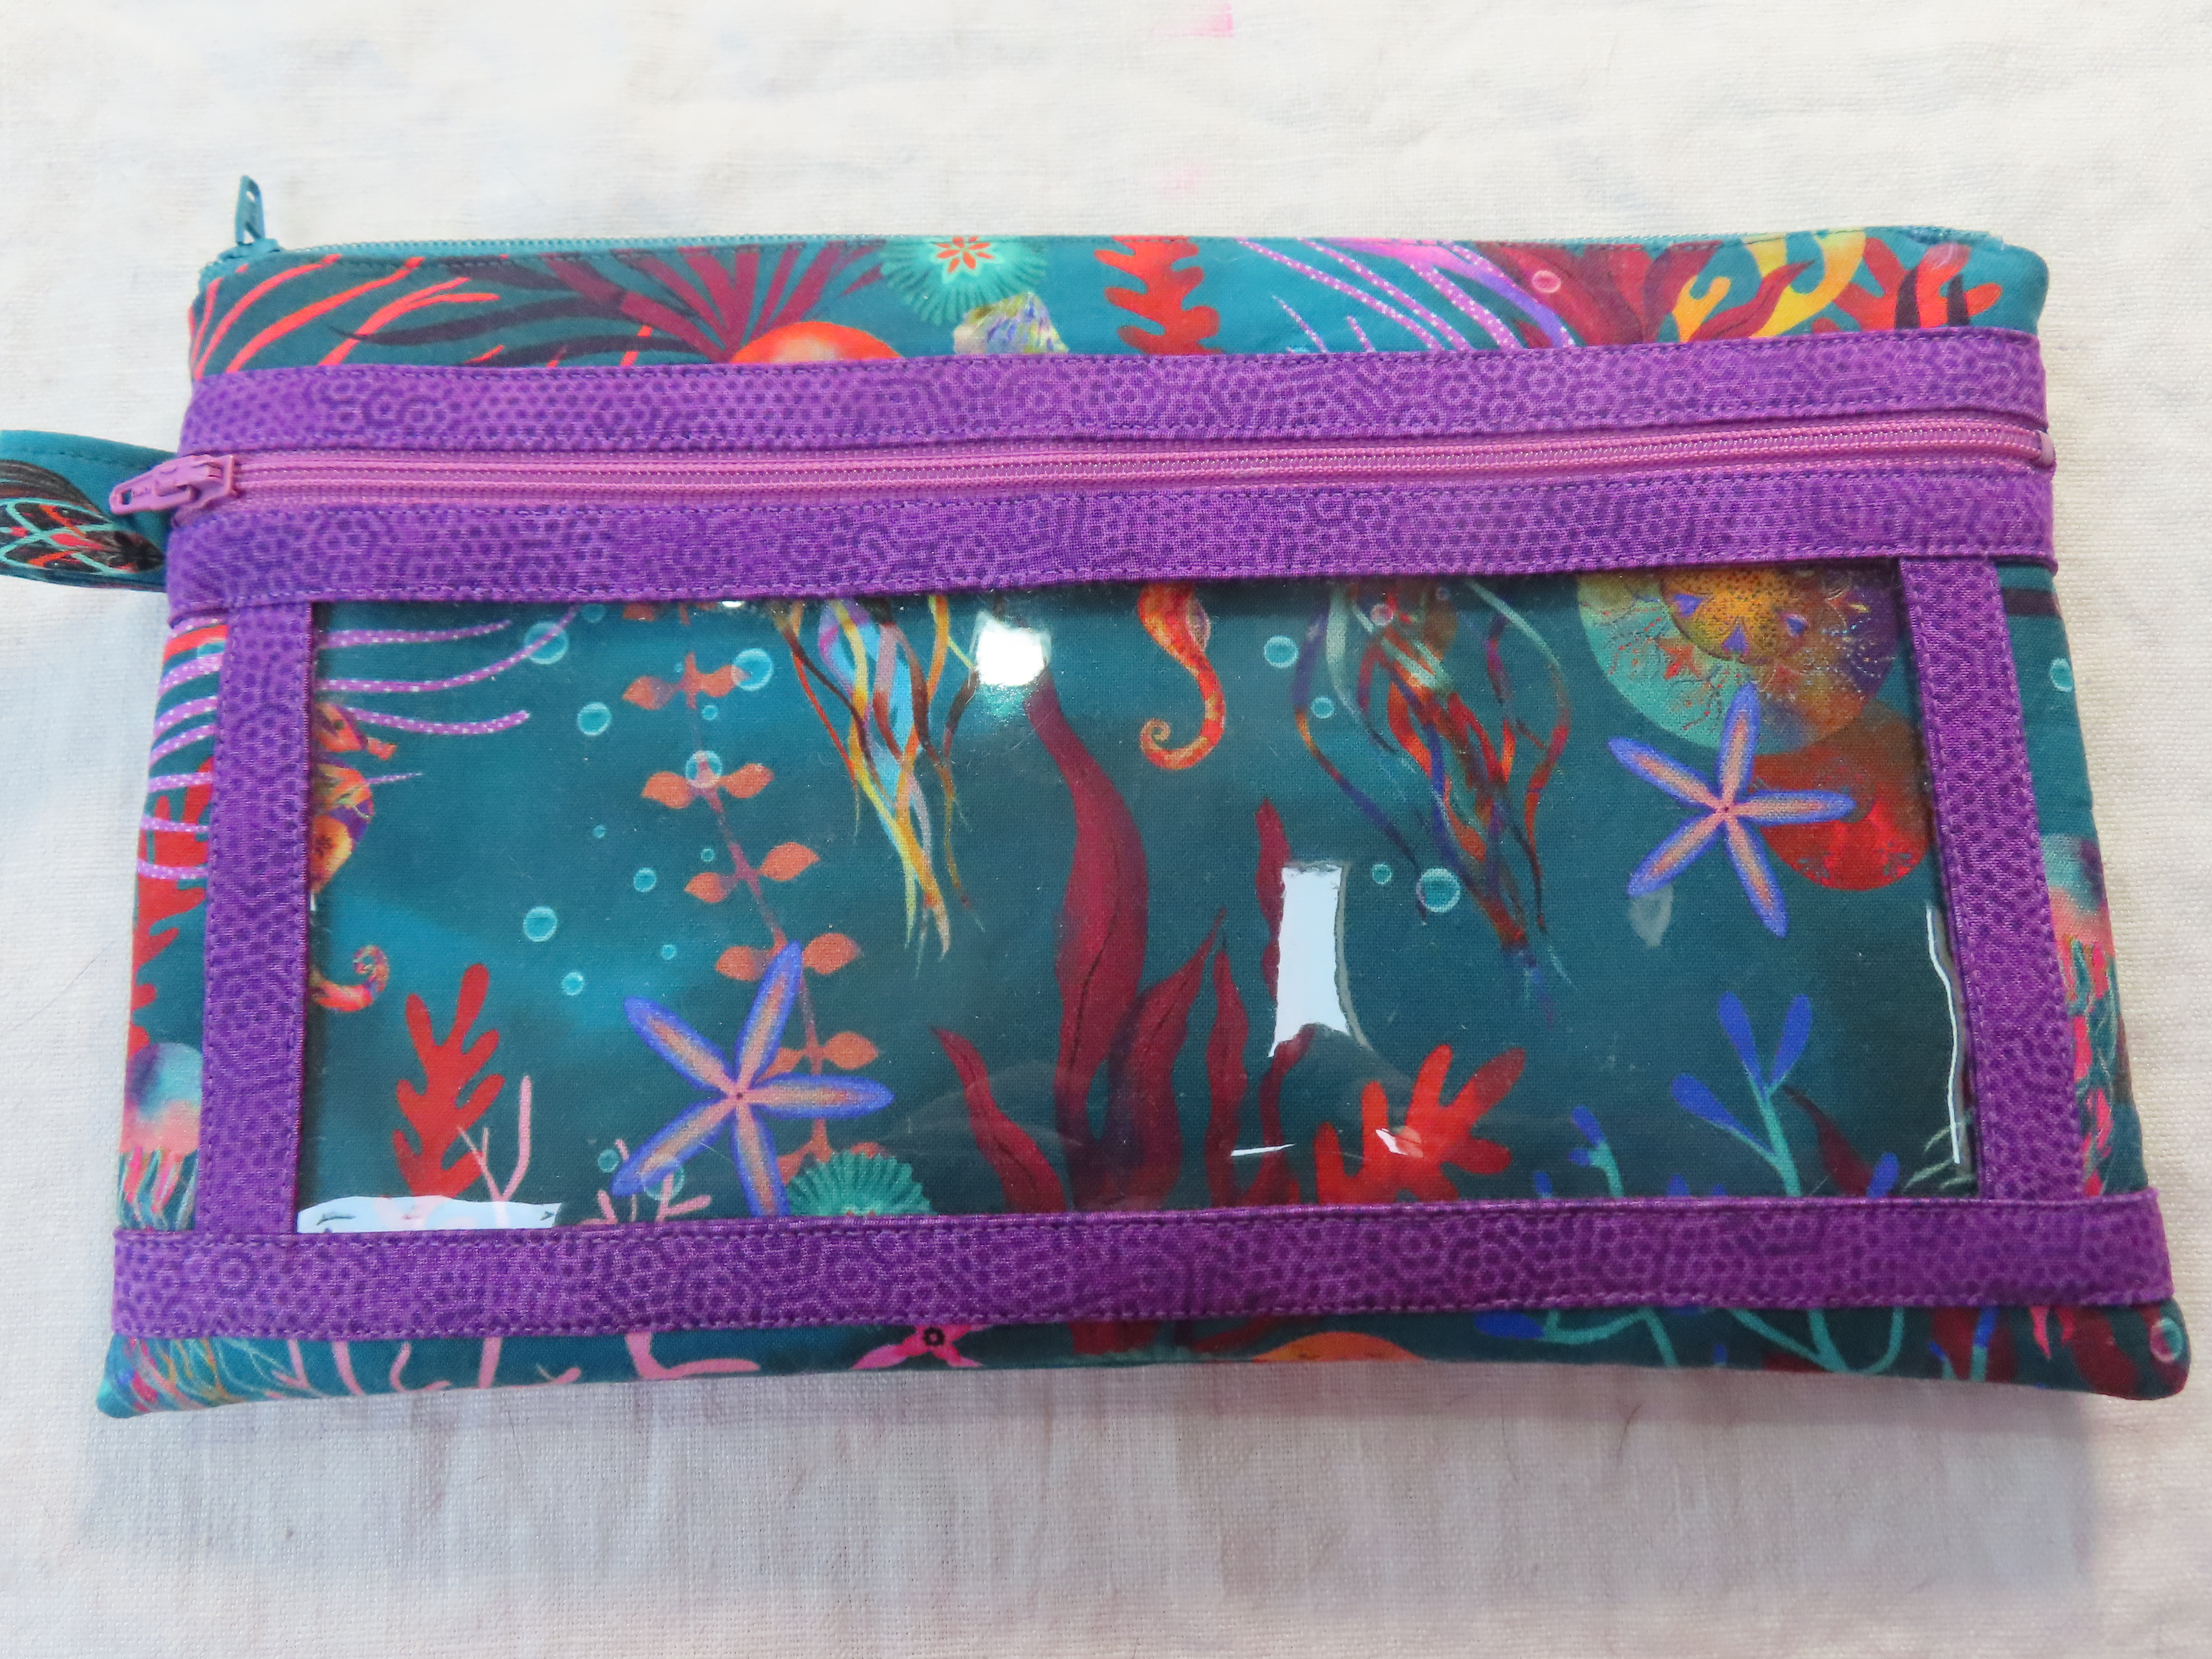
Twice As Nice Pouch - For A Friend

The final bag I made is for my good friend who is in the EPP group. I gave her a Twice As Nice Pouch for her birthday in February so I wanted to make a different bag for her. I decided to make the Peek-a-Boo Bag designed by Terri Staats.

Peek-a-Boo Bag

I used a firefly fabric since she loves fireflies. I made one of these bags for myself years ago and I keep a small EPP project in it. I think it's really cute and hope she likes it, too!

Since I'm making these bags, it makes sense that I should also make some progress on my EPP project. So I did some more work on my La Passacaglia quilt designed by Willyne Hammerstein.

La Passacaglia - Rosette 2

After I finish this round, I just have one more round and the rosette will be complete. The next round is another star round (like the green and pink round after the black round), so it's a more complicated round. I'd decided to use solid fabrics for all of the star units in this quilt so I'll probably use a solid darker purple for that round. Then I'll find matching printed fabrics for the pentagons and diamonds in the round. Although this is "rosette 2" in the pattern, it will be my first finished rosette for the quilt. I started with rosette 2 because it is one of the larger rosettes. There are four large rosettes in the quilt. I'm planning to make them first because I think that'll give me a better idea of how everything is looking when picking out fabrics for the smaller rosettes. This rosette is now too big to fit in my project bag without folding it. I'm thinking that after I finish the rosette, I'll probably make a new project bag that is big enough to fit the rosette flat so that I can keep all of the units together nicely while I'm making them. Any excuse to make another bag, right!!

I've also been thinking about another quilt that I want to work on. My Jungle Magnolia BOM is getting me excited to work on another Judy Niemeyer quilt.  I purchased the Amazon Star pattern from my quilt guild's online auction a couple of years ago. Someone had the pattern in their stash and decided that they weren't going to make it, so they donated it to the guild and I picked it up in the auction. I had been scared to start it since the Judy Niemeyer patterns are so complicated, but now that I have some experience with them I realize that they really are easy once you figure them out. Since I'll need to purchase the fabric for this quilt, I installed PhotoShop on my computer and started playing around with fabric colors. The pattern includes a schematic page that you can use to audition colors, so I scanned the page and opened it in PhotoShop. Then I had to remember how PhotoShop worked (it's been several years since I've used it) and figure out how to do the things that I wanted to do. There was a lot of fumbling at first, but now that I have everything set up, I can just pick a color from the top of the image and change the color and it will change that color throughout the quilt image. Here are the colors that I deicded to use:

Amazon Star - Chosen Colors

There are several "repeated" colors. These will be fabrics with very similar color and value, but with different pattern to make the quilt sparkle. I'm planning to use all batiks. I'm visiting the family in Kansas City next month so I'm planning to make a trip to Missouri Star while I'm there to pick up my fabrics. If you're a sewer or quilter and have never been to Missouri Star, it's definitely worth a visit if you're in the area! It's basically a small town that is also a quilt shop. The entire main street is shops that are all parts of the store. There's a batiks shop, a baby fabrics shop, a Christmas fabric shop, and so, so much more! I'm always excited to go there (although my bank account isn't so happy about it....)!

Finally, I made some more progress on my Peach Sorbet Throw designed by Janine Myska.

Peach Sorbet Throw

I'm getting so close on this one! Just a couple more stripes and I'll be done with the body of the throw. Then I'll just have to add the border. It'll feel good to have a big finish!

Nancy


Monday, May 19, 2025

Lots of Twice As Nice Pouches

 Hi all -

I hope everyone is doing well. We're still in the middle of spring, with hot days intermixed with colder ones. We had some light snow last week. It was fun because I woke to bear tracks in the snow on my front porch. Looks like he was just walking by, taking no notice of the door and there was no damage to the car or shed so it was all good. I always wonder what goes on in the yard at night!

This week I mostly worked on the Twice As Nice Pouches designed by Aneela Hoey. I was able to finish five more pouches for my English Paper Piecing (EPP) group. This one is for a lady who loves bright colors:

Twice As Nice Pouch #1

This one is for a lady who is also a knitwear designer:

Twice As Nice Pouch #2

This one is for a lady who has a cat:

Twice As Nice Pouch #3

This one is for a lady who works at the Rocky Mountain Quilt Museum and loves quilt history. She works with a lot of reproduction fabrics. I've never seen her work with 30's reproductions, but that was all I had in my stash so I hope she likes it:

Twice As Nice Pouch #4

This one is for a lady who went birdwatching in the morning before our last meeting. The red fabric actually has faint chickens on it:

Twice As Nice Pouch #5

That's everyone that was at last month's meeting except for my close friend who got one of these bags from me for her birthday earlier this year and myself. I have fabric cut out for making one of these for me and I'm going to dig through my pattern stash to find a different bag to make for my friend. There are some other people in the group who often don't show up for the meetings. I'll probaby make a couple more of these bags, just in case, and then look at the email confirmations before the next meeting to see if I have enough. I don't mind having a few of these bags for myself and I could also give them to my sisters. And I have another close friend who has a birthday coming up next month so there might be one of these in her future, too.

I also made some progress on my La Passacaglia quilt designed by Willyne Hammerstein. I'm really getting excited about finishing this first bit rosette, but I still have a long way to go even with just this one:

La Passacaglia

This rosette still has another round of pentagons and then another round of stars before it is finished. But there are "only" three of the large rosettes in the quilt, then I can work on the smaller ones which will feel pretty speedy after these large ones!

Finally, I continue to make progress on my Peach Sorbet Throw designed by Janine Myska:

Peach Sorbet Throw

I was able to finish several repeats this week:

Peach Sorbet Throw - Weekly Progress

I just have a little over five more pattern repeats to go! (A repeat consists of one white stripe and one colored stripe, so four rows of crochet.) So, at this rate, I should have the body of the blanket finished either next week or the one following. Then we'll see how the border goes.

Nancy


Tuesday, May 13, 2025

Low Motivation Week

 Hi all -

Well, this has been a low motivation week for me. Since I got caught up on Jungle Magnolia and now have to wait for the next fabric shipment, I found myself struggling to decide what I wanted to work on. Luckily, this was the week when all of my all of my quilt guild's monthly small groups met so I did get make some progress on my projects. We did end up getting some good snow last week so I ended up missing my Quilts of Valor (QOV) group meeting on Thursday. But I made it to the English Paper Piecing (EPP) meeting on Friday and the Block of the Month (BOM) meeting yesterday. It was really good to see everyone at both meetings!

At the EPP meeting, I made some progress on my La Passacaglia quilt designed by Willyne Hammerstein.

La Passacaglia - Rosette 2

There's a LONG way to go on this project! But I'm loving it more and more with each added round! At the meeting we talk about a lot of things. I was talking about the bags I like to make. When I got home, I had the urge to make a bag for each of the people in our group. I keep wavering on whether I want to do this because it's a lot of bags, but I did get started on some bags this weekend. I enjoyed making the Twice As Nice Pouch designed by Aneela Hoey for my friend for her birthday, so I decided to use this pattern. The first bag will probably be for the host of our group who loves the color green.

Twice As Nice Pouch

Twice As Nice Pouch - Inside

I probably need to continue this venture since I cut out a bunch of pieces of the vinyl, interfacing and fleece. But I would have to make something like 10 bags, so we'll see how it goes.....

Since I'm caught up on Jungle Magnolia designed by Judy Niemeyer, at the BOM meeting I decided to do some preparation for the upcoming months of the project. Although we receive the fabric in a packet each month, we already have the entire pattern, including all of the papers used each month. So I decided to start preparing the papers for future months at the meeting, which saved me from having to schlep my sewing machine to town. There's a lot of work just in the preparing of the papers, so I'm glad to get a start on this! Next month will be a really simple month for our colorway of the quilt. We will just be sewing 16 seams, making 8 each of two mirror-image units:

Jungle Magnolia - Chapter E Papers

(The other colorways will be piecing a checkerboard for the larger pieces next month.) After that, things will get more complicated! Here are the prepared papers for the next month:

Jungle Magnolia - Chapter D Papers

And I just got a small start on the next month's papers:

Jungle Magnolia - Beginning Chapter C Papers

I still have two and a half months of papers to prepare, so I will continue this task at our meeting next month. I'll be really happy to have these already ready when the fabric arrives!

I did continue to make progress on my Peach Sorbet Throw designed by Janine Myska. 

Peach Sorbet Throw

I keep track of my weekly progress on this blanket by moving a stitch marker to my current position after taking each picture.

Peach Sorbet Throw - Weekly Progress

I'm getting closer and closer to finishing this project! I'm on repeat 27 of 36, so the end is in sight. Then I'll just have to add the border.

Finally, I have a couple more blocks for my inset circles quilt.

Inset Circles Blocks

This makes 17 of the 30 planned blocks finished.

I'm still deciding what I'll work on this week. I have the fabric picked out for the next Twice As Nice Pouch so that should be finished. And, hopefully, more of these. But I'd also like to make progress on the circles quilt so I can put away that ruler. And there's so many other things I want to do! I just know that I'm lucky to have so many things I can do!

Nancy


Monday, May 5, 2025

Jungle Magnolia Month 2 Finished

 Hi all -

I hope everyone is doing well! We're still in the midst of our erratic spring weather in the mountains! It's been beautiful for the last couple of days, but a change is coming in this afternoon and we're supposed to get up to 7" of snow tomorrow. Of course, I had an appointment to get my winter tires taken off of my car tomorrow, but that has been rescheduled now so no driving up the canyon in the snow with my summer tires. This snow is sorely needed so I'm hoping the rescheduled appointment will trigger another storm!

My top priority continues to be my Jungle Magnolia BOM designed by Judy Niemeyer. I was able to finish the Month 2 sewing. I already had the Month 2 units created last week and had started assembling them with the Month 1 units. So this week I finished the assembly step:

Jungle Magnolia - H4/G2 Units

Jungle Magnolia - H1/G1 Units

Our instructor had a great tip for sewing the H and G units together. When doing the assembly, you remove the papers from the pieces before assembling (the most tedious part of the process!!). But when the papers are removed, you lose the match points that are printed on the papers that are useful when sewing the curved seams. She suggested that we glue just those "corners" to the fabric to help with sewing the units together:

Jungle Magnolia - Curved Piece With Glued Smart Corner

Then you can see exactly where to sew the corner:

Jungle Magnolia - Smart Corner Sewn With Guide

Once the corner is sewn, you can remove the paper. I thought this was a great tip to pass along to others who might do Judy Niemeyer quilts! My personal tip to pass along is that a wooden cuticle stick is great to use when separating the paper from the fabric in places where you have used glue. They are also useful for tight places that aren't glued. Here are the units for one of the corners laid out so you can see how everything will come together:

Jungle Magnolia - Corner Units

Now the long wait for the next month's packet to arrive! Looking ahead in the pattern, it looks like next month will be pretty quick. After that, things will get interesting again!

I was also able to finish my Fading Strips shawl designed by Beata Jezek.

Fading Strips - Blocking

This was a fun and easy shawl to make. And the garter stitch pattern makes is squishy soft!

I also keep plugging along on my Peach Sorbet Throw designed by Janine Myska.

Peach Sorbet Throw

It's hard to see the progress on this blanket since I only seem to get a few rows finished each week, but it will still be done before I know it! I really do like how soft and cute this blanket is!

Finally, I was able to make a couple of quick projects that I needed to make before my next trip to visit my family. Last Christmas I made a couple of trivets for one of my sisters. I made them as a thank-you for always letting Grace (my dog) and I stay with her and for cooking a lot of wonderful meals for us. My other sister saw them and wanted some for herself so I made last weekend. First, there's the Hot Stuff Trivet. This trivet is quilted and has a silicon insert to protect the table from the hot dish:

Hot Stuff Trivet - Top

Hot Stuff Trivet - Back

You can buy the silicon insert with the pattern or you can get a refill of just the insert. Of course, I wasn't expecting to make another of these so I had thrown away the pattern and had to buy it again. This time I'm keeping it even though I don't expect to make another one of these! The other trivet is a simple rope trivet:

Rope Trivet

These are really easy to make and there are a bunch of books out there to tell you how. I happened to use Zigzag Rope Sewing Projects by Katherine Lile. For the fabric highlights, I used some of the fabric from the Hot Stuff Trivet and added some other matching scraps so that the two trivets go together. One tip I have when making rope trivets and bowls is to take the rope out of the original package and rewind it on something like this Christmas lights holder:

Rope Wound on Christmas Lights Holder

I found that when I used the rope directly from the package, I had trouble with the rope twisting and I had to fight with it a lot. If you unwind the rope from the original package and put it on the lights holder, you can relieve the twisting in the rope and it's easier to work with. At least, that's what it felt like to me. This was my first time using the rope from the lights holder so I don't know how I'll feel about it when I have more experience.

Nancy