Saturday, October 21, 2017

R

Hi all -

I mentioned in my last post that our friend Marci had my other friend Cathy and myself up to her cabin in Red Feather Lakes, CO for a long quilting retreat weekend. Cathy and I decided to each make her a little thank-you gift. I had just been reading the latest issue of Quilting Arts magazine and they had an article about making an initial quilt where you put a large initial in the center of the quilt and quilt around it with colored threads so that the initial pops up without being actually quilted. I thought that would be a fun, quick project that Marci would like.

I started by looking at fonts to find one that I liked. The article suggested looking at dafont.com for free fonts, so that's where I went. They have thousands of wonderful, free fonts! I found an "R" that I liked (Marci's last name begins with "R"), downloaded it, drew a large "R" in AdobeIllustrator and printed it out. I wanted the wallhanging to have a woodsy feel, so I chose a brown fabric and traced the "R" onto it. I sandwiched it up and started quilting. I decided to put a layer of heavyweight stabilizer between the batting and the backing to give the quilt some extra structure.


Going against the article's instructions, I went ahead and quilted the "R" and added a 1/4" echo line inside of the letter. That will give the letter more crispness and I think adds some character. I chose a nice, woodsy fabric for the back, too.


I then went to my thread stash and pulled out all of my variegated threads with leaf colors -- from green to yellow to red.


I thought it would be really cool if I could transition the colors across the quilt from the greens of spring through the yellows/reds of fall, so I loosely put the threads in that order.


I was also originally thinking of quilting the background with a bunch of different fills that transition from one to another, but as I thought about it I started to think that it might end up too chaotic with all of those colors and a bunch of background fills, so I decided to instead use a single background fill. My first thought was to use pebbles because I love to do them, they fill up the space well so would really define the "R" and Marci was fascinated with my pebble quilting when we were at the cabin. But pebbles don't always look good in variegated threads because of the large amount of backtracking, so I decided to instead us a background fill of leaves.


For some reason, I have a lot of trouble making consistently nice leaf shapes so some of the individual leaves are really ugly, but I think the overall effect is nice. And I like the way the color transitions from the greens in the lower-left corner to the yellows in the upper-right corner. There's probably too much blue in it (but I absolutely love those threads with the green/blue/yellow combination so I just kept adding them) and there's a section in the center of the lefthand side where a color in the thread blends too much with the background, but I do really like the overall effect!

Now I had to decide  how to finish it. I was originally thinking about couching some interesting threads around the outside in place of binding, but I couldn't come up with good threads/yarns for that. Then I started thinking that this quilt really wanted to be round rather than square. I've never made a round quilt before, but this one really wanted that. And I had put that extra layer of heavyweight stabilizer in the sandwich at the beginning, so it wouldn't have any problems with not laying flat on the wall, even with a simple hanger on the back. So it really seemed like it was meant to be.

Now I had to come up with a way to draw the circle for the quilt border of a quilt that was bigger than any circle templates (or plates, etc) in my house. So, I got a piece of freezer paper bigger than the quilt and folded it very carefully into quarters, making sure to crease the edges well so it would lie flat. I got a ruler and a pencil and drew a bunch of points across the paper that were all 8" from the corner fold.


I then stapled the paper while it was still folded so that nothing would shift. I stapled after drawing the marks because I didn't want the staples to get in the way of the ruler and I needed the dots on the paper so I would know where to put the staples.


Then all I had to do was make a smooth cut along the dots.


When I removed the staples and opened it up, I had a pretty good circle!


I ironed the freezer paper onto the back of the quilt, centering it over the "R". I put it on the back rather than the front just in case there were any problems.


Then I could just cut around the edge of the circle.


And turn it over to see a perfectly round quilt.


Then I just had to add the binding. Since the quilt is round, I had to use bias binding. To cut bias binding, I start by folding my fabric at a 90 degree angle and pressing the fold:


This is a simple way of finding the bias without messing with rulers or anything. I've seen other people who go to great lengths to find the "exact" 45 degree line from the selvage and carefully cut along that line, but I really feel like that is a waste of time and energy because you're not going to get it perfect anyway and being a little bit off from the exact bias really doesn't affect the stretchiness of the strips enough to be noticeable. So why hassle with it?

I press the edge crisply because I find that doing that makes the cutting easier. With the pressed edge, I can fold the fabric in half matching that edge to give me a nice shape for cutting my strips. I square up the edge by cutting off the fold, then I can easily cut my bias strips:


Then I could just sew my strips together and put them on the quilt just like I do for any quilt. Here's how it turned out:


I'm pretty pleased with it and I hope that Marci likes it!

Nancy

Tuesday, October 3, 2017

The Incredible Upside-Down Bag

Hi all -

I was lucky enough to spend this past long weekend (Thurs-Sun) on a quilting retreat at a friend's cabin in Red Feather Lakes, CO. It was a beautiful setting and a wonderful place to make some progress on some projects. In this post, I'm going to talk about the set of bags that I was able to finish on the retreat.

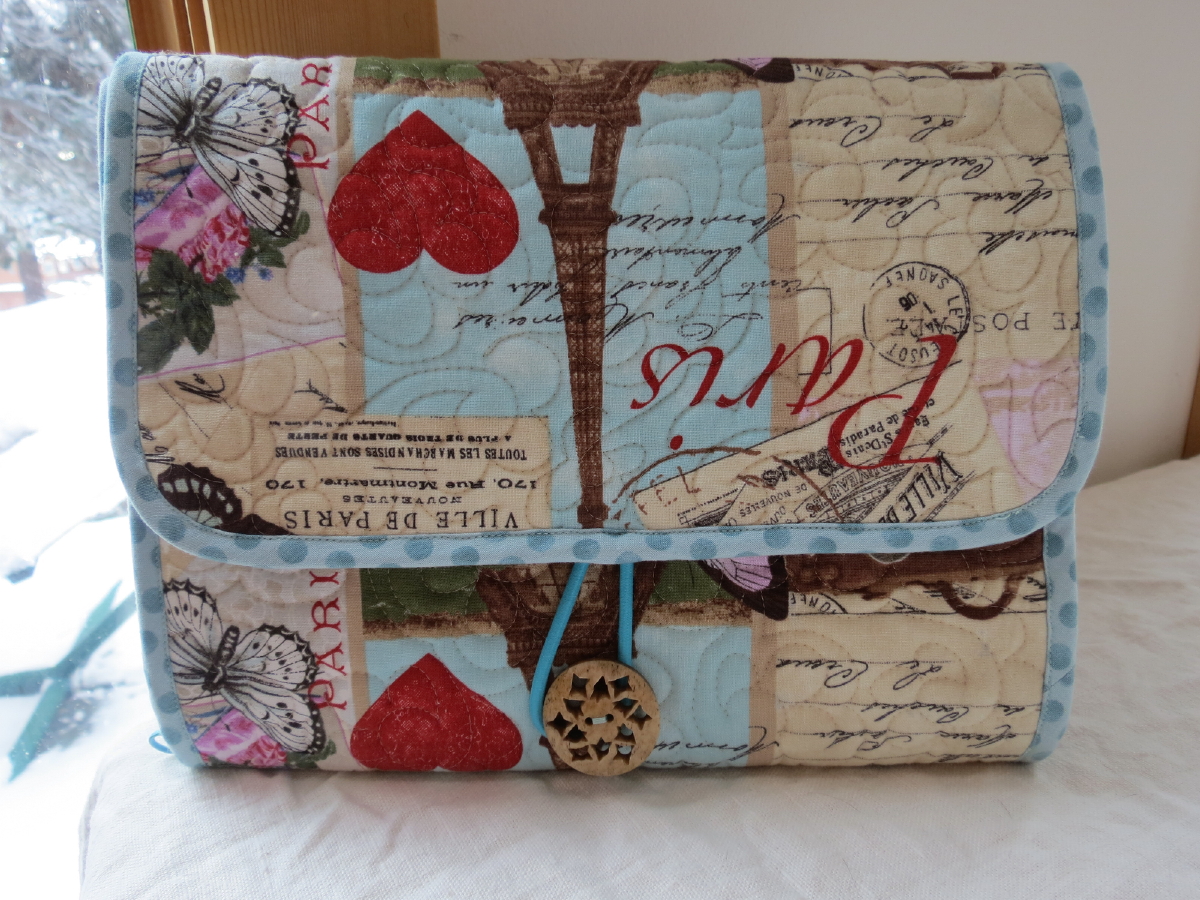
I think I've mentioned that my oldest sister has also become a quilter. I thought the perfect Christmas gift for her would be the set of bags in the Thread Dispenser/Sewing Case 2.0 pattern by byAnnie. I had originally planned on making these bags from my stash, but then I decided that I really wanted to make them out of Eiffle Tower fabrics, since that's where her husband proposed to her. I was excited to find the perfect fabrics on fabric.com.

The fabrics I got for both the inside and outside of the bags were directional so I knew I had to be careful to make sure that they didn't end up being upside-down. I spent a lot of time thinking about how this had to be done before starting the bag and I felt confident that I had it figured out. So, of course, I screwed it up and the main bag is upside-down. I now know that the key is that the outside fabric and the lining fabric have to face in opposite directions when you sandwich everything before quilting! Now to see if I can remember that for next time......

But I'm still happy with the bags. Here's a picture of both of the bags together, showing how well they match each other:


Pretty cool, huh? Got to love the incredible upside-down bag:


It has a lot of wonderful pockets on the inside:


(It looks crooked in the picture, but it really is straight. At least I got that part right!) The pattern had the bigger pocket on the bottom also made out of vinyl, but I thought it would be good to have a mesh pocket instead. And here is the outside of the bag, just so you can see the wonderful fabric:


Isn't that a pretty fabric when it's rightside-up?

The little bag is also pretty cute:


This one doesn't have a front or back, so it didn't matter what direction I put the fabric:


And it has a couple more pockets on the inside:


I think these will make a cute gift that she can make good use of.

We also have had our first taste of winter this week. We got several inches of snow overnight on Sunday and it continued to snow lightly most of the day on Monday. But it's supposed to be pretty nice tomorrow so it should all disappear by the end of the week.

I hope you are all enjoying autumn!

Nancy

Friday, September 15, 2017

Ice Cream Koozie and Gift Bags

Hi all -

No big accomplishments to share with you yet, so I thought I'd share some little things that I've made. A while ago I ran across a blog that described how to make an Ice Cream Koozie. What a wonderful idea! I like to eat Ben & Jerry's ice cream (a little too much!), but I hate holding onto the cold carton. I've always just wrapped the carton in a dish towel while eating the ice cream (because who likes to use a bowl????), so when I saw this blog I knew I had to make one for myself.

I think I made mine mostly like the directions describe, but I'm not sure since I really mostly just looked at the pictures and made it my own way. One change I did make was to add a layer of a extra firm sew-in stabilizer (Pellon 926) in the middle. I thought that would keep the koozie from flopping around and would add some extra insulation for my fingers. I think it was a good decision. I really like the stiffness it provides. I can still feel some of the cold through the koozie, but it works great. I also decided to round the corners because I thought the square corners would get in the way and rounded corners are easier to turn. I meant to add the elastic a little bit above the middle of that edge, which I thought was so obvious that I didn't think much as I did it, so, of course, I ended up putting the elastic a little bet below the center of that side. Oh well, it still works! Here it is going for its first test drive:


The other thing I've made since my last post were several Christmas gift bags. I try to make reusable gift bags for all of my gifts now, but they can take a while to make so I'm happy to get a start on my Christmas bags.


These are all of the gifts that I have so far so I'm completely caught up. Hopefully, I'll be disciplined enough to make new bags for each gift I get or make so I won't be rushing at the end! If you're interested, I wrote a blog post last year describing how I make these bags.

Well, that's all I've completed lately. I'm in the middle of knitting a little beaded scarf, so hopefully I'll be able to share that project soon.

Nancy

Sunday, September 3, 2017

Kaffe Kite Runner -- Quilting Part 1

Hi all -

I've started quilting on my Kaffe Kite Runner table runner. For me, deciding on the quilting design is always the hardest part. To help with this, I recently got an iPad Pro (in the beautiful rose-gold finish, of course!) and bought the Graphic app. This app is a drawing app much like Photoshop. I can take a picture of the quilt and then pull it into Graphic and draw different quilting designs until I get something I like. It has layers like Photoshop so I can put different parts of the quilting on different layers and turn them off and on to decide what I like. Time will tell whether this helps or it ends up being a time sink where I just keep trying things and can never make up my mind!

Before doing anything else on this table runner, I did my usual stitch-in-the-ditch quilting with invisible thread on all of the seams between the patterned fabric and the solid to stabilize everything. Then I did a basting stitch around the perimeter to stabilize that edge. The basting stitch holds the edge in place, but is easy to remove if I find that I have some bubbles in the fabric that I need to push to the outside of the quilt.

Then I used my iPad and Graphic app to design the first part of the quilting. I concentrated on the main solid areas and chose a quilting design that I decided to quilt using big stitch hand quilting. The first step was to draw the quilting lines on the quilt using water-soluable marker:


Then it was just a matter of doing the quilting one stitch at a time:


This is my first project using big stitch quilting that wasn't a class project just to try the technique. I used a size 5 pearl cotton and started with a John James size 22 chenille needle. I was having a lot of trouble getting the needle through the quilt in some places and was having a lot of hand pain from squeezing the needle like a vise to try to get it through. So I got out a needle grabber (a little piece of rubber like the old jar openers we used to have in the kitchen) and that helped a lot! I still had some trouble getting the needle through the quilt in some places, but with the grabber it was then a cinch to pull the thread through. I had gotten some new needle grabbers that fit over your finger tips so you don't have to keep picking it up, but when I tried those they didn't grab the needle enough so I was having to apply too much pressure with my thumb and was back to the hand pain so I went back to the old-fashioned needle grabber. I also tried a couple of different needles to see if I could find one that would go through the sandwich easier. First I tried a John James size 24 chenille needle, thinking that the smaller needle would pierce the fabric easier, but it didn't make a big enough hole so it was harder to pull the thread through. Then I tried a Sullivan's size 20 chenille needle and that worked a lot better for me. It was still hard to pierce the fabric in some places, but it was better than the first needle and I had an easier time making sure that the stitch went all the way through to the back with that needle.

Then it was just a matter of stitching and stitching until I finished all of the main motifs. I soaked the table runner to get out the blue marker so I could see what it looked like before continuing on. Here's the full table runner:


And a detail shot:


Next, I'm planning on doing some machine quilting to go along with the hand quilting and I've taken pictures of what I have so far on my iPad so I can start figuring out what will go in the other areas. This is how I generally work with the quilting. Decide on a piece, do it, then decide on the next piece. This works well for a lot of things and keeps me from getting completely stalled on my projects, but I do need to do more stepping back and trying to design over the whole quilt some times so that I can try to create more secondary designs and quilting that enhances the entire quilt rather than small areas of the quilt. But I think this method is working just fine for this piece.

Nancy

Saturday, August 19, 2017

Feather Study 28 Finished & Another Facing Method

Hi all -

Sorry for the long absence! I had other stuff going on and just hadn't gotten a project to an interesting point so I didn't have anything to post about. But now I have another finish so I'm ready to share! But I finally finished my Caryl Bryer Fallert-Gentry quilt, so today I have something to share. Yea!

Just to remind you, I started this quilt in a class in Houston several years ago. It's Caryl's Feather Study 28 pattern and here is the finished top:


(It's from a kit, so I can't take credit for the beautiful colors.)

Since it's a small quilt, I just used spray basting to make the quilt sandwich. I didn't want it to be puffy so I sandwiched it with a single layer of Warm & Natural cotton batting. I started off by doing stitch-in-the-ditch with invisible thread to stabilize everything. When I do SID, I stitch every seam that defines a line that I want to emphasize in the quilt. For this quilt, that meant that I stitched all of the seams that make up the feathers and their stems, but didn't stitch the seams between the background pieces because I wanted to unify the background. Since it's invisible thread, I can't show you this quilting in pictures.

The first visible quilting I did was the stems. I wanted to make them look rounded so I quilted them with C shapes:


I think that worked pretty well. My next quilting was in the foreground of the feathers, where I (not surprisingly) quilted tiny feathers:


And for the backgrounds of the feathers, I decided to use matchstick quilting:


I think it all looks pretty good together. The background was harder for me to figure out. I wanted to imply motion with the quilting -- I wanted the fronds to wave back and forth. I decided to start with echo quilting just on the left side of each frond. My thought was that this would be like the echo-like lines you draw on one side of a moving object in a cartoon:


I wouldn't be able to tell if this works until I finished the background quilting. The final choice was the background quilting and that was a really hard decision for me. I knew that it needed to be very dense since it had to be at least as dense as the foreground quilting. And I wanted lines that were somewhat horizontal to show the back-and-forth motion of the fronds. I didn't want it to be simple matchstick quilting since I'd already used that in the background of the feathers, but I wanted it to feel like the matchstick quilting for cohesion. I finally decided on wavy horizontal lines following the motion of the quilt. I started by drawing some registration lines with blue water-soluable marker to try to keep the lines in each background section looking like they were continuous. I added some flame shapes periodically to help me fill in spaces and to add some interest and some swirl to the motion. Here's what a little section looked like:


You can see the registration lines that I used. Here's the whole thing:


I love the look of it, but I'm not sure that I succeeded in making the background lines look continuous. It was really hard for me to follow the registration lines rather than making my background lines perpendicular to the edges of the feathers.

Now it was time to finish the edges. I decided to do a faced edge because I didn't have a good fabric for a binding and I thought it would look better without a frame anyway. I've already done a tutorial on one facing method, but I decided to try something slightly different this time.

This time I was going to do each border as a separate piece. That would allow me to understitch the edges. I started by sewing strips to the sides that were slightly shorter than the sides:


Actually, I started by sewing one side and then decided to sew twill tape around the edges because the side was trying to stretch as I sewed it:


I wasn't sure how the twill tape would work with a faced edge, but I figured that it couldn't hurt. So it was after sewing on the twill tape that I went back and sewed on the second side of the facing.

And then I realized that I had made a mistake. For this type of facing, the shorter sides end up underneath the full top and bottom, which means that the top and bottom pieces have to be sewn on first. Duh! So I had to do some unsewing, which included unsewing some of the twill tape that was put on after that first side.


Frustrating, but almost anything can be fixed! So, I sewed on the top and bottom strips:


And then sewed the side strips back into place:


Now it was time for the understitching. To understitch, you fold the facing piece over, leaving the raw edge of the quilt in place, then stitch along the edge of the fold, stitching the facing to the quilt edge. This makes it easier to get a clean edge when you fold the facing to the back.


It was harder to understitch the top and bottom. Basically, I folded the facing over the best I could and understitched just the areas I could reach, leaving the corners without understitching. It doesn't hurt anything to have spots that aren't understitched.

I then just clipped the corners, turned the facing to the back and hand-stitched it down:


I haven't figured out how to get the corners perfect yet, but I still really like how it turned out:


And here are a few more close-ups of the quilting. I'm not sure why the color is so far off in these pictures:


I added the hanging sleeve:


but haven't added the label yet. I need to decide on the name of this quilt, but I'm leaning towards Fronds. What do you think?

Nancy