Hi all -
This week I have a new project to share with you. I'm making a wallhanging for my nephew, Trevor, for Christmas. For this wallhanging, I'm using the techniques from Karen K. Stone's English Paper Piecing By Machine iQuilt class. I've wanted to try the technique and the blocks from the class are pretty cool, so this seemed like the perfect time. Since this is from a class, I won't go into much detail about how to make the blocks.
First I had to pick the fabrics. My mom used to buy me a couple of yards of 5 coordinating fabrics every year for my birthday. I loved that! I thought one of those sets would be perfect for a guy and Trevor will really appreciate the little bit of his grandma in the piece. So, here are the fabrics I chose:
My mom didn't believe me, but I thought she had a great eye for putting fabrics together!
The first step in Karen's method is to make templates. I made mine out of card stock:
I was worried that the cardstock wouldn't hold up, but it was one of the suggested materials and I had some on hand, so I went for it. The cardstock did curl up a bit, but it worked just fine.
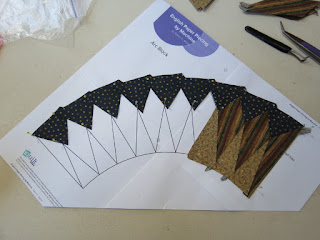
You prepare the pieces using the templates and lay them out on the pattern, gluing them together as you go:
Then you sew them together using machine applique with invisible thread. Here is my first block, before trimming:
In the class, Karen sews the arc together and then adds the inside and outside pieces, but I forgot that and glued everything together before sewing. For the second block, I did it Karen's way and felt like it was harder to keep the shape of the arc right, so I glued everything and sewed it all at once for the last two blocks. Here's what the first block looked like after trimming:
And here it is after leaving it laying on the cutting table overnight:
The cats do love fiber arts!
I now have the four blocks making the center of the wallhanging completed and have to decide how I want to put them together. My first thought was to make a circle with them:
I like the look, but it will be hard to put together this way. If I decide to make this block sometime, I think I'll make it as one continuous block so there won't be the ugly joins. This is the orientation that Karen used in the quilt for her class:
I think this is a more dynamic orientation, as well as being easier to piece, so I'll probably go with this one.
I still have to decide how I want to finish this. I could put simple borders on and do some fancy quilting. I could rotate it 45 degrees and add triangles in the corners with applique, like the ones in Karen's quilt. I think the applique triangles would be cooler, but I also don't want the wallhanging to get too big since it's harder to find wall space for larger quilts. I have time to sleep on this for a little while before the Christmas rush is on. I'll let you know what I decide.
Nancy


I love the colors! It is going to be beautiful.
ReplyDeleteStunning work, Nancy. I agree with you about your mom's choice of color/texture/value in the fabrics. That stripe was the perfect popper!
ReplyDeleteThanks! It was a bit of a pain to get the stripes to line up like that, but I think it was worth it.
DeleteI love what you are doing with this. I, too, have that iquilt class with Karen Stone, but haven't done anything with it yet. I need a quilt for my bed, and this may be something I use in it. Your colors are great in this. I like the bottom orientation.
ReplyDeleteThanks! It's a lot of work, but I think it'll make a gorgeous bed quilt. Can't wait to see what you do with it!
Delete