Hi all -
Recently, I pulled out a class project to work on. Feather Study 28, from a Caryl Bryer Fallert Gentry class, had been weighing on my mind for a while. It was a quilt that I really wanted to finish, but I knew that I needed to undo a bunch of work that I did in class before I could go any further. This was one of those frustrating classes where the instruction was great, but there was way too little room for us to really do the work. This was a class in Houston in 2012. Classroom space in Houston is generally pretty tight. You have a room that is filled with those brown rectangular tables with folding legs that you see everywhere. You generally have two people per table, with the tables set in three columns, one against each side wall and one down the middle. The teacher has a table or two up front and there are a couple of tables in the back with 2 irons set up. This was the setup that we had, along with a sewing machine for each student. We were learning Caryl's appli-piecing method in that class. For that, we also needed light boxes, irons and individual little design walls. So, we were sharing light boxes and irons and needed to put our design walls (a piece of white flannel) on the walls, where there wasn't enough room for everybody. I knew right away that I wouldn't get much done on the project because I tend to shut down in those tight situations. So I concentrated on listening and learning, and tried to get some work done with my design wall sharing my half-table space with my sewing machine.
I know it sounds like I was really upset about the setup, but I truly do understand the limitations of these types of classes and do my best to roll with it. I'm just sharing all of this to help you understand why the stuff I did in class didn't go well. We started by piecing one of the feather pieces. I decided to just work in my space and hope that I could get the pieces close enough together without trying to get time on one of the light boxes, but, as you can see, that didn't go well:
You can see how my finished section doesn't fit in with the rest of the pattern at all. So I knew I would have to take it home and redo it in more ideal circumstances. I did continue on and made a bit more progress that went better and here is what I had finished by the end of the class:
(The feather, stem and background piece are not sewn together in the picture, they are just laying next to each other.) So this was the state of the project when I pulled it out again last week.
The first thing I did was take apart the feather piece. That wasn't a lot of fun! It's not easy to unstitch invisible thread seams that have been glued together. I knew this would be hard, so I think that's probably what was keeping me from getting back to this piece. but I got it done and then continued on. Here you can see how well the pieces from the above picture fit together now:
(The are all sewn together in this picture.)
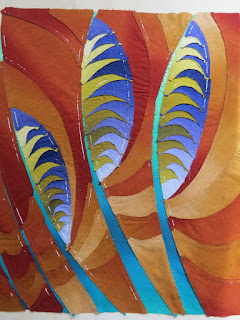
Once I got going, the technique was really fast and I got the entire top pieced in less than a week:
The colors are a lot brighter in person and the piece has a lot of excitement. This technique has you ironing the freezer paper pattern pieces to the backs of the fabric, then appliqueing them together along the seams with a narrow zigzag stitch. So, after you're done you have to take out all of the freezer paper. It was impossible to get out all of the paper, especially in the narrow points of the feathers, but I did a pretty good job of getting it out and I don't think the remaining paper will cause any problems:
I really love how this turned out and really look forward to quilting it! Of course, I'm also working on other things at the same time so we'll see when the quilting gets done....
Nancy


Wow Nancy this looks so bright and with your lovely quilting it'll be great. What fun.
ReplyDeleteWendy
Thanks! I'm still thinking about how to quilt it, but I have some ideas.
DeleteI'm glad you went back to this project! It looks great now! I hear you about the "available" space in classes. I tend to do as you. . .listen and try to learn as much as I can. I have physical limitations so it takes me longer to do everything as I need to put the activity into a format that I can do without causing me more pain. In the end, it always works. These are beautiful feathers!
ReplyDeleteI'm glad I'm working on it again, too, and am also looking at other class projects to finally finish. I realized the other reason I never seem to finish my class projects is that most are from Houston and when I get back I need to concentrate on Christmas presents, so have to put them aside right away. I'll have to think about how to change that.
DeleteOMG I love that piece. Good going to finish! Sharon
ReplyDeleteWonderful result. I'm glad you went back and picked this up again and ran with it. I also sometime shut down in such circumstances in a class but also tend to learn a lot.
ReplyDeleteThanks! I'm glad I'm not the only one that that happens to.
Delete