Hi all -
Sorry for the long absence! I had other stuff going on and just hadn't gotten a project to an interesting point so I didn't have anything to post about. But now I have another finish so I'm ready to share! But I finally finished my Caryl Bryer Fallert-Gentry quilt, so today I have something to share. Yea!
Just to remind you, I started this quilt in a class in Houston several years ago. It's Caryl's Feather Study 28 pattern and here is the finished top:
(It's from a kit, so I can't take credit for the beautiful colors.)
Since it's a small quilt, I just used spray basting to make the quilt sandwich. I didn't want it to be puffy so I sandwiched it with a single layer of Warm & Natural cotton batting. I started off by doing stitch-in-the-ditch with invisible thread to stabilize everything. When I do SID, I stitch every seam that defines a line that I want to emphasize in the quilt. For this quilt, that meant that I stitched all of the seams that make up the feathers and their stems, but didn't stitch the seams between the background pieces because I wanted to unify the background. Since it's invisible thread, I can't show you this quilting in pictures.
The first visible quilting I did was the stems. I wanted to make them look rounded so I quilted them with C shapes:
I think that worked pretty well. My next quilting was in the foreground of the feathers, where I (not surprisingly) quilted tiny feathers:
And for the backgrounds of the feathers, I decided to use matchstick quilting:
I think it all looks pretty good together. The background was harder for me to figure out. I wanted to imply motion with the quilting -- I wanted the fronds to wave back and forth. I decided to start with echo quilting just on the left side of each frond. My thought was that this would be like the echo-like lines you draw on one side of a moving object in a cartoon:
I wouldn't be able to tell if this works until I finished the background quilting. The final choice was the background quilting and that was a really hard decision for me. I knew that it needed to be very dense since it had to be at least as dense as the foreground quilting. And I wanted lines that were somewhat horizontal to show the back-and-forth motion of the fronds. I didn't want it to be simple matchstick quilting since I'd already used that in the background of the feathers, but I wanted it to feel like the matchstick quilting for cohesion. I finally decided on wavy horizontal lines following the motion of the quilt. I started by drawing some registration lines with blue water-soluable marker to try to keep the lines in each background section looking like they were continuous. I added some flame shapes periodically to help me fill in spaces and to add some interest and some swirl to the motion. Here's what a little section looked like:
You can see the registration lines that I used. Here's the whole thing:
I love the look of it, but I'm not sure that I succeeded in making the background lines look continuous. It was really hard for me to follow the registration lines rather than making my background lines perpendicular to the edges of the feathers.
Now it was time to finish the edges. I decided to do a faced edge because I didn't have a good fabric for a binding and I thought it would look better without a frame anyway. I've already done a tutorial on one facing method, but I decided to try something slightly different this time.
This time I was going to do each border as a separate piece. That would allow me to understitch the edges. I started by sewing strips to the sides that were slightly shorter than the sides:
Actually, I started by sewing one side and then decided to sew twill tape around the edges because the side was trying to stretch as I sewed it:
I wasn't sure how the twill tape would work with a faced edge, but I figured that it couldn't hurt. So it was after sewing on the twill tape that I went back and sewed on the second side of the facing.
And then I realized that I had made a mistake. For this type of facing, the shorter sides end up underneath the full top and bottom, which means that the top and bottom pieces have to be sewn on first. Duh! So I had to do some unsewing, which included unsewing some of the twill tape that was put on after that first side.
Frustrating, but almost anything can be fixed! So, I sewed on the top and bottom strips:
And then sewed the side strips back into place:
Now it was time for the understitching. To understitch, you fold the facing piece over, leaving the raw edge of the quilt in place, then stitch along the edge of the fold, stitching the facing to the quilt edge. This makes it easier to get a clean edge when you fold the facing to the back.
It was harder to understitch the top and bottom. Basically, I folded the facing over the best I could and understitched just the areas I could reach, leaving the corners without understitching. It doesn't hurt anything to have spots that aren't understitched.
I then just clipped the corners, turned the facing to the back and hand-stitched it down:
I haven't figured out how to get the corners perfect yet, but I still really like how it turned out:
And here are a few more close-ups of the quilting. I'm not sure why the color is so far off in these pictures:
I added the hanging sleeve:
but haven't added the label yet. I need to decide on the name of this quilt, but I'm leaning towards Fronds. What do you think?
Nancy
This is where I describe my quilting, knitting and crafting journey -- both the successes and the failures. There are so many interesting things to do and try! I hope you enjoy sharing my journey with me!
Saturday, August 19, 2017
Thursday, July 20, 2017
Luv Shack Top Pieced
Hi all -
As usual, I've been jumping around on my quilting projects. I was doing more paper piecing for the blocks for the quilt that I started in my Batik Wheels class at the KCRQF, but I kept thinking about a paper piecing kit I'd bought years ago with a gift certificate that I got from a friend. I decided that I needed to dig it out and get it pieced.
The main blocks of the quilt are paper pieced from a large stash of red and fuchsia/purple fabrics:
There are 12 of these blocks arranged with sashing and half-square triangle cornerstones (this picture is probably closest to the true colors of the quilt):
There are two borders: a plain, thin border and a wider random piano key border:
I love the bright colors of this quilt and how it just glows! The pattern is Luv Shack by Heather Pregger and Kyra Loadman. The instructions aren't the greatest, but it's an easy quilt to figure out. They also have you make the outer border using strip sets, but I cut each piece individually and pieced them randomly. I'm the type of person who has to look for the pattern when there is one, so "random" piecing using strip sets doesn't work well for me.
I was also able to sign up for my classes for Houston this week. I didn't get my class catalog early. like I was supposed to, so I watched the Web site like a hawk and submitted my registration as soon as that opened up. I got my confirmation the next day and I got all but one of my requested classes, so that was lucky. The class I didn't get is on Monday afternoon, so I submitted an addition to the registration to try to fill that spot. Since the show isn't going on then, I won't have anything to do that afternoon if I don't get into a class. The addition hasn't been processed yet, but hopefully I'll get into one of the two classes I chose. I've had my hotel reservations since last Nov and I bought my plane tickets this week, so all I have left to do is reserve a spot on the Super Shuttle. I'd better get that done soon so I don't forget!
Hope you're enjoying your summer!!
Nancy
As usual, I've been jumping around on my quilting projects. I was doing more paper piecing for the blocks for the quilt that I started in my Batik Wheels class at the KCRQF, but I kept thinking about a paper piecing kit I'd bought years ago with a gift certificate that I got from a friend. I decided that I needed to dig it out and get it pieced.
The main blocks of the quilt are paper pieced from a large stash of red and fuchsia/purple fabrics:
There are 12 of these blocks arranged with sashing and half-square triangle cornerstones (this picture is probably closest to the true colors of the quilt):
There are two borders: a plain, thin border and a wider random piano key border:
I love the bright colors of this quilt and how it just glows! The pattern is Luv Shack by Heather Pregger and Kyra Loadman. The instructions aren't the greatest, but it's an easy quilt to figure out. They also have you make the outer border using strip sets, but I cut each piece individually and pieced them randomly. I'm the type of person who has to look for the pattern when there is one, so "random" piecing using strip sets doesn't work well for me.
I was also able to sign up for my classes for Houston this week. I didn't get my class catalog early. like I was supposed to, so I watched the Web site like a hawk and submitted my registration as soon as that opened up. I got my confirmation the next day and I got all but one of my requested classes, so that was lucky. The class I didn't get is on Monday afternoon, so I submitted an addition to the registration to try to fill that spot. Since the show isn't going on then, I won't have anything to do that afternoon if I don't get into a class. The addition hasn't been processed yet, but hopefully I'll get into one of the two classes I chose. I've had my hotel reservations since last Nov and I bought my plane tickets this week, so all I have left to do is reserve a spot on the Super Shuttle. I'd better get that done soon so I don't forget!
Hope you're enjoying your summer!!
Nancy
Monday, July 10, 2017
Monarch Heart
Hi All -
Today, I thought I'd share a little quilt that I just made for a friend. She is in the midst of her second battle with breast cancer. Another friend suggested that we each secretly make some sort of Monarch butterflies to send to her because the Monarch is her symbol of strength. I thought that was a great idea, so I started looking at "monarch coloring book" images on Google. There were a bunch of really cool images, but when I found a set of images each with a butterfly inside of a heart, I knew that that was what I needed to do. This is the image that I chose:
It came from https://www.getcoloringpages.org/downloads/butterfly-and-heart-design-9, if you are interested in seeing their other cool designs. This design is perfect for a little wholecloth quilt, so that's what I decided to make.
To get started, I loaded the image into Adobe Illustrator, scaled it up to the size I wanted to make and printed it onto regular paper. I decided to make it about 12" square, so I had to tape several pages together to get the full image:
Next, I had to choose the fabric. I wanted an orange fabric to represent the Monarch. I started by looking at some fabrics with some texture. I really wanted to use this fabric and had originally convinced myself that it would be wonderful, but after sleeping on it I started to feel like the pattern in the fabric would overshadow the quilting:
But I was still really wanting to use a patterned fabric, so next I set my heart on this fabric:
I love the deeper color and how the dots suggest the dots on the Monarch's wings and how the flow of the pattern suggests the fluttery flight of a butterfly, but in the end I was too worried about the pattern making it hard to see the quilting so I ended up putting this one aside, too. I finally decided that I would have to stick with a more solid fabric:
The other decision I had to make was the thread. I stuck with my favorite FilTec Glide. I love how this thread shines and how easy it is to work with. I wanted to do the subtle color change of the original picture, so I chose a black and a dark gray for the quilting:
I always choose my threads by unwinding a bit and laying it on top of the fabric. I don't pool the thread like some people do because I want to get a sense for how a single line of quilting will look on the fabric. (Note that the quilted line will be slightly darker than the line you get when laying the thread on top of the fabric because the quilted line makes holes in the quilt that create shadows that darken the quilting line slightly.)
Now that I had chosen my supplies, I could get to the business of making the quilt. First step was to transfer the image to the fabric. I use a lightbox:
And transfer the lines using a blue water-soluable pen:
Turning on and off the lightbox makes it really easy to check for missed lines.
Next I needed to sandwich the quilt. Even though the colors don't go with the front of the quilt at all, I decided to use a breast cancer fabric for the backing since that seemed most appropriate:
For small quilts like this, I like to use basting spray to hold the layers together:
(For bigger quilts, I generally pin baste since it's hard to deal with the layers on a large quilt without help and I feel like the pins hold things more securely for me.)
Now for the fun part -- the quilting! I started with the black thread. I was afraid of accidentally quilting with the black outside of the butterfly boundary, so I started by quilting the boundary and then filled in the middle:
(If you look closely, you might be able to see the little blip at the bottom on the left side of the butterfly where I accidentally followed a line in the heart instead of the butterfly line, but it was subtle enough that I decided to leave it when I found it.) I didn't quilt the antennae at this point because I wanted to make sure that they were quilted over the heart rather than under it.
Then I switched thread to the gray and quilted the heart. Then I switched back to the black thread for the antennae:
It always looks messy to me with the blue markings, so I soaked the quilt right away to get rid of those:
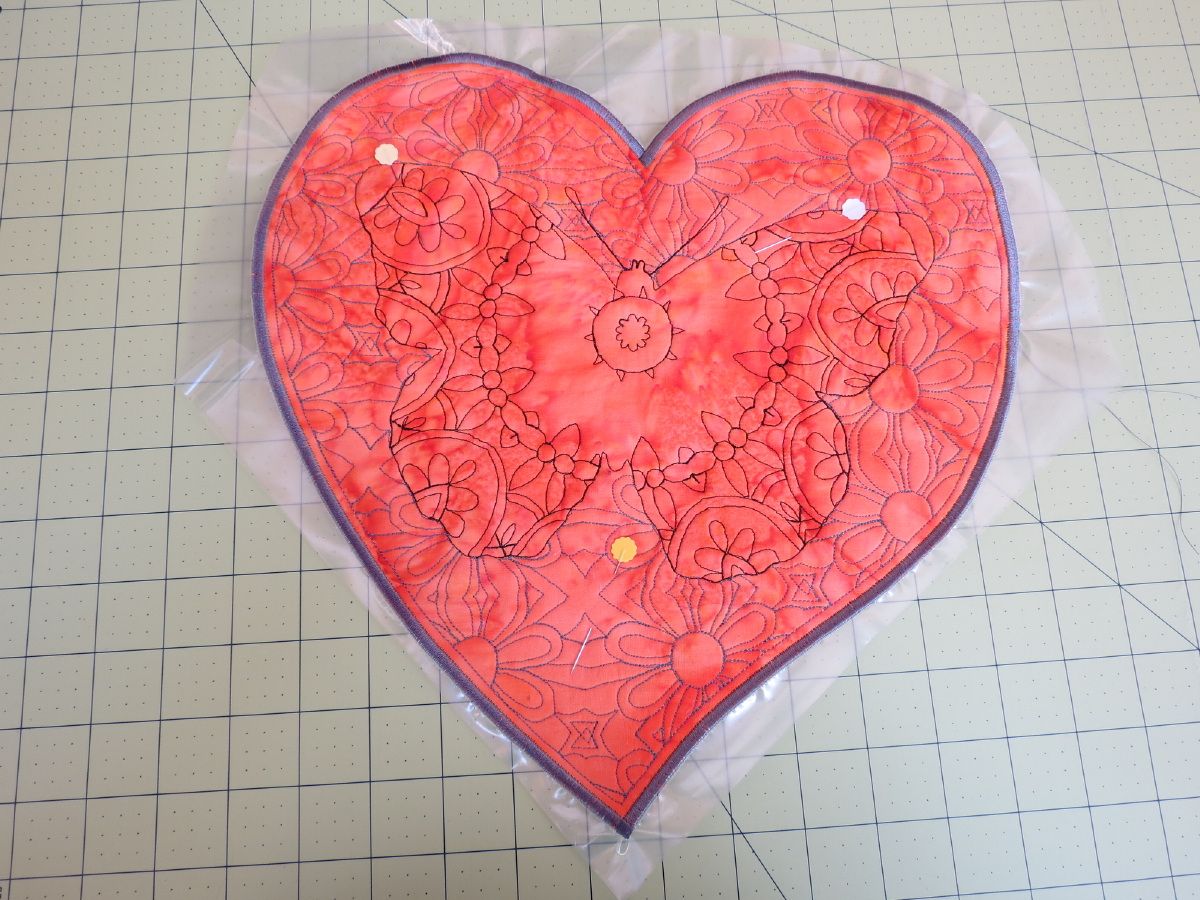
Ahhhh! So much better! I like the way the butterfly subtly separates itself from the heart.
Now I had to make another decision -- how to finish the edges?? I'm always so uncertain about these decisions, but I also like thinking about the possibilities, so I just have to let it sit for a little while I mull things over. I felt a binding would be too bulky for the delicacy of this piece. It would also be difficult to put on around the heart shape.I thought about couching something fun around the edge, but I didn't have anything that would look good and I wanted to get the piece finished so it would get to my friend as soon as possible. So I finally decided to just satin stitch around the edge of the quilt using the dark gray thread.
To start, I just quilted a line a quarter of a inch from the outside of the quilt. This line would stabilize the edge of the quilt and keep the edge from folding under while I was doing the satin stitching:
To quilt this line, I used the echo quilting foot on my Bernina:
I love this foot for quilting around thick areas on your quilt, like around hand embroidery, but I'd never tried it for echo quilting before. It worked great! When I've tried to do 1/4" echo quilting with my regular darning foot, I've had trouble seeing things so my lines would always waver, but the visibility on this foot is great and it was a lot easier to use. Once that line was quilted, I trimmed the heart just outside of the line. (The color of the quilt is more like the above pictures than this picture.)
Then I just started satin stitching around the edge of the quilt. I found that the satin stitching was causing the edge of the quilt to curl pretty severely, so I stopped after 4 or 5 inches and ripped out those stitches. It was clear that I needed to add a stabilizer. I looked through my stabilizers and this is the one that I chose:
This is a heavyweight water-soluable stabilizer. I think that one layer of this stabilizer would have been enough, but I used two layers instead. I wanted to make sure that I didn't have to rip out the stitches again because I was afraid that all of the holes from the satin stitching would weaken the edge of the quilt. Better to waste an extra layer of stabilizer than to have to start over on the quilt!
I just pinned the quilt on top of the stabilizer in 3 places and that was enough to hold everything in place. This time the satin stitching went perfectly!
Since I've only satin stitched the edge of a quilt once or twice before, I wasn't sure how to tie things off neatly. I decided to tie the two threads together on the back:
And then run the thread ends underneath the satin stitching before trimming it off:
I think that's going to hold everything in place well. The last steps were to tear away as much of the stabilizer as I could, and then soak the quilt again to remove the remaining stabilizer. I found that the stabilizer was thick enough that I had to cut it with scissors to get the tears started, but then it tore pretty easily next to the stitching. I'm not sure if I got all of the stabilizer out with the final soaking, but I actually hope that a little bit stayed in because I think that'll help hold the thread ends better.
Unfortunately, after waiting overnight for the quilt to dry, I forgot to take a final picture before putting it into the envelope and taking it to the Post Office. But I think you can see it well enough in the picture before the stabilizer was removed. I did remember to sign the back, though.
I hope you like this little quilt. It was fun to make and my friend was happy to receive it!
Nancy
Today, I thought I'd share a little quilt that I just made for a friend. She is in the midst of her second battle with breast cancer. Another friend suggested that we each secretly make some sort of Monarch butterflies to send to her because the Monarch is her symbol of strength. I thought that was a great idea, so I started looking at "monarch coloring book" images on Google. There were a bunch of really cool images, but when I found a set of images each with a butterfly inside of a heart, I knew that that was what I needed to do. This is the image that I chose:
It came from https://www.getcoloringpages.org/downloads/butterfly-and-heart-design-9, if you are interested in seeing their other cool designs. This design is perfect for a little wholecloth quilt, so that's what I decided to make.
To get started, I loaded the image into Adobe Illustrator, scaled it up to the size I wanted to make and printed it onto regular paper. I decided to make it about 12" square, so I had to tape several pages together to get the full image:
Next, I had to choose the fabric. I wanted an orange fabric to represent the Monarch. I started by looking at some fabrics with some texture. I really wanted to use this fabric and had originally convinced myself that it would be wonderful, but after sleeping on it I started to feel like the pattern in the fabric would overshadow the quilting:
But I was still really wanting to use a patterned fabric, so next I set my heart on this fabric:
I love the deeper color and how the dots suggest the dots on the Monarch's wings and how the flow of the pattern suggests the fluttery flight of a butterfly, but in the end I was too worried about the pattern making it hard to see the quilting so I ended up putting this one aside, too. I finally decided that I would have to stick with a more solid fabric:
The other decision I had to make was the thread. I stuck with my favorite FilTec Glide. I love how this thread shines and how easy it is to work with. I wanted to do the subtle color change of the original picture, so I chose a black and a dark gray for the quilting:
I always choose my threads by unwinding a bit and laying it on top of the fabric. I don't pool the thread like some people do because I want to get a sense for how a single line of quilting will look on the fabric. (Note that the quilted line will be slightly darker than the line you get when laying the thread on top of the fabric because the quilted line makes holes in the quilt that create shadows that darken the quilting line slightly.)
Now that I had chosen my supplies, I could get to the business of making the quilt. First step was to transfer the image to the fabric. I use a lightbox:
And transfer the lines using a blue water-soluable pen:
Turning on and off the lightbox makes it really easy to check for missed lines.
Next I needed to sandwich the quilt. Even though the colors don't go with the front of the quilt at all, I decided to use a breast cancer fabric for the backing since that seemed most appropriate:
For small quilts like this, I like to use basting spray to hold the layers together:
(For bigger quilts, I generally pin baste since it's hard to deal with the layers on a large quilt without help and I feel like the pins hold things more securely for me.)
Now for the fun part -- the quilting! I started with the black thread. I was afraid of accidentally quilting with the black outside of the butterfly boundary, so I started by quilting the boundary and then filled in the middle:
(If you look closely, you might be able to see the little blip at the bottom on the left side of the butterfly where I accidentally followed a line in the heart instead of the butterfly line, but it was subtle enough that I decided to leave it when I found it.) I didn't quilt the antennae at this point because I wanted to make sure that they were quilted over the heart rather than under it.
Then I switched thread to the gray and quilted the heart. Then I switched back to the black thread for the antennae:
It always looks messy to me with the blue markings, so I soaked the quilt right away to get rid of those:
Ahhhh! So much better! I like the way the butterfly subtly separates itself from the heart.
Now I had to make another decision -- how to finish the edges?? I'm always so uncertain about these decisions, but I also like thinking about the possibilities, so I just have to let it sit for a little while I mull things over. I felt a binding would be too bulky for the delicacy of this piece. It would also be difficult to put on around the heart shape.I thought about couching something fun around the edge, but I didn't have anything that would look good and I wanted to get the piece finished so it would get to my friend as soon as possible. So I finally decided to just satin stitch around the edge of the quilt using the dark gray thread.
To start, I just quilted a line a quarter of a inch from the outside of the quilt. This line would stabilize the edge of the quilt and keep the edge from folding under while I was doing the satin stitching:
To quilt this line, I used the echo quilting foot on my Bernina:
I love this foot for quilting around thick areas on your quilt, like around hand embroidery, but I'd never tried it for echo quilting before. It worked great! When I've tried to do 1/4" echo quilting with my regular darning foot, I've had trouble seeing things so my lines would always waver, but the visibility on this foot is great and it was a lot easier to use. Once that line was quilted, I trimmed the heart just outside of the line. (The color of the quilt is more like the above pictures than this picture.)
Then I just started satin stitching around the edge of the quilt. I found that the satin stitching was causing the edge of the quilt to curl pretty severely, so I stopped after 4 or 5 inches and ripped out those stitches. It was clear that I needed to add a stabilizer. I looked through my stabilizers and this is the one that I chose:
This is a heavyweight water-soluable stabilizer. I think that one layer of this stabilizer would have been enough, but I used two layers instead. I wanted to make sure that I didn't have to rip out the stitches again because I was afraid that all of the holes from the satin stitching would weaken the edge of the quilt. Better to waste an extra layer of stabilizer than to have to start over on the quilt!
I just pinned the quilt on top of the stabilizer in 3 places and that was enough to hold everything in place. This time the satin stitching went perfectly!
Since I've only satin stitched the edge of a quilt once or twice before, I wasn't sure how to tie things off neatly. I decided to tie the two threads together on the back:
And then run the thread ends underneath the satin stitching before trimming it off:
I think that's going to hold everything in place well. The last steps were to tear away as much of the stabilizer as I could, and then soak the quilt again to remove the remaining stabilizer. I found that the stabilizer was thick enough that I had to cut it with scissors to get the tears started, but then it tore pretty easily next to the stitching. I'm not sure if I got all of the stabilizer out with the final soaking, but I actually hope that a little bit stayed in because I think that'll help hold the thread ends better.
Unfortunately, after waiting overnight for the quilt to dry, I forgot to take a final picture before putting it into the envelope and taking it to the Post Office. But I think you can see it well enough in the picture before the stabilizer was removed. I did remember to sign the back, though.
I hope you like this little quilt. It was fun to make and my friend was happy to receive it!
Nancy
Saturday, June 24, 2017
Kansas City Regional Quilt Festival 2017 - Classes
Hi all -
In this post, I'll describe the classes that I took at the KCRQF.
Batik Wheels with Deb Karasik
The first class was Batik Wheels with Deb Karasik on Thursday from 8-3. This was a piecing class for a New York Beauty class that I took for fun. Here is the class project:
It wasn't hanging very well, so here is a picture of the pattern so you can see it better and in some other colors:
I enjoyed this class. I have some experience with New York Beauty quilts so I'm confident in making them on my own, but Deb had some good tips and tricks that I liked. I liked the way that Deb taught.
She described each step in making the blocks and gave her tips along the way, but she stressed that these are the things that work for her and we have to find the things that work for us. She gave good demonstrations and gave us plenty of time to work on our own. I also liked the room setup:
The machines were set up in two rows, with two machines per table. There was enough room to do what we needed to do and the convention center power was designed well enough that we could use our own irons without blowing the breakers. At Houston, you can't have more than 2-3 irons for each class, so this was a nice change! I didn't want to do any color planning ahead of time, so I'm doing a scrappy version of the quilt. Here's what I got done in class:
I look forward to continuing to work on this quilt and may end up making it larger than the pattern.
Charming Logs with Barb Eichmeier
On Thursday evening (4-7pm), I had signed up for Charming Logs with Barb Eichmeier. This is the class that I gave to my sister so I don't have much information on it, but I wanted to mention what I thought was rude behavior with this class. This class was in the same room as my earlier class, so my sister met me there and we set her up at the machine that I had been using, then went to see some of the show in the short break between classes. I left a bunch of stuff, including my cutting mat, ironing surface, iron and power strip. In order to have the iron there, I had had to unplug the sewing machine, plug the power strip into its plug, then plug the sewing machine into my power strip. Anyway, when my sister got back to the class, 5 minutes before class was supposed to start, not only had someone taken her spot so she had to unplug and move all of her stuff, but the teacher had also started class early even though not everyone was there. I wanted to mention that here because I thought it was completely rude and inconsiderate. It's not difficult to figure out why there is stuff at one of the machines and there were enough machines for everyone, so there was no need for someone else to sit in her spot except that they really wanted that spot and didn't care that someone else was there first. And for the teacher to start early, there's really no excuse for that in my mind. And it will make me think twice before signing up for one of Barb Eichmeier's classes in the future.
I want to make sure to add that my sister said that she did enjoy the class once she got resettled. So the class itself might have been good.
BIG Easy Hand Quilting with Cynthia Schrader
Friday morning (8-11am) was BIG Easy Hand Quilting with Cynthia Schrader.
This class was about big stitch quilting. I had a class in this with Gyleen Fitzgerald in Houston a couple of years ago, but I wanted to get another take on starting and stopping so I took this class. It was a good thing that we didn't need much room in this class because we were completely crowded into a tiny room. Cynthia started off with a trunk show of her quilts. There were some nice quilts, but I got a little frustrated with this because she spent 1.5 hours of our 3 hour class on the trunk show. A couple of examples are useful. That many quilts are a waste of our time. And it didn't help that she made a little comment that if we were interested in buying any of her quilts, we should catch her after class. But she did have a couple of good examples of how big stitch quilting can be used in quilts:
After the trunk show, Cynthia spent another 30 minutes teaching us to wind a skein of perl cotton into a ball. Sorry to be snitty, but I was getting a bit frustrated at this point. But after that we finally got down to actually stitching. I did like the way she did starts and stops, so that made the class worthwhile. This is all that I had time to get done in class, but it does include several starts and stops for practice:
Advanced Sit-Down Quilting on a Sweet 16: Combining Techniques to Create Ornate Motifs with Liz Granberg
My next class was the one that I was looking forward to the most. It's very rare to find an "advanced" quilting class anywhere, so I was excited to see what I could learn. But I got a bad feeling when I got into the classroom and there were only 12 Sweet 16 machines for a class of 18. Maybe I'm spoiled, but I personally think that making people share sewing machines in a sewing class is cheating the students out of their class time. I appreciate the loan of the machines for the class and understand how expensive that is, but I also think that if there is a possibility of sharing machines that it should be mentioned in the class description before you sign up and pay for the class because it makes a difference in the quality of the class. But this was not mentioned in the description. And this was the class where you could bring your own projects to work on. So I don't understand how you can share machines when you are each using different thread for your projects. So I was pretty unhappy to start with.
This class started off with a 1.5 hour presentation. That could have been good, but this presentation was a beginning quilting presentation and this was supposed to be an "advanced" quilting class! The presentation covered needles and how they are numbered, threads and how they are numbered, marking tools and the difference between air erase markers and water soluable markers, etc, etc, etc. All good information, but in my opinion advanced quilters should already know all of this. What I really wanted to hear about was how she combined techniques (stencils and rulers were mentioned in the description) to make ornate motifs. After she finished the presentation, she had us stand and stretch. While stretching, she joined a conversation with a group of students who were trying to understand the difference between cross-wound and stacked thread and why the thread needs to come off of the spool in different directions for the two. So I stood and waited for what was going to come next. While I was standing there, she walked by and asked if I was still stretching and I said "Yes, because I'm not sure what we're supposed to be doing now," but she just continued walking by. Then there was mention that she was going to show us how to pin baste our quilts. At that point, I just picked up all of my stuff and left. This obviously was not an advanced class and I wasn't going to get anything out of it. That was probably rude of me and was something that I'd never done before, but I was probably going to lose it if I stayed in that class.
Border & Backgrounds with Angela Walters
On Saturday morning (8-11am) I had a class with Angela Walters. This was another class that I was really looking forward to; and I wasn't disappointed.
This was also in the Sweet 16 room, but, luckily, there were only 12 people in the class so there was no sharing of machines. I'm not sure if that was expected since they had put two copies of the handouts at each of the machines, but that's how it turned out so that was nice.
Before class started, Angela put a bunch of sample quilts on tables around the room. What a perfect alternative to wasting class time with a trunk show! This class was about border/background motifs, so Angela would demonstrate how to stitch the motif using a whiteboard:
She discussed how to stitch the motif, how to turn corners, variations on the motif and how to use the motif as a background fill. She would show examples of how the motif was used in a quilt and would show a stitched out sample.
Then she would sit down at someone's machine and demonstrate the stitching. Here's the one she stitched at my machine:
Then we would take some time to practice the stitching ourselves while she walked around the room helping anyone who had questions. Here are my samples from the class:
I thought it was a wonderful class! We learned exactly what the description said we would learn and it was presented in a clear and understandable way. Angela was pleasant and funny and made the class a lot of fun!
Free Motion and Rulers on a Sit Down Sweet 16 with Kelly Cline
My final class was Saturday afternoon (12-3pm) with Kelly Cline.
This was also in the Sweet 16 room and we all had to share machines. As I'm sure you've guessed, I wasn't happy about having to share machines, but Kelly at least conducted the class so that sharing the machines worked out. I wasn't sure exactly what to expect from this class since the description just said: "Each student will learn a variety of free motion designs and begin ruler work using a Handi Quilter Sweet 16 machine." My guess was that it was going to be pretty basic, but I thought I'd try it anyway since it mentioned ruler work. I was right about this being a basic class. But Kelly conducted it well. She would demonstrate a design on the whiteboard then we would practice it. She would remind us to switch to make sure everyone got time to practice the designs (of course, we also had to waste half of the time just sitting there while our partners stitched). The designs were extremely basic, so it was a wasted class for me but it matched the class description so it didn't bother me. Here are the designs we practiced in class:
After practicing the different motifs, Kelly gave a demonstration on how to use rulers and then we all got to practice that. The part at the bottom of my sample was me playing with the ruler that we got in our class materials:
I found that this ruler was a good size for my hand, but it slips a lot so I'm going to put something on the bottom to see if that helps. I heard online about using no-slip bathroom tape on the back to help with slipping, so I got some of that to try. I'll let you know in a later post how well that works. Kelly had a class sample that she had quilted up showing how to use the different quilting motifs in a flower:
Our class packets included a flower that we could play with ourselves:
I'll probably quilt this up at some point, just for fun.
Well, that's all of the classes that I took. I hope you enjoyed reading about them!
Nancy
In this post, I'll describe the classes that I took at the KCRQF.
Batik Wheels with Deb Karasik
The first class was Batik Wheels with Deb Karasik on Thursday from 8-3. This was a piecing class for a New York Beauty class that I took for fun. Here is the class project:
It wasn't hanging very well, so here is a picture of the pattern so you can see it better and in some other colors:
I enjoyed this class. I have some experience with New York Beauty quilts so I'm confident in making them on my own, but Deb had some good tips and tricks that I liked. I liked the way that Deb taught.
She described each step in making the blocks and gave her tips along the way, but she stressed that these are the things that work for her and we have to find the things that work for us. She gave good demonstrations and gave us plenty of time to work on our own. I also liked the room setup:
The machines were set up in two rows, with two machines per table. There was enough room to do what we needed to do and the convention center power was designed well enough that we could use our own irons without blowing the breakers. At Houston, you can't have more than 2-3 irons for each class, so this was a nice change! I didn't want to do any color planning ahead of time, so I'm doing a scrappy version of the quilt. Here's what I got done in class:
I look forward to continuing to work on this quilt and may end up making it larger than the pattern.
Charming Logs with Barb Eichmeier
On Thursday evening (4-7pm), I had signed up for Charming Logs with Barb Eichmeier. This is the class that I gave to my sister so I don't have much information on it, but I wanted to mention what I thought was rude behavior with this class. This class was in the same room as my earlier class, so my sister met me there and we set her up at the machine that I had been using, then went to see some of the show in the short break between classes. I left a bunch of stuff, including my cutting mat, ironing surface, iron and power strip. In order to have the iron there, I had had to unplug the sewing machine, plug the power strip into its plug, then plug the sewing machine into my power strip. Anyway, when my sister got back to the class, 5 minutes before class was supposed to start, not only had someone taken her spot so she had to unplug and move all of her stuff, but the teacher had also started class early even though not everyone was there. I wanted to mention that here because I thought it was completely rude and inconsiderate. It's not difficult to figure out why there is stuff at one of the machines and there were enough machines for everyone, so there was no need for someone else to sit in her spot except that they really wanted that spot and didn't care that someone else was there first. And for the teacher to start early, there's really no excuse for that in my mind. And it will make me think twice before signing up for one of Barb Eichmeier's classes in the future.
I want to make sure to add that my sister said that she did enjoy the class once she got resettled. So the class itself might have been good.
BIG Easy Hand Quilting with Cynthia Schrader
Friday morning (8-11am) was BIG Easy Hand Quilting with Cynthia Schrader.
This class was about big stitch quilting. I had a class in this with Gyleen Fitzgerald in Houston a couple of years ago, but I wanted to get another take on starting and stopping so I took this class. It was a good thing that we didn't need much room in this class because we were completely crowded into a tiny room. Cynthia started off with a trunk show of her quilts. There were some nice quilts, but I got a little frustrated with this because she spent 1.5 hours of our 3 hour class on the trunk show. A couple of examples are useful. That many quilts are a waste of our time. And it didn't help that she made a little comment that if we were interested in buying any of her quilts, we should catch her after class. But she did have a couple of good examples of how big stitch quilting can be used in quilts:
After the trunk show, Cynthia spent another 30 minutes teaching us to wind a skein of perl cotton into a ball. Sorry to be snitty, but I was getting a bit frustrated at this point. But after that we finally got down to actually stitching. I did like the way she did starts and stops, so that made the class worthwhile. This is all that I had time to get done in class, but it does include several starts and stops for practice:
Advanced Sit-Down Quilting on a Sweet 16: Combining Techniques to Create Ornate Motifs with Liz Granberg
My next class was the one that I was looking forward to the most. It's very rare to find an "advanced" quilting class anywhere, so I was excited to see what I could learn. But I got a bad feeling when I got into the classroom and there were only 12 Sweet 16 machines for a class of 18. Maybe I'm spoiled, but I personally think that making people share sewing machines in a sewing class is cheating the students out of their class time. I appreciate the loan of the machines for the class and understand how expensive that is, but I also think that if there is a possibility of sharing machines that it should be mentioned in the class description before you sign up and pay for the class because it makes a difference in the quality of the class. But this was not mentioned in the description. And this was the class where you could bring your own projects to work on. So I don't understand how you can share machines when you are each using different thread for your projects. So I was pretty unhappy to start with.
This class started off with a 1.5 hour presentation. That could have been good, but this presentation was a beginning quilting presentation and this was supposed to be an "advanced" quilting class! The presentation covered needles and how they are numbered, threads and how they are numbered, marking tools and the difference between air erase markers and water soluable markers, etc, etc, etc. All good information, but in my opinion advanced quilters should already know all of this. What I really wanted to hear about was how she combined techniques (stencils and rulers were mentioned in the description) to make ornate motifs. After she finished the presentation, she had us stand and stretch. While stretching, she joined a conversation with a group of students who were trying to understand the difference between cross-wound and stacked thread and why the thread needs to come off of the spool in different directions for the two. So I stood and waited for what was going to come next. While I was standing there, she walked by and asked if I was still stretching and I said "Yes, because I'm not sure what we're supposed to be doing now," but she just continued walking by. Then there was mention that she was going to show us how to pin baste our quilts. At that point, I just picked up all of my stuff and left. This obviously was not an advanced class and I wasn't going to get anything out of it. That was probably rude of me and was something that I'd never done before, but I was probably going to lose it if I stayed in that class.
Border & Backgrounds with Angela Walters
On Saturday morning (8-11am) I had a class with Angela Walters. This was another class that I was really looking forward to; and I wasn't disappointed.
This was also in the Sweet 16 room, but, luckily, there were only 12 people in the class so there was no sharing of machines. I'm not sure if that was expected since they had put two copies of the handouts at each of the machines, but that's how it turned out so that was nice.
Before class started, Angela put a bunch of sample quilts on tables around the room. What a perfect alternative to wasting class time with a trunk show! This class was about border/background motifs, so Angela would demonstrate how to stitch the motif using a whiteboard:
She discussed how to stitch the motif, how to turn corners, variations on the motif and how to use the motif as a background fill. She would show examples of how the motif was used in a quilt and would show a stitched out sample.
Then she would sit down at someone's machine and demonstrate the stitching. Here's the one she stitched at my machine:
Then we would take some time to practice the stitching ourselves while she walked around the room helping anyone who had questions. Here are my samples from the class:
I thought it was a wonderful class! We learned exactly what the description said we would learn and it was presented in a clear and understandable way. Angela was pleasant and funny and made the class a lot of fun!
Free Motion and Rulers on a Sit Down Sweet 16 with Kelly Cline
My final class was Saturday afternoon (12-3pm) with Kelly Cline.
This was also in the Sweet 16 room and we all had to share machines. As I'm sure you've guessed, I wasn't happy about having to share machines, but Kelly at least conducted the class so that sharing the machines worked out. I wasn't sure exactly what to expect from this class since the description just said: "Each student will learn a variety of free motion designs and begin ruler work using a Handi Quilter Sweet 16 machine." My guess was that it was going to be pretty basic, but I thought I'd try it anyway since it mentioned ruler work. I was right about this being a basic class. But Kelly conducted it well. She would demonstrate a design on the whiteboard then we would practice it. She would remind us to switch to make sure everyone got time to practice the designs (of course, we also had to waste half of the time just sitting there while our partners stitched). The designs were extremely basic, so it was a wasted class for me but it matched the class description so it didn't bother me. Here are the designs we practiced in class:
After practicing the different motifs, Kelly gave a demonstration on how to use rulers and then we all got to practice that. The part at the bottom of my sample was me playing with the ruler that we got in our class materials:
I found that this ruler was a good size for my hand, but it slips a lot so I'm going to put something on the bottom to see if that helps. I heard online about using no-slip bathroom tape on the back to help with slipping, so I got some of that to try. I'll let you know in a later post how well that works. Kelly had a class sample that she had quilted up showing how to use the different quilting motifs in a flower:
Our class packets included a flower that we could play with ourselves:
I'll probably quilt this up at some point, just for fun.
Well, that's all of the classes that I took. I hope you enjoyed reading about them!
Nancy
Subscribe to:
Posts (Atom)