Hi all -
I'm happy to announce that I've finished piecing the Hospice quilt top! I'm going to start with a picture of the top because I'm so excited about it:
I think it turned out really cool!
In my last post about this quilt, I'd finished the columns of stripes, so now I'll show you how I did the stars. I wanted to applique the stars on the blue rectangles before piecing the columns since that would be a lot easier than adding them later. But I had to be really careful about how I positioned the stars because it would be very obvious if they didn't line up pretty well. The eye would correct little wobbles, but nothing very big. So I started by drawing the finished parallelograms on graph paper:
I drew the left-facing and right-facing parallelograms on top of each other so I could find the overlapping area in the middle that would be the perfect spot for the star. I looked at simple star images online and found a shape that I liked. I printed it out in several sizes and laid them in the intersection until I found a size that looked good to me:
I slid the star behind the pattern and traced it in the precise location that I thought would look good:
The graph paper allowed me to position the start on an even 1/4" mark and made it easy to determine the location by counting the grid squares. One note of caution: if you use this method, don't forget to add the seam allowances to your measurement! For this block, I only needed to add the 1/4" inch on each side, extending the corner on each end, because of the way I constructed the quilt.
Now it was time to prepare the actual appliques. I used fusible applique and was worried about the blue background fabric shadowing through the white appliques. To counter this, I decided to add an extra layer to the applique shapes. I didn't want the stiffness of 2 layers of fusible so it dawned on me that I could use a layer of Shape-Flex under the applique fabric. Shape-Flex (Pellon SF101) is a fusible interfacing that feels like muslin with a fusible on one side. In the past I've used this as a stabilizer backing for hand embroidery that's been turned into a quilt and it worked really well for that. It was wonderful for this, too! To prepare for the applique, I cut a square of the applique fabric 1/2" bigger than the applique pattern on each side and a square of the Shape-Flex 1/4" bigger on each side:
I fused those together:
Then I traced the star on the back of some fusible web and fused that to the back of the Shape-Flex:
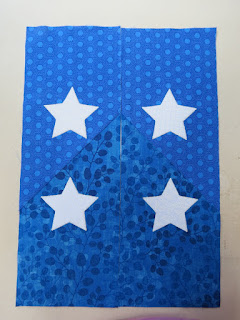
I cut out the star and positioned it on the blue rectangle:
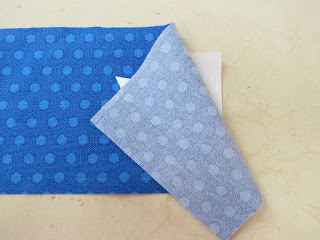
The bottom ruler was used to measure up to the applique location. The top ruler was used to make sure that the top point of the star was centered. To double-check my measurements, I folded each of the corners of the rectangle over to make sure that my seams wouldn't intersect the star on any side (this is how I figured out that I had originally forgotten to add the seam allowances to my placement calculations). I then fused the star to the rectangle.
To attach the star, I decided to use the double blanket stitch. I could also have used a satin stitch, but I haven't done much satin stitch so I'm not sure I could have made that look good, especially on the points (something to work on in another project!). To make sure I wouldn't get any puckering, I decided to add a square of stabilizer underneath each star. For that, I used Floriani's Stitch N Wash, a fusible water-soluable tearaway stabilizer. The fusible allowed me to use a square of stabilizer cut the same size as I had cut the applique fabric so there was little waste, and the water-soluable property made me fine with leaving some of the stabilizer in the final quilt. I fused the stabilizer on the back of the rectangle, underneath the star:
sewed around the star:
and tore away some of the stabilizer:
I wanted to tear the stabilizer away from the outside of the star so it wouldn't get in my way when I was sewing the rectangles together. I didn't tear it away from behind the star because I wanted to keep my manipulations of the rectangles to a minimum so they wouldn't be distorted before sewing them together. I can decide before quilting if I want to remove that stabilizer.
To double-check the star placement, I finished 4 rectangles first and sewed them together:
I did a left-facing and a right-facing and sewed the columns. Then just laid them next to each other and stepped back to make sure that everything seemed to line up nicely in all directions. I liked what I saw so I finished up the blue rectangles and added them to the red/white columns, laying them on the floor to see how they looked:
Just in case, I also laid them out so it looked like they were pointing up rather than down:
I decide I liked the original layout best, so I sewed the columns together and completed the quilt top:
Now I have to sandwich and quilt it. The quilting shouldn't take too long because this is a fairly small top (36" x 48", the requested size). I also still need to write the pattern from the notes that I kept while making the quilt. I'm also thinking about making another, larger one of these next year and seeing if I can get it into a modern quilt show. I think the design is graphic enough to fit that category. I could make it large enough for a Quilt of Valor (about 60" x 80") and then donate it after any shows. We'll see what my commitments look like next year.....
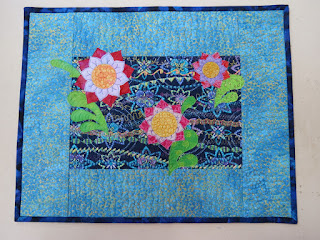
Before getting back to this quilt, I did go ahead and finish the little quilt that I used for the adding borders demo:
Patsy Thompson had had a sale on her Sizzix and Accuquilt cutting dies, so I picked up a bunch for $10 a piece. I decided to play with some of these to make the quilt more interesting, added some stitches and finished it with a binding. It's a silly little quilt, but I like it and plan on adding it to the quilt gallery I have going in my little cubicle at work. I hate looking at the gray fabric walls!
Another project that I have to get started on is a donation quilt for the IQA silent auction in Houston. All ribbon winners are asked to donate quilts so I said that I would. I can do anything for this quilt; it doesn't have to relate to my winning quilt. The only requirements are that it be no larger than 25"x25" and has a hanging sleeve and label. This has me a bit stressed because there will be quilts from well-known quilters in the auction and I'm afraid that nobody will bid on mine. But this will be a good challenge for me and I can always pay my friend to bid on mine if nobody else does. They want these to arrive in Houston by Sept 22, so I need to get cracking! I'll keep you updated as I design and make this quilt.
Nancy


Love your Hospice quilt. I like the bright patriotic colors.
ReplyDeleteI really love the way your hospice quilt came out...great job! And the little quilt is fun too. When I worked (outside the home..I work now as a full time fabric artist) I used to make things to decorate the cubicles/walls too. Cheers.
ReplyDeleteThanks! I'm lucky enough to get to work at home most days, but it's nice to have a pleasant space when I have to go into town.
DeleteWow Nancy the hospice quilt looks great! The border demo piece looks great too I especially like the applique it will differently look great hanging in your cubicle. Looking forward to seeing your IQA donation quilt, don't sell yourself short you are very creative my friend!
ReplyDeleteBarb
Thanks! I really appreciate your support and encouragement! I'm still mulling over what I should do. Something just popped into my head, but it might be too wild for this. Hmmmmmm
DeleteYour hospice quilt is so bright and fresh design wise. It would look great as a larger quilt. I like your little quilt too. I look forward to seeing your donation quilt. I'm glad your mojo is back!
ReplyDeleteThanks! Following your journey really helps to jump start my interest and ideas. I guess it takes a village for creativity, too!
DeleteBeautiful quilt.
ReplyDeleteThanks!
Delete