Hi all -
A friend expressed an interest in quilt-as-you-go techniques and I had a left-over piece of quilted fabric from one of the little bags I made recently, so I thought I'd do a tutorial about how to add borders to an already quilted top. This isn't a quilt-as-you-go technique for combining already quilted blocks into a single quilt, but could be used for creating a quilt-as-you-go medallion quilt. I found it useful in the past when I had a little sample from a class that I wanted to enlarge as a gift for a friend.
For this project, I started with this piece of quilted fabric left over from making a bag:
Either side could be used as the front -- I chose the dark side. To make things more fun, I stitched a bunch of fancy stitches across the piece using fun threads and trimmed things up nicely:
So this is my completed top. Now I want to add borders to make it bigger.
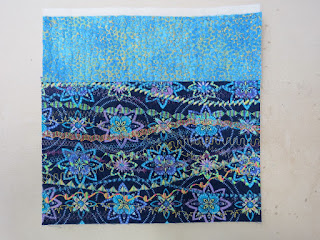
For the first border, I start by picking my fabrics for both the front and the back and cutting the pieces to size. I decided I wanted a 3" finished border so I cut the borders 3.5" wide. Here is the border piece I cut for the top (the border fabric is just lying next to the quilted top):
And here is the border piece for the back:
You can see in the pictures that I cut the border pieces the same width as the center piece. This made it easier to line things up, but made me have to trim the center a bit at the end. If you have a center that you can't trim, then you should cut the border pieces longer than the center piece so that you can just trim the border when finished.
The first step is to line up the top border with the quilt top, right sides together, and line up the back border piece with the quilt back, right sides together and pin everything. This gives you 3 layers: The back border piece, right side up; the quilt top, right side up and the front border piece, wrong side up. This is what it looks like from the top:
And from the back:
Stitch through all 3 layers, .25" from the edge. When finished, the front looks like this:
And the back looks like this:
Now it's time to add the batting. I cut the batting piece the same size as the border pieces:
Because of the seam allowances, this makes the border batting piece .5" too wide, but that gives you a little something extra to hold onto as you quilt and something to trim off when completed. Use a zigzag stitch to attach the batting piece to the quilt:
I set my zigzag to be approximately .25" wide, so that the needle goes in to about the center of the seam allowance on the top side and the same amount on the batting side. I butt the pieces up to each other and use the Bernina #10 foot, which has a nice divider down the middle to help keep the join neat, and sew across. As you're sewing, be sure to keep the end of the batting piece even with the end of the top. Otherwise, your batting will tend to stretch on the edge and won't lay flat when you're finished. Here is what it looks like with the batting attached from the front:
And from the back:
Now you just press the border pieces over toward the batting and quilt that border as desired. Here I used wavy piano keys, a border favorite of mine:
And from the back:
Trim up the edges and you're ready to add the next border.
You can add the borders in any order that you want, depending on how you want the seams to look. For the classic look, I added the opposite border next:
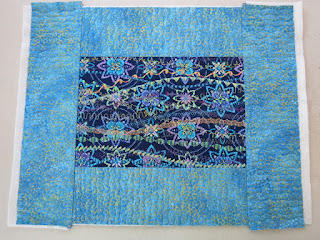
If your piece is small, like mine, you can add the two opposite borders at the same time. This time, I cut the border pieces and batting slightly longer than the quilt top to leave space for trimming:
Since I used a different thread for the piecing than I used for the quilting, doing the borders at the same time saved me from having to change threads quite as often. But that also meant that I had some flappy fabric to deal with on one side of the quilt while I was working on the other side of the quilt. That's why I'm not sure I'd want to do that on a larger quilt.
If making a large medallion quilt, you could start with a center and just keep adding borders until you're done. If you are quilting your quilt on a domestic machine, adding borders in this way allows you to do your quilting with just the width of the border under the arm of your machine, much easier than quilting the whole quilt at the end.Your border pieces can be pieced rather than plain pieces of fabric. In that case, you just have to be extra careful in lining things up.
For this little quilt, I still need to add some applique and the binding, but I'll leave that for another day.
Nancy
PS - I'm hoping to write more tutorials as I go along. If you have a technique that you would like me to demonstrate, just let me know and I'll see what I can do. I love to try to figure different techniques out!


I love this tutorial! I like your concept of more tutorials. I can't think of anything myself, but wish you well in your tutorial blog posts. Cheers.
ReplyDeleteThanks! If you think of anything in the future, just let me know....
ReplyDeleteI too enjoyed your tutorial. I have QAYG several times using different techniques; but, I haven't attached the batting like you did. I look forward to trying your method! Great job!
ReplyDeleteThanks! I like that it keeps the joins nice and flat so you can't even tell that it wasn't made as a single piece.
DeleteI never thought about this, but I have a piece I did a lot of thread sketching on and I always wished it would have been larger. I may be using this method to finish it out. Thanks for sharing.
ReplyDeleteWonderful tutorial Nancy! Nice way to practice new ideas too.
ReplyDeleteBarb
Thanks, Barb! It definitely is nice to have little things around to play around with.
DeleteWow! This way of adding borders makes sense to me while other methods hasn't. Thank you.
ReplyDelete