Lately, I've been working on the class project from a Karen Kay Buckley class that I took in Houston in 2014. Yep, another class project that has been sitting around patiently waiting for some attention. What a coincidence that she is also the featured artist on the TQS show that came out today!
This class was a hand applique class with the project being block 3 of her Fiesta Mexico quilt. Here is a picture of the class project from the class materials so you can see where we're going:

The was the second hand applique class that I took from Karen. I need to find that first project so I can finish it up, too! I really love Karen's classes and think she is one of the best teachers out there. If you ever get a chance to take a class from her, I'd say go for it! And if you ever think about teaching classes and want to get good ideas of how to do that, take one of her classes. You'll learn a lot!
I didn't get much actually finished during class because, again, we were sharing 2 irons in a large class, so I spent my time making sure I learned as much as possible. Here was my project at the end of class:

Pretty sad, but it was enough! Once I got going again, I felt like I made some pretty fast progress. In the first week, I finished the main block:

Then I had to put the project aside for a few days because I realized I didn't have enough of the background fabric to do the borders, so I had to order more fabric. That's when I worked on the Caryl Bryer Fallert Gentry project. Some of the fabric I ordered was a perfect match so I was able to continue on with the borders. The first step was to trace the pattern onto the background fabric:

Each one of those stripes had to be hand appliqued to the background. That's a lot of hand applique! I found this fuchsia batik in my stash that I thought would work and started working away. It took me 2 weeks to finish that part, finally finishing a couple of days ago.
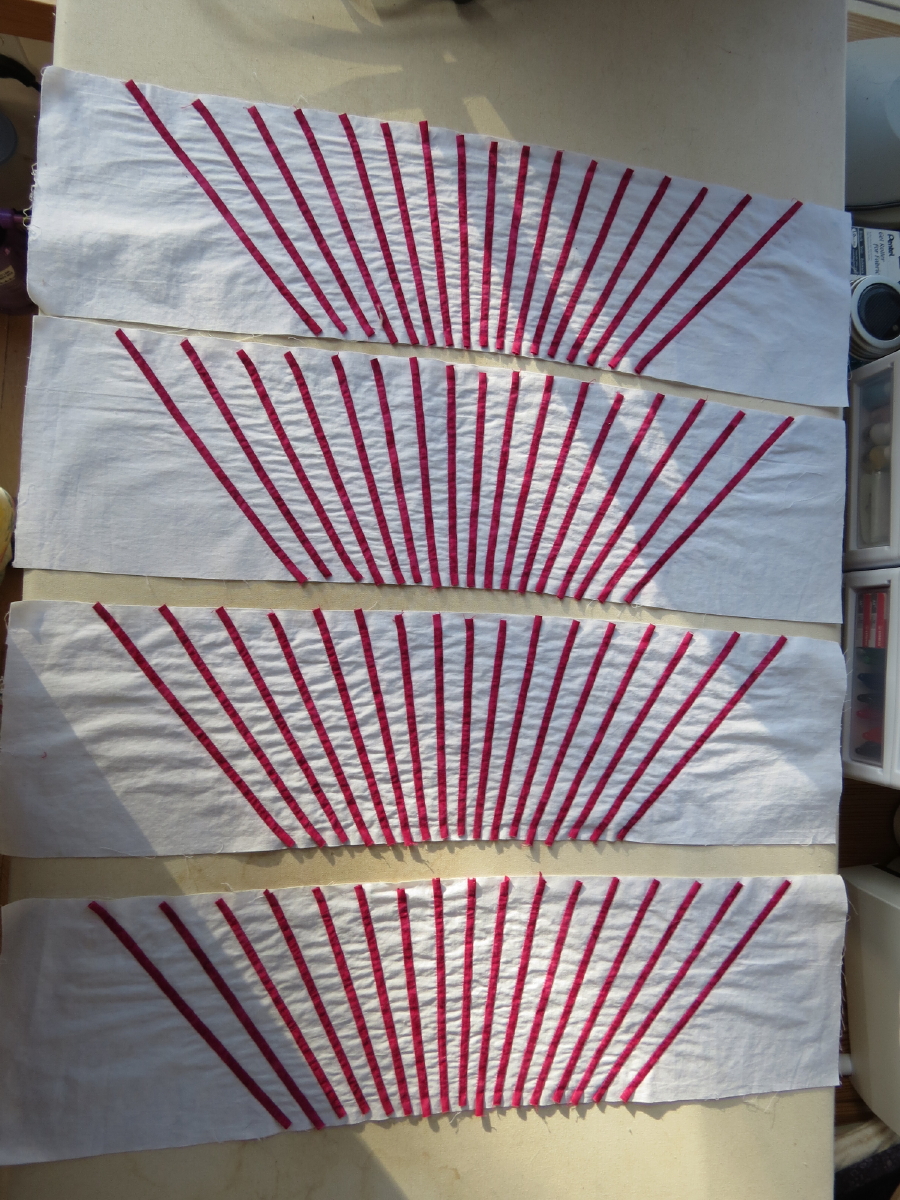
A lot of work, especially when you make small stitches like I do:

The next step was to sew the border pieces together. Before doing that, I figured I should iron and remark the pieces to remove the distortion that creeps in when you do applique. So I rinsed out the old markings and ironed the pieces using a fluffy towel so I wouldn't flatten the applique. Then I pulled out the light box, taped the pattern on it and lined up the pieces matching the pattern as much as possible.

Then I remarked the edges and the guidelines for the stripes that would be appliqued over the seams:

After marking, I trimmed the border pieces on the top and the sides:

I left the bottoms alone because the center part would be appliqued there later and it wouldn't hurt to have a little bit extra fabric. Once the pieces were trimmed, I sewed them together and finger-pressed the seams open:


Then I just had to hand applique the strips over the seams to finish this part of the border. I pushed the seam allowances out of the way while doing this stitching so that I was only stitching through one fabric thickness at this point. When the strips were in place, I ironed those seams open to finish this part of the border. Sorry I didn't get a picture of this step!
Now it was time to go back to the center block and add a mitered border:

To attach the center to the striped border, I had to iron 1/4" over on the edges. I had a Clover pressing tool that was useful for that"

Then I needed to applique the center to the border. Originally, I was going to do hand applique for this, but as I was preparing things I felt like it would be really difficult to do and that it would be hard to keep things in the right place, even with gluing, so I decided to do machine applique for this part.

I'm really glad I made that choice! The thick corners were hard to get through with the machine, so I was glad I wasn't trying to do it by hand. It still didn't turn out perfect, but it's good enough and I'm pleased with it.

The final step was another mitered border around the entire piece. The pattern had that border being 1" finished, like the border around the block, but that seemed a bit narrow to me so I opted for a 3" border. If it seems too big when I'm done, then I can always trim it down.

I'm really excited to have gotten this far!
The next step will be to add random hand appliqued circles to the striped border. Then it will match the class project picture. After that, I want to embellish this piece with hand embroidery and maybe some beads. I've been wanting to do this type of embellishment to a project, but I always chicken out at the end, being afraid that I'm going to ruin what I've done. I also tend to want to get the project finished when I get to this point, so decide not to put in the time to embellish it. I'm hoping this will be the project to break that barrier for me.
I don't know if I'll continue on with this project right now, or if I'll move onto something else for a while. I'm guessing I'll do something else for a little while, then will come back to this one with renewed interest and energy, but you never know!
Nancy
Wow! This is an amazing project! I love the effect of all those skinny strips that you appliquéd for a border. Don't chicken out. . .beads are fun and I'm finding that embroidery is fun too! You can do it! :) I'm cheering you on!!
ReplyDeleteI agree with Terry, have fun. Lovely project.
ReplyDeleteWendy